Pan‐Tilt Internet Camera User Manual Version: 1.
I. Product Information .......................................................................... 2 I‐1. I‐2. I‐3. I‐5. Package Contents ............................................................................................................. 2 Back Panel........................................................................................................................ 2 LED Status ......................................................................................................................
I. Product Information I‐1. Package Contents IC‐5006IWW I‐2.
I‐3. LED Status LED Color Orange LED Status Description Quick Flashing Network camera is starting up/restarting. Slow Flashing (1 x per second) WPS is active. On Green Off Connected to network and cloud. Slow Flashing (1 x per second) Connected to network but not cloud. ‐‐ No connection.
I‐5. Reset If you experience problems with your network camera, you can reset the camera back to its factory default settings. This resets all settings back to default. 1. Press and hold the WPS button found on the back panel for at least 10 seconds 2. Release the button when the orange LED is flashing quickly. 3. Wait for the network camera to restart. The camera is ready when the green LED is on or flashing.
II. Hardware Installation Follow the instructions below to ensure your camera is properly connected and ready for setup. 1. Use an Ethernet cable to connect the network camera’s LAN port to a router/switch/access point’s LAN port, as shown below. 2. Connect the power adapter to the network camera’s power port and to a power supply, as shown below. 3. Wait a moment for the camera to power on. The camera is ready when the green LED on the back of the camera displays on or flashing. Please refer to III.
III. Camera Setup Your network camera can be up and running in just a few minutes. First, please follow the instructions below in III‐1. Installing & Using EdiView Finder to install the included EdiView finder software and connect your camera to your wireless network. Or you can follow III‐2. WPS as an alternative method to connect your network camera to your wireless network. Then, you can use the web based management interface to watch a live stream and further configure the camera if you need (see III‐3.
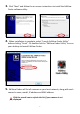
3. Click “Next” and follow the on‐screen instructions to install the EdiView Finder software utility. 4. When installation is complete, select “Launch EdiView Finder Utility” before clicking “Finish”. Or double click the ”EdiView Finder Utility” icon on your desktop to launch EdiView Finder. 5. EdiView Finder will list all cameras on your local network, along with each camera’s name, model, IP address and MAC address. Click the search icon to refresh the list if your camera is not displayed.
The network camera’s IP address is displayed on this screen. After setup, you can enter this IP address into the URL bar of a web browser on the same local network to access your network camera’s web‐based configuration interface. 6. Double click your camera and then choose “Yes” or “No” if you wish to set up a wireless connection. If you choose “No” please go to step 10. The IC‐5006IWT is a wireless camera, please choose “Yes” to set up your wireless connection.
7. Select your wireless network from the list and enter the correct password in the “Password” field, before clicking “OK”. This is the wireless network which your camera will connect to. 8. Unplug the Ethernet cable from your network camera and click “Next”. Please wait a moment for the camera to detect the connection.
9. When the connection is detected as shown below, please click “Next”. 10. Enter a name and password for your camera.. Click “OK” to continue.
III‐2. WPS (Wi‐Fi Protected Setup) The WPS button is a quick and easy method to establish a secure wireless connection between your network camera and your wireless router/access point. 1. Press and hold the WPS button on your wireless router/access point for the correct length of time to activate its WPS. Please check the instructions for your wireless router/access point for how long you need to hold down its WPS button to activate WPS. 2.
III‐3. Web‐Based Management Interface When you are using the same local network as your camera, you can use the web‐based management interface to view or configure the camera. If you are not on the same local network as your network camera (e.g. if you are away from your home), please refer to chapters III‐ 4. or III‐5. instead. To access the web‐based management interface, please follow the instructions below. 1. Enter the network camera’s IP address into the URL bar of a web browser.
2. You may be prompted to allow a Java add‐on to run. Please click the message where it says “click here” and then click “Run Add‐on”. If any other security warnings/prompts appear, please select “Run” or “Allow” or similar, depending on your browser. 3. Enter the username and password for your network camera (default username: admin default password: 1234). The network camera’s web‐ based management interface will then be displayed in your browser. Please refer to the user manual for more guidance.
14
Federal Communication Commission Interference Statement This equipment has been tested and found to comply with the limits for a Class B digital device, pursuant to Part 15 of the FCC Rules. These limits are designed to provide reasonable protection against harmful interference in a residential installation. This equipment generates, uses and can radiate radio frequency energy and, if not installed and used in accordance with the instructions, may cause harmful interference to radio communications.