
User's Manual

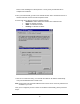


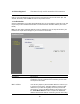
Table Of Contents
- Introduction
- Features
- Minimum Requirements
- Package Content
- Note
- Get to know the Broadband Router
- Back Panel
- Front Panel
- Setup Diagram
- Getting started
- Chapter 1
- Quick Setup
- Step 1) Time Zone
- Step 2) Broadband Type
- 1.1 Cable Modem
- 1.2 Fixed-IP xDSL
- 1.3 PPPoE
- 1.4 PPTP
- 1.5 L2TP
- 1.6 Telstra Big Pond
- Chapter 2
- General Settings
- 2.1 System
- 2.1.1 Time Zone
- 2.1.2 Password Settings
- 2.1.3 Remote Management
- 2.2 WAN
- 2.2.1 Dynamic IP
- 2.2.2 Static IP Address
- 2.2.3 PPPoE (PPP over Ethernet)
- 2.2.4 PPTP
- 2.2.5 L2TP
- 2.2.6 Telstra Big Pond
- 2.2.7 DNS
- 2.2.8 DDNS
- 2.3 LAN
- 2.4 Wireless
- 2.4.1 Basic Settings
- 2.4.2 Advanced Settings
- 2.4.3 Security
- 2.4.3.1 WEP only
- 2.4.3.2 802.1x only
- 2.4.3.3 802.1x WEP Static key
- 2.4.3.4 WPA Pre-shared key
- 2.4.3.5 WPA Radius
- 2.4.4 Access Control
- 2.5 QoS
- 2.6 NAT
- 2.6.1 Port Forwarding
- 2.6.2 Virtual Server
- 2.6.3 Special Applications
- 2.6.4 UPnP Settings
- 2.6.5 ALG Settings
- 2.6.6 Static Routing
- 2.7 Firewall
- 2.7.1 Access Control
- 2.7.2 URL Blocking
- 2.7.3 DoS (Denial of Service)
- 2.7.4 DMZ
- Chapter 3
- Status
- 3.1 Status and Information
- 3.2 Internet Connection
- 3.3 Device Status
- 3.4 System Log
- 3.5 Security Log
- 3.6 Active DHCP Client
- 3.7 Statistics
- Chapter 4
- Tool
- 4.1 Configuration Tools
- 4.2 Firmware Upgrade
- 4.3 Reset
- Appendix A
- Glossary

Chapter 1
Quick Setup
The Quick Setup section is designed to get you using the broadband router as quickly as possible.
In the Quick Setup you are required to fill in only the information necessary to access the Internet.
Once you click on the Quick Setup Wizard in the HOME page, you should see the screen below.
Step 1) Time Zone
The Time Zone allows your router to base its time on the settings configured here, this will affect
functions such as Log entries and Firewall settings.
Parameter Description
Set Time Zone Select the time zone of the country you are currently in.
The router will set its time based on your selection.
Time Server Address You can manually assign time server address if the
default time server dose not work.
Enable Daylight Savings The router can also take Daylight savings into
account. If you wish to use this function, you must
check/tick the enable box to enable your daylight
saving configuration (below).
Start Daylight Savings Time Select the period in which you wish to start daylight
Savings Time
End Daylight Savings Time Select the period in which you wish to end daylight
Savings Time
16