
User's Manual
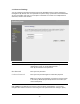


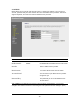
Table Of Contents
- Introduction
- Features
- Minimum Requirements
- Package Content
- Note
- Get to know the Broadband Router
- Back Panel
- Front Panel
- Setup Diagram
- Getting started
- Chapter 1
- Quick Setup
- Step 1) Time Zone
- Step 2) Broadband Type
- 1.1 Cable Modem
- 1.2 Fixed-IP xDSL
- 1.3 PPPoE
- 1.4 PPTP
- 1.5 L2TP
- 1.6 Telstra Big Pond
- Chapter 2
- General Settings
- 2.1 System
- 2.1.1 Time Zone
- 2.1.2 Password Settings
- 2.1.3 Remote Management
- 2.2 WAN
- 2.2.1 Dynamic IP
- 2.2.2 Static IP Address
- 2.2.3 PPPoE (PPP over Ethernet)
- 2.2.4 PPTP
- 2.2.5 L2TP
- 2.2.6 Telstra Big Pond
- 2.2.7 DNS
- 2.2.8 DDNS
- 2.3 LAN
- 2.4 Wireless
- 2.4.1 Basic Settings
- 2.4.2 Advanced Settings
- 2.4.3 Security
- 2.4.3.1 WEP only
- 2.4.3.2 802.1x only
- 2.4.3.3 802.1x WEP Static key
- 2.4.3.4 WPA Pre-shared key
- 2.4.3.5 WPA Radius
- 2.4.4 Access Control
- 2.5 QoS
- 2.6 NAT
- 2.6.1 Port Forwarding
- 2.6.2 Virtual Server
- 2.6.3 Special Applications
- 2.6.4 UPnP Settings
- 2.6.5 ALG Settings
- 2.6.6 Static Routing
- 2.7 Firewall
- 2.7.1 Access Control
- 2.7.2 URL Blocking
- 2.7.3 DoS (Denial of Service)
- 2.7.4 DMZ
- Chapter 3
- Status
- 3.1 Status and Information
- 3.2 Internet Connection
- 3.3 Device Status
- 3.4 System Log
- 3.5 Security Log
- 3.6 Active DHCP Client
- 3.7 Statistics
- Chapter 4
- Tool
- 4.1 Configuration Tools
- 4.2 Firmware Upgrade
- 4.3 Reset
- Appendix A
- Glossary

2.2.8 DDNS
DDNS allows you to map the static domain name to a dynamic IP address. You must get an
account, password and your static domain name from the DDNS service providers. This router
supports DynDNS, TZO and other common DDNS service providers.
Parameters Default Description
Enable/Disable Disable Enable/Disable the DDNS function of this router
Provider
Select a DDNS service provider
Domain name
Your static domain name that use DDNS
Account/E-mail The account that your DDNS service provider
assigned to you
Password/Key
The password you set for the DDNS service
account above
Click <Apply> at the bottom of the screen to save the above configurations. You can now
configure other advance sections or start using the router (with the advance settings in place)
38