BR-6479Gn Quick Installation Guide 03-2013 / v1.
Copyright by Edimax Technology Co, LTD. all rights reserved. No part of this publication may be reproduced, transmitted, transcribed, stored in a retrieval system, or translated into any language or computer language, in any form or by any means, electronic, mechanical, magnetic, optical, chemical, manual or otherwise, without the prior written permission of this company.
Federal Communication Commission Interference Statement This equipment has been tested and found to comply with the limits for a Class B digital device, pursuant to Part 15 of FCC Rules. These limits are designed to provide reasonable protection against harmful interference in a residential installation. This equipment generates, uses, and can radiate radio frequency energy and, if not installed and used in accordance with the instructions, may cause harmful interference to radio communications.
Table of Content Chapter 1: Product Information....................................................................................... 3 1-1 Safety Information ............................................................................................................................. 3 1-2 Package Contents ............................................................................................................................. 3 1-3 Interface and Function ................................................
6-4 DDNS ................................................................................................................................................ 38 Chapter 7: LAN ................................................................................................................ 39 Chapter 8: Wireless ......................................................................................................... 41 8-1 Basic Settings ...........................................................................
Chapter 1: Product Information Thank you for purchasing the Edimax BR-6479Gn Wireless Gigabit Router. BR-6479Gn Supports IEEE 802.11b/g/n the standard 2.4 GHz bands. In addition, BR-6479Gn features with iQ Setup- Smart and automated router setup that needs no more CD installation and helps to get you online in minutes. 1-1 Safety Information Please follow the following safety instructions to ensure your safety: • This router is designed for indoor use only. DO NOT place this router outdoors.
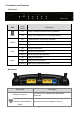
1-3 Interface and Function • Front Panel Light Status LED Power 2.4GHz On Router is switched on and correctly powered. Off Router is not switched on or correctly powered. On 2.4GHz Wireless connectivity activated. Off 2.4GHz Wireless connectivity not activated. Flashing LAN LAN port connected Off LAN port not connected LAN activity (transferring data) On WAN port connected Off WAN port not connected Flashing • 2.4GHz Wireless LAN activity (transferring data).
Resets the router to factory default settings or WPS/Reset Button starts WPS function (Reset: press this button and hold for 20 seconds to clear all settings. WPS: Press this button for10~15 seconds to activate WPS function) Gigabit LAN Ports (Yellow Ports 1-4) Connects to computer or other web devices Gigabit WAN Port Connects to Cable/xDSL modems (Blue Port) 5V Power Connector Connects to the supplied power adapter 1-4 Features • Support IEEE 802.11b/g/n the standard 2.4 GHz and less bands.
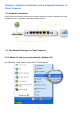
Chapter 2: Hardware Installation and the Network Settings for Client Computer 2-1 Hardware Installation Please follow the following instructions to build a network connection between your new broadband router, computers, and other network devices: 2-2 The Network Settings for Client Computer 2-2-1 Obtain IP addresses automatically: Windows XP (A). Click the “Start” button, then click “Control Panel”.
(B). 請Double‐click the “Network” icon, and the “Network” window will appear. (C). Right click “Local Area Connection” on the mouse. When the “Local Area Connection Properties” window appears, click “Properties”.
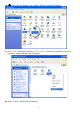
(E) Select “Obtain an IP address automatically” and “Obtain DNS server address automatically”, then click “OK”.
2-2-2 Obtain IP addresses automatically: Windows 7 (A) Click the “Windows” button, then click “Control Panel”.
(B) Double‐click the “Network and Internet” icon, and the “Network” window will appear.
(D) Double-click『Change adapter settings』 (E) Right click “Local Area Connection” on the mouse. When the “Local Area Connection Properties” window appears, click “Properties”.
(F) Click “Properties” (G) Choose『Internet Protocol Version 4(TCP/IPv4)』and then click “Properties” (H) Select “Obtain an IP address automatically” and “Obtain DNS server address automatically”, 12
then click “OK”.
Chapter 3: Setting Up This section introduces network set-up methods of BR-6479Gn:1) iQ Setup and 2) Manual set-up via web browser. 3-1 iQ Setup iQ Setup is a simple and intelligent WAN detection tool. When BR-6479Gn is in the factory default settings, as long as your internet connections are DHCP, Static IP or PPPoE, iQ Setup can quickly detect the WAN types and help you to easily set up BR-6479Gn.
3) If your network connection is DHCP, you will see the following message: (if your network connection is PPPoE, please skip to Step 4) When you see the above successful DHCP connection message, please click the next ">>" proceed to Step 5) 4) If your network connection is PPPoE, you will see the following message: Please enter the user name and password provided by your ISP (user name and password are case- sensitive).
5) IF you are not sure about the DNS, please do not check the “User configure manually” and click “>>” to continue the next step. If you prefer to set up DNS manually, please check the box first, and then enter DNS1 and DNS2 info. 6) You have to set up the ESSID (factory default is the EDIMAX) for your BR-6479Gn on this page. If you want to set up the wireless security encryption, please click the check box of "enabled WPA2 security encryption" first.
7) When you see the following web page shown on your screen, that means you had been successfully connected to the internet. Please restart your browser and enjoy surfing the Internet. 8) If you need to execute iQ Setup again, please find “iQ Setup” function at System Management.
3-1-2 iQ Setup with iPhone 1) Enable ”Settings” 2) Click ”Wi-Fi” 3) Turn On”Wi-Fi” and search available network connection. 4) Choose EDIMAX(the default ESSID of BR-6479Gn). After you successfully connected to the network, please go back to “ Settings” and enter “EDIMAX” again.
5) iPhone or iPad OS will automatically run the iQ Setup. There are three languages available here. Choose your language first and click the next “>>” 6) iQ Setup will detect your whether your network connection is “DHCP” or “PPPoE” 7) If your network connection type is detected as “DHCP”, iQ Setup will help you to set up right away.
8) If your network connection type is detected as “PPPoE”, you will be asked to enter your Username and Password first before iQ Setup proceeds to connect internet.
first ,and input your DNS server address in DNS1 和 DNS2 columns. If you don’t need any specific settings, just click the next”>>”. 11) To set up your Wireless LAN, please input the name you would like to have for your wireless LAN in the ESSID column. If you need to secure your wireless LAN from unpermitted accesses, please check the “Enable WPA2 encryption” box and enter your password. Click the next “>>” when you’ve done the foresaid.
3-1-3 iQ Setup with Android Phone 1. Enter the system menu. Find and click “Settings”. Click “Wireless and Network”. Check the Wi-Fi box to turn on Wi-Fi. Click “ Wi-Fi Settings”. Find “EDIMAX” from the wireless network list and click it. Click “Connect” When you see the following message that EDIMAX connected, it means that you have connected wireless network successfully.
Then, click “Internet” to enable browser. 2. After enabling the browser, the system will run iQ Set automatically. Please follow the instructions as below and complete the set-up. There are three languages available here. Choose your language first and click the next “>>” 1) iQ Setup will detect your whether your network connection is “DHCP” or “PPPoE 2) If your network connection type is detected as “DHCP”, iQ Setup will help you to set up right away.
Please click the next “>>” to set up “DNS” and “ Wireless Settings” (Please refer to Step 9) 3) If your network connection type is detected as “PPPoE”, you will be asked to enter your Username and Password first before iQ Setup proceeds to connect internet. 4) Then, click the next “>>” to set up “DNS” and “ Wireless Settings” (Please refer to Step 9) 5) If you prefer to use specific DNS server address, please click “User configure manually” first ,and input your DNS server address in DNS1 和 DNS2 columns.
6) To set up your Wireless LAN, please enter the name you would like to have for your wireless LAN in the ESSID column. If you need to secure your wireless LAN from unpermitted accesses, please check the “Enable WPA2 encryption” box and enter your password. Click the next “>>” when you’ve done the foresaid . 7) When the “Wireless LAN Settings” is done, the system will restart immediately.
have done the iQ Setup.
3-2 Manual set-up via web browser 3-2-1Login Web UI the setting page (A) Please input “192.168.2.1” in the web browser’s address bar and press “Enter”. (B) Please input “admin” in the “User name” field and “1234” in the “Password” field. Click the “OK” button. (C) The first page you see after logging in is “Home”. You can see all the current settings and other system information here.
Chapter 4: Quick Setup 4-1 System Time Zone Set Time Zone Please select the time zone of your country or region. NTP Server Address Input the host name or IP address of the NTP server here. The common NTP server is 192.43.244.18 Daylight Saving If your country/region uses daylight saving time, please check the “Enable Function” box, and select the start and end date. 4-2 WAN Settings After you have done the “System Time Zone” settings, you will be proceeded to “WAN” settings page.
Chapter 5: Admin 5-1 Firmware Upgrade This page allows you to upgrade new firmware for BR-6479Gn. When you have done the upgrade, the system will restart automatically. 5-2 Language Choose the language you preferred.
Please refer to 4-1 System Time Zone. 5-4 Config Backup Settings Through this function, you may backup your current settings in case you need to restore it later. Restore Settings Through this function, you may restore the settings you’ve backed up. Restore to Factory Default Through this function, you may restore you system back to the factory default setting. All the setting you’ve done will be removed.
5-6 WOL WOL (Wake On Lan) : For devices which do not need to be operated 24/7, WOL function allows you to turn them on or to wake them up remotely through network only when they are needed. You just need to enter the MAC address of the computer which you want to wake it up in the “Client PC MAC address” column, you can wake it up as you wish. The maxium computers you can wake it up via WOL function here is 16. Please note that the WOL is mainly for Windows 7 system, not all the computers can be supported.
5-8 iQSetup Please refer 3-1 iQ Setup 5-9 Restart Restart: When you apply the “Restart” function, the system will stop responding and restart, but all the settings will not be changed. When the LED lights stay ON and stop flushing, that means the system restart is done.
Chapter 6: WAN 6-1 WAN You can select the WAN (Wide Area Network, i.e. Internet) Connection Mode you wish to use to setup Internet connection for BR-6479Gn in this page.
Host Name MAC Address TTL Input the host name of your computer( this is optional and only required if your service provider asks you to do so). Input MAC address of your computer here, if your ISP only permits computer with certain MAC address to access internet. If you’re using the computer which used to connect to Internet via cable modem, you can simply press ‘Clone Mac address’ button to fill the MAC address field with the MAC address of your computer.
6-1-3 PPPoE User Name Input the User Name assigned by your ISP. Password Input the Password assigned by your ISP. Service Name Input the Service Name assigned by your ISP. MAC Address Input the MAC address of your computer here, if your ISP only permits computer with certain MAC address to access internet. If you’re using the computer which used to connect to Internet via cable modem, you can simply press ‘Clone Mac address’ button to fill the MAC address field with the MAC address of your computer.
6-1-4 PPTP / L2TP Both the settings of PPTP and L2TP are the same. Here we will introduce the PPTP settings. User ID Input the User ID assigned by your ISP. Password Input the Password assigned by your ISP. PPTP Gateway Input the PPTP Gateway assigned by your ISP. Connection ID MTU Input the Connection ID assigned by your ISP. (usually not use) Input the MTU (maximum transmission unit ) value of your network connection here. If you don’t know, you can use default value: 1392.
6-2 DNS DNS address Obtain DNS address automatically or User configures manually. If you choose to configure manually, you will have to input the IP address of DNS server provided by your ISP in the following DNS1 and DNS2 columns. DNS1 Please input the address of DNS1 DNS2 Please input the address of DNS2 6-3 WISP WISP is another WAN option.
If your WISP service was provided with encryption, you will have to enable the “Encryption” and input correct security setting info first, the WISP function can be functioned after that. No matter what kind of Connection Type you choose to use, the system will ask you to restart the router after you completed the settings and your settings will be saved after that.
ZoneEdit (http://www.zoneedit.com) DHIS (http://www.dhis.org/) CyberGate (http://cybergate.planex.co.jp/ddns/) Please go get a free DDNS account from any of the DDNS service providers’ web pages listed above (the instructions will be given on their web pages) first. After that, you can use the DDNS page to setup DDNS parameters to use DDNS service: Chapter 7: LAN IP Address Subnet Mask Input the LAN IP address of BR-6479Gn. (A valid IP address has 4 fields: a.b.c.
Enable Static DHCP Leases Enable Static DHCP Leases (This allows only 16 sets of addresses.
Chapter 8: 2.4G Wireless You can setup Wireless LAN connection parameters of BR-6479Gn in this page After you unboxed the BR-6479Gn and powered it on, just 2 minutes later and without any configuration, a wireless network without any encryption was established. In other words, there is no “Encryption” and setting of “802.11” for BR-6479Gn from the factory default. In the next sections, we are going to tell you how to encrypt for your BR-6479Gn that helps to secure your Wireless LAN.
(a)2.4GHz(b+g+n): 802.11b + 802.11g +802.11n (default setting) ESSID Broadcast ESSID Channel Number Channel Width Wireless Clients (b) 2.4GHz(b): 802.11b (c) 2.4GHz(g): 802.11g (d) 2.4GHz(n): 802.11n (e) 2.4GHz(b+g): 802.11b and 802.11g ESSID is the name of broadband router which is used to identify your own broadband router from others in the same area. If you enable “Broadcast ESSID”, the router will be opened to be searched and accessed by wireless adapters or devices.
Channel Frequency (MHz) China 1 2412 Y North America Y 2 2417 Y 3 2422 4 Europe Japan Australia Israel Y Y Y N Y Y Y Y N Y Y Y Y Y Y 2427 Y Y Y Y Y Y 5 2432 Y Y Y Y Y Y 6 2437 Y Y Y Y Y Y 7 2442 Y Y Y Y Y Y 8 2447 Y Y Y Y Y Y 9 2452 Y Y Y Y Y Y 10 2457 Y Y Y Y Y N 11 2462 Y Y Y Y Y N 12 2467 Y N Y Y Y N 13 2472 Y N Y Y Y N 14 2484 N N N Only 802.
8-2 Encryption The factory default is “Disable”. Click the dropdown menu, you will see three encryption options: WEP / WPA pre-shared key / WPA RADIUS. Here we recommend you to choose WPA pre-shared key to encrypt your network. If you have enable the WPA2 encryption and setup your password when you were running iQ Setup to setup your BR-6479Gn at the first time, you will see your settings as follow and you can change your settings in this page as well.
Key Length Choose 64bit or 128bit Key Format Choose ASCII or Hex Default Tx Key Choose the Key to apply Encryption Key1~4 Enter 4 sets of Encryption Key Enable 802.1x Authentication Enable / Disable 802.1x Authentication RADIUS Server IP address Input the IP address of RADIUS authentication server here. RADIUS Server Port Input the port number of RADIUS authentication server here. The default value is 1812 as most RADIUS servers use that.
8-2-3 WPS RADIUS WPA Encryption There are three options for WPA encryption: 『WPA(TKIP)』『WPA2(AES)』『WPA2 Mixed』 RADIUS Server IP address Input the IP address of RADIUS authentication server here. RADIUS Server Port Input the port number of RADIUS authentication server here. The default value is 1812 as most RADIUS servers use that. RADIUS Server Password Input the password of RADIUS authentication server here. 8-3 Advanced Settings This section is about advanced wireless settings of BR-6479Gn.
Fragment Set up the value of Fragment Threshold. (Default: 2346) Threshold RTS Threshold Set up the value of RTS Threshold. (Default: 2347) Beacon Interval Set up the value of Beacon Interval. (Default: 100ms) DTIM Period Set up the value of DTIM Period. (Default: 3) Data Rate Set up the value of Data Rate. (Default: Auto) MSC index Set up the value of MSC index. (Default: Auto) Preamble Type There are two options: Short Preamble and Long Preamble.
8-4 WPS WPS (Wi‐Fi Protected Setup) provides an easy and secure way to establish the connection between BR-6479Gn and wireless clients. Any WPS‐compatible wireless clients can establish secure connection with BR-6479Gn through simple push‐button type configuration or Pin Code type configuration. We recommend you to have both WPA2 encryption and WPS to protect your network. Step 1. As above mentioned, have your ESSID and WPA2 password settings done first.
8-5 Access Control Through Access Control, you can restrict your computers from accessing improper website or using disallowed applications. Only computers with certain MAC address are allowed to access the network or prevent computers in the list to access Internet.
Chapter 9: NAT NAT (Network Address Translations) solves the problem of sharing a single IP address to multiple computers. Without NAT, all computers must be assigned with a valid Internet IP address to get connected to Internet, but Internet service providers only provide very few IP addresses to every user. Therefore it’s necessary to use NAT technology to share a single Internet IP address to multiple computers on local network, so everyone can get connected to Internet.
Private IP Computer Name Type Port Range Comment Set the IP address for internal computers or devices usage The Windows computer name can be chosen automatically. Set up the network communication protocol. The port number(s) of Internet IP address and private IP address (the IP address on local network) must be the same. Input the starting port number in the left field, and input the ending port number in the right field.
9-4 ALG ALG (Application Layer Gateway) is a network connection ability which supports specific network applications, such as game and instant online chat. Without ALG, these applications will not be able to communicate with their server when working with BR‐6475nD.
Chapter 10: Firewall BR-6479Gn supports several firewall functions, such as DMZ, Access Control, URL Blocking and DoS, which will help you to protect your network and computer. To set up the fore-mentioned functions, you will have to enable Firewall module function first. 10-1 DMZ DMZ (Demilitarized Zone) is a special area in your local network that all computers in this area uses private IP address.
10-2 Access Control By using access control, you can restrict your computers from accessing improper website, or using disallowed applications. You can even just allow computers with certain MAC address to access the network, or deny the computers in the list from accessing Internet. Enable MAC Filtering Table: Check the box to enable MAC address based filtering, and select ‘Deny’ or ‘Allow’ to decide the behavior of MAC filtering table.
block the URL according to your definition. 10-4 DoS (Denial of Service) DoS (Denial of Service) is a common attack measure, by transmitting a great amount of data or request to your Internet IP address and server, the Internet connection will become very slow, and server may stop responding because the traffics is much more than it can handles.
Port Scan Sync Flood PING requests, but when you activate this function, you will not be able to ping your own router from internet, too. Some malicious intruder will try to use a ‘port scanner’ to detect how many ports of your Internet IP address are open. Check this box and BR-6479Gn will block all traffics which are trying to scan your Internet IP address.
Chapter 11: QoS & iQoS 11-1 QoS QoS (Quality of Service) setting is a way to quickly and effectively restrict the use of network bandwidth. Because of limitations of SOHO products’ hardware and software, QoS can just offer some simple features, but for the demand of home or small office local area network usage, it has greatly improved an effective network bandwidth management. Total Download Bandwidth Total Upload Bandwidth Current QoS Table You can set the limit of total download bandwidth in kbits.
Rule name Bandwidth Local IP Address Input a name for this QoS rule for identification purpose. This name should be unique and not the same with others. Download/Upload bandwidth (guarantee/ max) Set the IP address range that will be affected by this QoS rule( If only one IP address is involved, input the IP address in left field only) Local Port Range Remote IP Address Remote Port Range Traffic Type Protocol Set the Port Range that will activate this QoS rule.
Double click the big icon to remove from table Double click the small icon Double click the small icon Enabling iQoS, not only you can set up the download and upload bandwidth; but also you can set priorities for the following five network applications. The priority table starts from left to right as high to low and the factory default applications priorities are Network browsing/P2P/FTP/Multimedia transmission/Online game. You can rearrange it as you wish.
Chapter 12: Status Here in this page, you can see the system status/ system log and security log.
Appendix Troubleshooting If you found that the router is working improperly or stops responding, please don’t panic! Before you contact your dealer of purchase for help, please read this troubleshooting first. Some problems can be solved by you in minutes. Scenario Solution Router is not a. Please check the connection of power cord and network responding to me cable of this router. All cords and cables should be correctly when I want to and firmly inserted to the router. access it by web browser b.
too. i. Try to use IP address instead of hostname. If you can use IP address to communicate with a remote server, but can’t use hostname, please check DNS setting. I can’t locate my a. ‘Broadcast ESSID’ set to off? router by my b. All two antennas are properly secured. wireless client c. Are you too far from your router? Try to get closer. d. Please remember that you have to input ESSID on your wireless client manually, if ESSID broadcast is disabled. File download is a.
Glossary Default Gateway (Router): Every non-router IP device needs to configure a default gateway’s IP address. When the device sends out an IP packet, if the destination is not on the same network, the device has to send the packet to its default gateway, which will then send it out towards the destination. DHCP: Dynamic Host Configuration Protocol. This protocol automatically gives every computer on your home network an IP address.
bits correspond to the host ID. For example, if the IP address for a device is, in its binary form, 11011001.10110000.10010000.00000111, and if its network mask is, 11111111.11111111.11110000.00000000 It means the device’s network address is 11011001.10110000.10010000.00000000, and its host ID is, 00000000.00000000.00000000.00000111. This is a convenient and efficient method for routers to route IP packets to their destination. ISP Gateway Address: (see ISP for definition).
PPTP TCP 1723 PC Anywhere TCP 5631 PC Anywhere UDP 5632 PPPoE: Point-to-Point Protocol over Ethernet. Point-to-Point Protocol is a secure data transmission method originally created for dial-up connections; PPPoE is for Ethernet connections. PPPoE relies on two widely accepted standards, Ethernet and the Point-to-Point Protocol.