
- Edimax Ethernet Broadband Router User's Manual
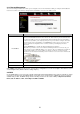
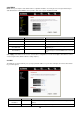
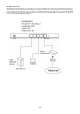

2.4.2 Virtual Server
Use the Virtual Server function when you want different servers/clients in your LAN to handle different service/Internet
application type (e.g. Email, FTP, Web server etc.) from the Internet. Computers use numbers called port numbers to
recognize a particular service/Internet application type. The Virtual Server allows you to re-direct a particular service port
number (from the Internet/WAN Port) to a particular LAN private IP address and its service port number. (See Glossary for
an explanation on Port number)
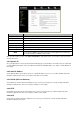
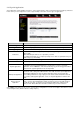
Parameter Description
Enable Virtual Server Enable Virtual Server.
Private IP
This is the LAN client/host IP address that the Public Port number packet will be sent to.
Note: You need to give your LAN PC clients a fixed/static IP address for Virtual Server to
work properly.
Private Port
This is the port number (of the above Private IP host) that the below Public Port number
will be changed to when the packet enters your LAN (to the LAN Server/Client IP)
Type
Select the port number protocol type (TCP, UDP or both). If you are unsure, then leave it
to the default both protocol.
Public Port
Enter the service (service/Internet application) port number from the Internet that will be
re-directed to the above Private IP address host in your LAN
Note: Virtual Server function will have priority over the DMZ function if there is a conflict
between the Virtual Server and the DMZ settings.
Comment The description of this setting.
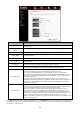
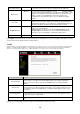
Add Virtual Server
Fill in the "Private IP", "Private Port", "Type", “Public Port” and "Comment" of the setting
to be added and then click "Add". Then this Virtual Server setting will be added into the
"Current Virtual Server Table" below. If you find any typo before adding it and want to
retype again, just click "Clear" and the fields will be cleared.
Remove Virtual Server
If you want to remove some Virtual Server settings from the " Current Virtual Server
Table", select the Virtual Server settings you want to remove in the table and then click
"Delete Selected". If you want remove all Virtual Server settings from the table, just click
"Delete All" button. Click "Reset" will clear your current selections.
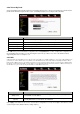
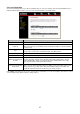
Click <Apply> at the bottom of the screen to save the above configurations. You can now configure other advance sections
or start using the router (with the advance settings in place)
28