EW-7438RPn Air User Manual 02-2014 / v1.
CONTENTS I. Product Information .............................................................................. 1 I-1. I-2. I-3. I-4. I-5. Package Contents ..........................................................................................................1 System Requirements ....................................................................................................1 LED Status ...................................................................................................................
V-1-1-4. V-1-1-5. V-1-2. Windows 8 ...................................................................................................................45 Mac OS .........................................................................................................................49 How to modify the IP address of your computer ........................................................51 V-1-2-1. V-1-2-2. V-1-2-3. V-1-2-4. V-1-2-5. V-1-3. V-1-3-1. V-1-3-2. V-1-4. V-1-4-1. Windows XP .......................
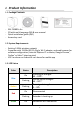
I. Product Information I-1. Package Contents - EW-7438RPn Air CD with multi-language QIG & user manual Quick installation guide (QIG) Access key card I-2. System Requirements - Existing 2.4GHz wireless network - Computer with 2.4GHz 802.11/b/g/n Wi-Fi adapter, and web browser for software configuration (Internet Explorer 8® or above, Google Chrome®, Firefox® or Safari® latest version) - iOS 5 or above or Android 4.x or above for mobile app I-3.
Flashing Off Off WPS in progress Sleep Mode I-4.
I-5. Safety Information In order to ensure the safe operation of the device and its users, please read and act in accordance with the following safety instructions. 1. The device is designed for indoor use only; do not place it outdoors. 2. Do not place the device in or near hot/humid places, such as a kitchen or bathroom. 4. Handle the device with care. Accidental damage will void the warranty of the device. 5. The device contains small parts which are a danger to small children under 3 years old.
II. Installation II-1. Installation 1. Plug the EW-7438RPn Air into a power socket. The LED will flash red while the system is booting up. The device is ready when the LED displays on (red). 2. Use a Wi-Fi device (e.g. computer, tablet, smartphone) to search for a Wi-Fi network with the SSID “EdimaxEXT.Setup **” and connect to it. If you are using a computer, please disconnect any Ethernet cables. For mobile devices, iOS 5 or Android 4.x or above is required.
3. Open a web browser and if you do not automatically arrive at the “Get Started” screen shown below, enter the URL http://edimaxext.setup and click “Get Started” to begin the setup process. If you cannot access http://edimaxext.setup, please make sure your computer is set to use a dynamic IP address. For more information please refer to V. Appendix. 4. Please read the on screen instructions about selecting a good location for your wireless extender and then click “NEXT” to continue.
5. Select your Wi-Fi network from the list and enter the security key/password. You can also enter a new Wi-Fi network name (SSID) if you wish. Click “Next” to continue. By default, the Wi-Fi extender’s new wireless network name ( SSID) is your existing router/access point’s SSID + _2EX. For example if your router’s SSID is “Your SSID” then the EW-7438RPn Air ’s SSID will be “Your SSID_2EX”. You can change your extender’s new SSID in the “Extender Device SSID” field.
8. Please wait a moment until the extender is ready. 9. A final congratulations screen will indicate that setup is complete. The EW-7438RPn Air is working and ready for use - the LED should display on or flashing blue depending on your signal strength. To download the EdiRange app, click the icon or scan the QR code.
Android: iOS: 10. Please close the browser window. You can now connect to the extender’s new SSID on a wireless device within range such as a computer, smartphone or tablet. The password for your Wi-Fi extender’s SSID is the same as for your router’s SSID. For more advanced configurations, use the browser based configuration interface (refer to III.
II-2. WPS Setup If your wireless router/access point supports WPS (Wi-Fi Protected Setup) then you can use this method to setup your wireless extender. 1. Press the WPS button on your wireless router/access point to activate its WPS. Please check the instructions for your wireless router/access point for how long you need to hold down its WPS button. 2. Within two minutes, press and hold the WPS button on the wireless extender for two seconds.
II-3. Reset to Factory Default Settings If you experience problems with your extender or if you want to change the extender to a different operating mode, you can reset the device back to its factory settings. This resets all settings back to default. 1. Press and hold the WPS/Reset button for at least 10 seconds until the LED is flashing red. 2.Wait for the extender to restart. The extender is ready for setup when the LED displays on (red).
III. Browser Based Configuration Interface You can use the browser based configuration interface to configure advanced settings. Please ensure that your computer is set to use a dynamic IP address. Refer to V-1. Configuring your IP address for more information. III-1. 1. Login Enter http://edimaxext.setup into the URL bar of a browser on a network device which is connected to the same Wi-Fi network as the extender. 2.You will be prompted for a username and password.
12
III-2. Save Settings 1. After you make any changes to the EW-7438RPn Air’s settings, please click “APPLY”. 2. Then, select “CONTINUE” to save changes but not apply them yet, or select “APPLY” to restart the EW-7438RPn Air and bring the changes into effect. The EW-7438RPn Air needs to restart in order to apply and bring any changes into effect. Use the “CONTINUE” button to make several changes and apply them all together in one restart.
III-3. Main Menu Use the main menu down the left side to navigate. Screenshots displayed are examples.The information shown on your screen will vary depending on your configuration. III-3-1. Home The “Status” page displays basic system information about the device, arranged into three categories: system, wireless configuration & LAN configuration.
Uptime Displays the total time since the device was turned on. Hardware Version Displays the hardware version. Firmware Version Displays the firmware version. Mode Displays the operating mode. Wireless Scheduling Displays whether wireless scheduling is on or off. ESSID Displays the EW-7438RPn Air’s ESSID, sometimes also known as SSID. The ESSID/SSID is the name used to identify a wireless network. Channel Number Displays the current wireless channel. Security Displays the current wireless security setting.
Status Signal Strength IP Address Subnet Mask Default Gateway MAC address Clients” to display a new window showing information about wireless clients. Displays the current connection status of the EW-7438RPn Air. Displays the wireless signal strength from your router/access point to the EW-7438RPn Air. Displays the IP address of this device. Displays the subnet mask of the IP address. Displays the IP address of the default gateway. Displays the device’s MAC address.
III-3-2. iQ Setup You can run the setup wizard again to reconfigure the basic settings of the device. Please refer back to II-1. Installation for guidance. III-3. WPS Settings Wi-Fi Protected Setup is a simple way to establish connections between WPS compatible devices. When WPS is activated in the correct manner and at the correct time for two compatible devices, they will automatically connect. PIN code WPS includes the use of a PIN code between the two devices for verification.
Self PIN Code Displays the WPS PIN code of the device. Configuration Mode Device is as an AP The configuration mode of the device’s WPS setting is displayed here. “Registrar” means the device acts as an access point for a wireless client to connect to and the wireless client(s) will follow the device’s wireless settings. Click “Start PBC” (Push-Button Configuration) to activate WPS on the access point. WPS will be active for 2 minutes.
III-4. Advanced Settings The “Advanced Settings” page allows you to adjust the power output and LED operation of the EW-7438RPn Air. The submenu options listed under “Advanced Settings” allow you to configure security, scheduling, guest network and various administrative and management functions. Tx Power Enable LED Off Mode You can adjust the level of wireless output power as a percentage. Depending on the size of your location and required coverage, you may not require 100% output power.
III-4-1. WLAN Security The security/encryption type and password for your wireless extender is the same as your existing router/access point. On this page you can set a new SSID for your extender and choose to broadcast or hide the extender’s SSID. Broadcast SSID Device SSID Security Type Enable or disable ESSID broadcast. When enabled, the ESSID will be visible to clients as an available Wi-Fi network.
III-4-2. Scheduling Setting The “Scheduling Settings” page enables you to configure the EW-7438RPn Air’s scheduling function, along with the time & date settings. The scheduling function allows you to schedule the extender’s Wi-Fi and LED on or off according to your preference. Wireless scheduling can save energy and increase the security of your network.
Add Edit Delete Click to add a new schedule in a new window (see below). Edit an existing schedule in a new window. Delete the specified schedule. Add When you click “Add” to add a new schedule, a new window will open as shown below: Schedules can be set individually by day or to occur every day.
1.Enter a name for the schedule in the “schedule description” box in the top right corner. 2. Specify a start and end time (hours and minutes) and day (or select “everyday”) for the schedule using the drop-down menus. 3. Select the schedule in the “Select” column and click “Save” to save the schedule, or “Back” to cancel and go back to the previous screen.
III-4-3. Guest Network You can use an additional “guest” wireless network so guest users can enjoy Wi-Fi connectivity without accessing your primary network. The guest network can also be used as a parental control function, allowing you to moderate your child’s Internet access. The guest network is separate from your extender’s primary network. Enable Guest SSID Wireless Guest Name Enable Wireless Clients Isolation Band Check/uncheck the box to enable/disable the guest Wi-Fi network.
Channel Number Channel number for the guest network is the same as the main SSID and cannot be adjusted independently. Encryption Enable or disable encryption for the guest network. When encryption is enabled, enter a pre-shared key (password) for your guest network. Pre-shared Key You cannot select a different encryption type (e.g. WEP, TKIP, etc.) for your guest network. The default encryption type is WPA2 which is the most secure encryption type.
III-4-4. Administration Utility You can change the password used to login to the browser-based configuration interface here. It is advised to do so for security purposes. You can also configure the EW-7438RPn Air’s IP address. Please make a note of the new password. In the event that you forget the password and are unable to login to the browser based configuration interface, see II-3. Reset to factory default settings for how to reset the device. Current Password Enter your current password.
2.4GHz To have your wireless router automatically assign an IP address to your extender (recommended), select “Obtain an IP address automatically”. To assign an IP address to your extender manually, select “Use the following IP address”. IP Address Subnet Mask Gateway Address Specify an IP address here. This IP address will be assigned to your EW-7438RPn Air. Input the subnet mask of the new IP address. Input the network’s gateway IP address.
III-4-5. Configuration Tools The “Configuration Tools” menu allows you to backup the EW-7438RPn Air’s settings, restore the settings to a previous version or restore the EW-7438RPn Air back to its factory default state. You can also upgrade the firmware, reboot the device and export the system log. Backup Settings Restore Settings Restore to Factory Default Click “Save” to save the current settings on your computer as config.bin file. Click “Browse” to find a previously saved config.
Upgrade Firmware You can upgrade the system firmware to a more recent version. You can download the latest firmware from the Edimax website. After the upgrade, the system will restart. Do not switch off or disconnect the device during a firmware upgrade, as this could damage the device. It is recommended that you use a computer for a firmware upgrade. Browse Open a new window to locate and select the firmware file in your computer.
Reboot In the event that the extender malfunctions or is not responding, then it is recommended that you restart the device. Rebooting the EW-7438RPn Air will not affect the current configuration/settings of the device. Apply Click “Apply” to reboot the device. A status bar will indicate the progress of the reboot and you will see a confirmation screen when the reboot is complete.
System Log You can export the system log to a separate file if you require. Export system log Click to open a new window and select a location to save the log file.
IV. EdiRange App The EdiRange app is a free smartphone app from which you can manage the extender’s functions and check your local Wi-Fi environment. Please ensure that your smartphone/tablet is connected to your extender’s Wi-Fi (SSID). IV-1. Login After setup you can use the browser based configuration interface to configure advanced settings. 1. Open the EdiRange app. 2. Select “Management”.
3. Enter the username and password (default username: admin default password: 1234). The admin password is the same password used for the browser based configuration interface. It is recommended that you change the password from the default “1234”. You can change the password in the “admin” page from the main menu. 4. Wait for the app to log in.
IV-2. Main Menu After you log in, the “Status” page will be displayed. You can see the extender status, SSID name, and guest network and schedule status here. Use the menu of icons across the bottom of the screen to navigate around the app. Logout Click the logout icon in the top left corner of the app anytime to log out from the app. Help Click the help icon in the top right corner of the app anytime to display help and tips about using the app.
IV-3. Good Night Mode Good Night Mode will put the extender to “sleep” (switch off Wi-Fi and LED) for a specified number of hours. Enter the number of hours and click “Yes” to activate Good Night Mode. Your mobile device will be disconnected from the extender during sleep mode since Wi-Fi is disabled. You can wake the extender (back to its fully functional state) anytime by manually pressing the WPS/Reset button. IV-4. Wi-Fi Scheduling Wi-Fi can be scheduled to switch off according to your preference.
IV-5. Admin You can change the extender’s admininstrative password on the Admin page. This is the password to login to the EdiRange app and the browser based configuration interface.
V. Appendix V-1. Configuring your IP address For first time access to the URL http://edimaxext.setup on a computer please ensure your computer is set to use a dynamic IP address. This means your computer can obtain an IP address automatically from a DHCP server. You can check if your computer is set to use a dynamic IP address by following V-1-1. How to check that your computer uses a dynamic IP address.
V-1-1. How to check that your computer uses a dynamic IP address Please follow the instructions appropriate for your operating system. V-1-1-1. Windows XP 1. Click the “Start” button (it should be located in the lower-left corner of your computer), then click “Control Panel”. Double-click the “Network and Internet Connections” icon, click “Network Connections”, and then double-click “Local Area Connection”. The “Local Area Connection Status” window will then appear, click “Properties”. 2.
39
V-1-1-2. Windows Vista 1. Click the “Start” button (it should be located in the lower-left corner of your computer), then click “Control Panel”. Click “View Network Status and Tasks”, then click “Manage Network Connections”. Right-click “Local Area Network”, then select “Properties”. The “Local Area Connection Properties” window will then appear, select “Internet Protocol Version 4 (TCP / IPv4)”, and then click “Properties”. 2.
41
V-1-1-3. Windows 7 1. Click the “Start” button (it should be located in the lower-left corner of your computer), then click “Control Panel”. 2. Under “Network and Internet” click “View network status and tasks”. 3. Click “Local Area Connection”.
4. Click “Properties”. 5. Select “Internet Protocol Version 4 (TCP/IPv4) and then click “Properties”.
6. Select “Obtain an IP address automatically” and “Obtain DNS server address automatically” should be selected.
V-1-1-4. Windows 8 1. From the Windows 8 Start screen, you need to switch to desktop mode. Move your curser to the bottom left of the screen and click. 2. In desktop mode, click the File Explorer icon in the bottom left of the screen, as shown below. 3. Right click “Network” and then select “Properties”.
4. 5. In the window that opens, select “Change adapter settings” from the left side. Choose your connection and right click, then select “Properties”.
6. 7. Select “Internet Protocol Version 4 (TCP/IPv4) and then click “Properties”. Select “Obtain an IP address automatically” and “Obtain DNS server address automatically” should be selected.
48
V-1-1-5. 1. 2. Mac OS Have your Macintosh computer operate as usual, and click on “System Preferences”. In System Preferences, click on “Network”. 3. Click on “Wi-Fi” in the left panel and then click “Advanced” in the lower right corner. 4. Select “TCP/IP” from the top menu and “Using DHCP” in the drop down menu labeled “Configure IPv4” should be selected.
50
V-1-2. How to modify the IP address of your computer Please follow the instructions appropriate for your operating system. In the following examples we use the IP address 192.168.9.20 though you can use any IP address in the range 192.168.9.x (x = 3 – 254) in order to access iQ Setup/browser based configuration interface. Please make a note of your static IP before you change it. V-1-2-1. 1. 2.
address, subnet mask, default gateway and DNS server addresses. IP address: 192.168.9.20 Subnet Mask: 255.255.255.0 Click ‘OK’ when finished.
V-1-2-2. 1. 2. Windows Vista Click the “Start” button (it should be located in the lower-left corner of your computer), then click “Control Panel”. Click “View Network Status and Tasks”, then click “Manage Network Connections”. Right-click “Local Area Network”, then select “Properties”. The “Local Area Connection Properties” window will then appear, select “Internet Protocol Version 4 (TCP / IPv4)”, and then click “Properties”.
V-1-2-3. 1. Windows 7 Click the “Start” button (it should be located in the lower-left corner of your computer), then click “Control Panel”.
2. Under “Network and Internet” click “View network status and tasks”. 3. Click “Local Area Connection”.
4. Click “Properties”. 5. Select “Internet Protocol Version 4 (TCP/IPv4) and then click “Properties”.
6. Select “Use the following IP address”, then input the following values: Your existing static IP address will be displayed in the “IP address” field before you replace it. Please make a note of this IP address, subnet mask, default gateway and DNS server addresses. IP address: 192.168.9.20 Subnet Mask: 255.255.255.0 Click ‘OK’ when finished.
58
V-1-2-4. Windows 8 1. From the Windows 8 Start screen, you need to switch to desktop mode. Move your curser to the bottom left of the screen and click. 2. In desktop mode, click the File Explorer icon in the bottom left of the screen, as shown below.
3. 4. Right click “Network” and then select “Properties”. In the window that opens, select “Change adapter settings” from the left side.
5. Choose your connection and right click, then select “Properties”. 6. Select “Internet Protocol Version 4 (TCP/IPv4) and then click “Properties”.
7. Select “Use the following IP address”, then input the following values: Your existing static IP address will be displayed in the “IP address” field before you replace it. Please make a note of this IP address, subnet mask, default gateway and DNS server addresses. IP address: 192.168.9.20 Subnet Mask: 255.255.255.0 Click ‘OK’ when finished.
V-1-2-5. 1. 2. Mac Have your Macintosh computer operate as usual, and click on “System Preferences” In System Preferences, click on “Network”. 3. Click on “Wi-Fi” in the left panel and then click “Advanced” in the lower right corner. 4. Select “TCP/IP” from the top menu and select “Manually” from the drop down menu labeled “Configure IPv4”, then click “OK”.
Your existing static IP address will be displayed in the “IP address” field before you replace it. Please make a note of this IP address, subnet mask, default gateway and DNS server addresses. 5. In the “IPv4 Address” and “Subnet Mask” field enter IP address 192.168.9.20 and subnet mask 255.255.255.0. Click on “OK”.
6. Click “Apply” to save the changes.
V-1-3. How to Find Your Network Security Key To find your network security key, please follow the instructions appropriate for your operating system. If you are using Windows XP or earlier, please contact your ISP or router manufacturer to find your network security key. V-1-3-1. Windows 7 & Vista 1. Open “Control Panel” and click on “Network and Internet” in the top menu. 2. Click on “View network status and tasks” which is under the heading “Network and Sharing Center”. 3.
4. You should see the profile of your Wi-Fi network in the list. Right click on your Wi-Fi network and then click on “Properties”. 5.Click on the “Security” tab, and then check the box labeled “Show characters”. This will show your network security key. Click the “Cancel” button to close the window.
V-1-3-2. Mac 1. Open a new Finder window, and select “Applications” from the menu on the left side. Open the folder labeled “Utilities” and then open the application “Keychain Access”. 2. Select “Passwords” from the sub-menu labeled “Category” on the left side, as shown below. Then search the list in the main panel for the SSID of your network. In this example, the SSID is “EdimaxWireless” – though your SSID will be unique to your network.
3. Double click the SSID of your network and you will see the following window. 4. Check the box labeled “Show password” and you will be asked to enter your administrative password, which you use to log into your Mac. Enter your password and click “Allow”.
Your network security password will now be displayed in the field next to the box labeled “Show password”. In the example below, the network security password is “edimax1234”. Please make a note of your network security password.
V-1-4. How to Find Your Router’s IP Address To find your router’s IP address, please follow the instructions appropriate for your operating system. V-1-4-1. Windows XP, Vista & 7 1. Go to “Start”, select “Run” and type “cmd”, then press Enter or click “OK”. 2. A new window will open, type “ipconfig” and press Enter.
3. Your router’s IP address will be displayed next to “Default Gateway”.
V-1-4-2. Windows 8 1. From the Windows 8 Start screen, move your curser to the top right corner of the screen to display the Charms bar. 2. Click “Search” and enter “cmd” into the search bar. Click the “Command Prompt” app which be displayed on the left side.
3. A new window will open, type “ipconfig” and press Enter.
4.Your router’s IP address will be displayed next to “Default Gateway”.
V-1-4-3. 1. Mac Launch “System Preferences” and click on “Network”. 2. If you are using an Ethernet cable to connect to your network, your router’s IP address will be displayed next to “Router”. 3. If you are using Wi-Fi, click “Wi-Fi” in the left panel, and then “Advanced” in the bottom right corner.
4. Click the “TCP/IP” tab and your router’s IP address will be displayed next to “Router”.
V-2. Connecting to a Wi-Fi network For help connecting to your device’s EdimaxEXT.Setup SSID for initial setup, or to connect to your device’s new Wi-Fi network (SSID) after setup is complete, follow the guide below: Below is an example of how to connect using Windows Vista – the process may vary slightly for other versions of Windows. 1. Click the network icon ( to a network”. 2. Search for the SSID of your EW-7438RPn Air and then click “Connect”.
3. After correctly entering your password, you will be successfully connected to the EW-7438RPn Air’s wireless network.
V-3. Glossary Default Gateway (Wireless bridge): Every non-access point IP device needs to configure a default gateway’s IP address. When the device sends out an IP packet, if the destination is not on the same network, the device has to send the packet to its default gateway, which will then send it out towards the destination. DHCP: Dynamic Host Configuration Protocol. This protocol automatically gives every computer on your home network an IP address.
A network mask is also a 32-bit binary pattern, and consists of consecutive leading 1’s followed by consecutive trailing 0’s, such as 11111111.11111111.11111111.00000000. Therefore sometimes a network mask can also be described simply as “x” number of leading 1’s. When both are represented side by side in their binary forms, all bits in the IP address that correspond to 1’s in the network mask become part of the IP network address, and the remaining bits correspond to the host ID.
Application Protocol Port Number Telnet TCP 23 FTP TCP 21 SMTP TCP 25 POP3 TCP 110 H.323 TCP 1720 SNMP UCP 161 SNMP Trap UDP 162 HTTP TCP 80 PPTP TCP 1723 PC Anywhere TCP 5631 PC Anywhere UDP 5632 Access point: A access point is an intelligent network device that forwards packets between different networks based on network layer address information such as IP addresses. Subnet Mask: A subnet mask, which may be a part of the TCP/IP information provided by your ISP, is a set of four numbers (e.g. 255.255.255.
COPYRIGHT Copyright Edimax Technology Co., Ltd. all rights reserved. No part of this publication may be reproduced, transmitted, transcribed, stored in a retrieval system, or translated into any language or computer language, in any form or by any means, electronic, mechanical, magnetic, optical, chemical, manual or otherwise, without the prior written permission from Edimax Technology Co., Ltd. Edimax Technology Co., Ltd.
Federal Communication Commission Interference Statement This equipment has been tested and found to comply with the limits for a Class B digital device, pursuant to Part 15 of FCC Rules. These limits are designed to provide reasonable protection against harmful interference in a residential installation. This equipment generates, uses, and can radiate radio frequency energy and, if not installed and used in accordance with the instructions, may cause harmful interference to radio communications.
EU Declaration of Conformity English: This equipment is in compliance with the essential requirements and other relevant provisions of Directive 1995/95/EC, 2011/65/EC. Français: Cet équipement est conforme aux exigences essentielles et autres dispositions de la directive 1995/95/CE, 2011/65/CE. Čeština: Toto zařízení je v souladu se základními požadavky a ostatními příslušnými ustanoveními směrnic 1995/95/ES, 2011/65/ES.
Declaration of Conformity We, Edimax Technology Co., Ltd., declare under our sole responsibility, that the equipment described below complies with the requirements of the European R&TTE directive 1999/95/EC, and directive 2011/65/EC(RoHS) . Equipment: Model No.: N300 Smart Wi-Fi Extender EW-7438RPn Air The following European standards for essential requirements have been followed: Spectrum: EMC: EMF: Safety (LVD): ETSI EN 300 328 V1.8.1 (2012-06) EN 301 489-1 V1.9.2 (2011-09); EN 301 489-17 V2.2.
Notice According to GNU General Public License Version 2 This product includes software that is subject to the GNU General Public License version 2. The program is free software and distributed without any warranty of the author. We offer, valid for at least three years, to give you, for a charge no more than the costs of physically performing source distribution, a complete machine-readable copy of the corresponding source code.
intact all the notices that refer to this License and to the absence of any warranty; and give any other recipients of the Program a copy of this License along with the Program. You may charge a fee for the physical act of transferring a copy, and you may at your option offer warranty protection in exchange for a fee. 2.
6. Each time you redistribute the Program (or any work based on the Program), the recipient automatically receives a license from the original licensor to copy, distribute or modify the Program subject to these terms and conditions. You may not impose any further restrictions on the recipients’ exercise of the rights granted herein. You are not responsible for enforcing compliance by third parties to this License. 7.