
User guide


10
II. Quick Installation
Your wireless access point can be up and running in a matter of minutes.
If you need to make more detailed configurations after setup, you can refer to
III. Browser Based Configuration Interface.
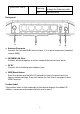
1. Connect one end of an Ethernet cable to the Ethernet port on your
computer. Connect the other end to an Ethernet port on the access point.
2. Plug the power adapter into the device’s 5V power port, and plug the
adapter into a wall socket. The PWR LED should light up.
Refer to the following instructions appropriate for your operating system.
II-1. Mac
MAC USERS: You may need to modify the IP
address of your computer before you can setup the
access point. For guidance on how to do this,
please see Appendix IV-1. Configuring your IP
Address.
For Mac users it is necessary to configure the access point manually, using the
browser based configuration interface. Please open a web browser and enter
the access point’s default IP address “http://192.168.2.1” into the URL bar.
You will then be prompted to enter the device’s username and password. The