Wireless 802.11b/g USB Adapter User Manual Version: 1.
COPYRIGHT Copyright ©2005/2006 by this company. All rights reserved.
Federal Communication Commission Interference Statement This equipment has been tested and found to comply with the limits for a Class B digital device, pursuant to Part 15 of FCC Rules. These limits are designed to provide reasonable protection against harmful interference in a residential installation. This equipment generates, uses, and can radiate radio frequency energy and, if not installed and used in accordance with the instructions, may cause harmful interference to radio communications.
R&TTE Compliance Statement This equipment complies with all the requirements of DIRECTIVE 1999/5/EC OF THE EUROPEAN PARLIAMENT AND THE COUNCIL of March 9, 1999 on radio equipment and telecommunication terminal Equipment and the mutual recognition of their conformity (R&TTE) The R&TTE Directive repeals and replaces in the directive 98/13/EEC (Telecommunications Terminal Equipment and Satellite Earth Station Equipment) As of April 8, 2000.
CONTENTS 1. PRODUCT INTRODUCTION ................................................................... 2 1.1 Features ..........................................................................................................2 2.1 Specifications.................................................................................................2 2. PACKAGE CONTENTS .......................................................................... 3 3. HARDWARE INSTALLATION .................................................
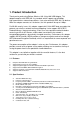
1. Product Introduction Thank you for purchasing Edimax Wireless 802.11b/g LAN USB Adapter. This adapter complies with IEEE 802.11g standard, which supports up to 54Mbps high-speed wireless network connections. It can also work with IEEE 802.11b devices. When the adapter connects to 11b devices, the link speed will be up to 11Mbps. For WLAN security issues, this adapter supports 64/128-bit WEP data encryption that protects your wireless network from eavesdropping.
2. Package Contents Before you starting to use this Wireless USB Adapter, please check if there’s anything missing in the package, and contact your dealer of purchase to claim for missing items: One Wireless USB Adapter One USB cable One Quick Installation Guide One CD-ROM (Including Multi-language QIG, User’s Manual and Driver/Utility) If any of the above items is missing, contact your supplier as soon as possible.
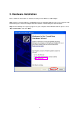
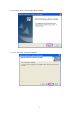
3. Hardware Installation Please follow the instructions as below to install your new Wireless USB Adapter: Step 1. Please insert the Wireless USB Adapter into an available USB 2.0 port of your computer. We recommend you to insert the adapter after the software of driver/utility has been installed. Step 2. The following message may appear on your computer under Windows OS XP, please select “No, not this time” and click ‘Next’.
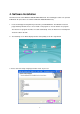
4. Software Installation This wizard can be run in Windows 2000/XP/XP64/2003/Vista. The following procedures are operated in Windows XP. (Procedures are similar for Windows 2000/XP/XP64/Vista.) 1. Insert the CD shipped along with the product into your CD-ROM drive. The Windows Vista will popup AutoPlay window, Please select “Install or run program” to execute Autorun.exe program. The Autorun.exe program should be executed automatically. If not, run Autorun.exe manually from “Autorun” folder in the CD. 2.
4. Please Click “Next” to start installing driver and utility 5.
6. The driver and utility is installing, please wait a while. 7. When you see this message, please click ‘Finish’ to complete the driver installation process.
5. Connect to Wireless Access Point Using Configuration Utility to Connect to Wireless Access Point 5.1 Using Realtek Wireless Configuration Utility 1. After installation is complete, wireless configuration utility will be shown an icon at your windows desktop as below. Please click the icon by right mouse key to lunch the configuration utility. 2. Configuration utility will scan for wireless access points automatically, and all found access points will be displayed on “Available Network”.
9
4. The utility will automatically add the access point at Wireless Utility Profile.
5. If the wireless access point is successfully connected, you’ll see a connected icon displayed at the lower-left corner of wireless configuration utility window and click ‘Close’ to exit.
5.2 Using Windows Zero Config 1. After lunch wireless configuration, Please select “Windows Zero Config” and click “OK” to disable the utility of the adapter.. 2. Please lunch Windows Zero Config by double-click the wireless connection icon in the lower-left corner on Windows desktop.
3. The Windows Zero Config Panel will pup-up.
4. If the wireless access point without encryption, there is warning window will pup-up. Please click “Connect Anywhere”.
5. When you see the “Connected” shows on the Windows Zero Config window, the wireless is successfully connected.
6. Configuration Utility The Configuration Utility is a powerful application that helps you configure the Wireless LAN USB Adapter and monitor the link status and the statistics during the communication process. The Configuration Utility appears as an icon on the system tray and desktop of Windows. You can open it by double-click on the icon. In the Desktop In the System Tray Right click the icon in the system tray there are some items for you to operate the configuration utility.
Parameter Description Refresh – Refresh adapter list in the “B“ block. A RT-Set – Open the RT-Set wizard. Mode – There are two modes: Station and Access Point. If “Station“ is selected, the adapter works as a wireless adapter. If “Access Point“ is selected, the adapter will works as a wireless AP. View – Enable “Status Bar“ and the “D“ block in the utility will display the current status of the utility. About – To check the version of the utility, select this item.
6.2 Available Network When you open the Configuration Utility, the system will scan all the channels to find all the access points/stations within the accessible range of your adapter and automatically connect to the wireless network with the highest signal strength. From the “Available Network” tab, all the networks nearby will be listed. You can change the connection to another network.
6.3 General To check the connection status of the adapter, select “General“. This screen shows the information of Link Speed, Network Type, Encryption Method, SSID, Signal Strength, Link Quality and Network Address of the adapter. Parameter Description Status It will show the connection status of the adapter. Speed It shows the current speed Type Infrastructure – This operation mode requires the presence of an 802.11 Access Point. All communication is done via the Access Point or Router.
Parameter Description Link Quality It indicates the wireless link quality. Network Address It shows the MAC, IP address and other information of the adapter. 6.4 Profile The “Profiles List” is for you to manage the networks you connect to frequently. You are able to Add/Remove/Edit/Duplicate/Set Default to manage a profile. Parameter Description Available Profile(s) This list shows the preferred networks for the wireless connection.
6.4.1 Configure the Profile Parameter Description Profile Name Define a recognizable profile name for you to identify the different networks. Network Name (SSID) The SSID (up to 32 printable ASCII characters) is the unique name identified in a WLAN. The ID prevents the unintentional merging of two co-located WLANs. You may specify a SSID for the adapter and then only the device with the same SSID can interconnect to the adapter.
Parameter Network Authentication Description This setting has to be consistent with the wireless networks that the adapter intends to connect. Open System – No authentication is needed among the wireless network. Shared Key – Only wireless stations using a shared key (WEP Key identified) are allowed to connecting each other. WPA 802.1X – WPA provides a scheme of mutual authentication using either IEEE 802.1x/Extensible Authentication Protocol (EAP) authentication or pre-shared key (PSK) technology.
Parameter Description Data Encryption Disabled – Disable the WEP Data Encryption. WEP – Enable the WEP Data Encryption. When the item is selected, you have to continue setting the WEP Encryption keys. TKIP – TKIP (Temporal Key Integrity Protocol) changes the temporal key every 10,000 packets (a packet is a kind of message transmitted over a network.) This insures much greater security than the standard WEP security.
Parameter Description EAP Type GTC – GTC is an authentication protocol which allows the exchange of clear text authentication credentials across the network. TLS – TLS is the most secure of the EAP protocols but not easy to use. It requires that digital certificates be exchanged in the authentication phase. The server presents a certificate to the client. After validating the server’s certificate, the client presents a client certificate to the server for validation.
6.5 Advanced The “Advanced” option enables you to configure more advanced settings, for example: Power Save, Turbo Mode, Wireless Mode and etc. Parameter Description Power Save None – The adapter will always set in active mode. Min – Enable the adapter in the power saving mode when it is idle, but some components of the adapter are still alive. In this mode, the power consumption is larger than “Max“ mode. Max – Enable the adapter in the power saving mode when it is idle.
to this mode. Parameter Description Preamble Mode The preamble defines the length of the CRC block for communication among the wireless stations. There are three mode including Long, Short and Auto. High network traffic areas should use the shorter preamble type. If “Auto“ mode is selected, the adapter will auto switch the preamble mode depending on the wireless stations that the adapter is connecting to. Note that the parameter is only active in the Ad Hoc operation mode.
6.6 Status This screen shows the information of manufacturer, driver version, settings of the wireless network the adapter is connecting to, linking time and link status. If you don’t ensure the status of the adapter and the network you are connecting, please go to the screen for more details. 6.7 Statistics You can get the real time information about the packet transmission and receiving status during wireless communication from the screen.
6.8 Software AP This adapter can run as a wireless AP. The relative configurations of the AP including channel, SSID, WEP encryption and so on are described as follows. Parameter Description SSID The SSID (up to 32 printable ASCII characters) is the unique name identified in a WLAN. The ID prevents the unintentional merging of two co-located WLANs. The default SSID of the AP is Full Computer Name + “_AP“. Wireless adapters connect to the AP should set up the same SSID as the AP.
6.8.1 AP Properties Setting Please refer to Section 3.4.1 for the setting of the parameters for AP. Note that Ad Hoc mode is not enabled for AP. 6.8.
Parameter Description Beacon Interval Beacon Interval that specifies the duration between beacon packets (milliseconds). The range for the beacon period is between 20-1000 milliseconds with a typical value of 100. DTIM Period Determines the interval the Access Point will send its broadcast traffic. Default value is 3 beacons. Data Rate The preamble defines the length of the CRC block for communication among the wireless stations. There are three mode including Long, Short and Auto.
6.8.4 SoftAP If you want to connect to the internet through this SoftAP, you will need to make a bridge between our SoftAP and your internet connect. Select the internet connection in your SoftAP host machine and press the “Apply” button.
7. RT-Set Wizard The RT-Set wizard can help users to connect to a wireless LAN or build an Ad-hoc wireless network. For example, if you want to connect to a wireless LAN in infrastructure mode: A. Open the RT-Set wizard and choose the Station (infrastructure) mode. B. The site survey results will show up. Please select the one you’d like to connect to and click the “Next” button.
C. In the Wireless network properties dialog, please fill in the security settings for this wireless network you’d like to connect to. D. Please specify the IP settings for this wireless network and click the “Finish” button.
E. Now you can connect to the wireless network successfully.
8. Troubleshooting This chapter provides solutions to problems usually encountered during the installation and operation of the adapter. 1. What is the IEEE 802.11g standard? 802.11g is the new IEEE standard for high-speed wireless LAN communications that provides for up to 54 Mbps data rate in the 2.4 GHz band. 802.11g is quickly becoming the next mainstream wireless LAN technology for the home, office and public networks. 802.11g defines the use of the same OFDM modulation technique specified in IEEE 802.
wireless application for mobile workers. 6. What is BSS ID? A specific Ad hoc LAN is called a Basic Service Set (BSS). Computers in a BSS must be configured with the same BSS ID. 7. What is WEP? WEP is Wired Equivalent Privacy, a data privacy mechanism based on a 40 bit shared key algorithm, as described in the IEEE 802 .11 standard. 8. What is TKIP? TKIP is a quick-fix method to quickly overcome the inherent weaknesses in WEP security, especially the reuse of encryption keys.
13. What is Spread Spectrum? Spread Spectrum technology is a wideband radio frequency technique developed by the military for use in reliable, secure, mission-critical communication systems. It is designed to trade off bandwidth efficiency for reliability, integrity, and security.