Wireless LAN / Fast Ethernet Motion JPEG Internet Camera (IC-1500Wg / IC-1500) Quick Installation Guide Version 1.
Multi-Language QIG in driver CD =========================================== Český: Anglického průvodce rychlou instalací naleznete na přiloženém CD s ovladači Deutsch: Finden Sie bitte das englische QIG beiliegend in der Treiber CD (German) Español: Incluido en el CD el QIG en Ingles. Français: Veuillez trouver l’anglais QIG ci-joint dans le CD driver Italiano: Incluso nel CD il QIG in Inglese.
1. Check your package contents z z z z One Internet Camera / with antenna (IC-1500Wg only) One external power adapter One camera stand and 100M Cat.5 Ethernet cable One Quick Installation Guide and User’s CD Please contact your dealer if any items above are missing. 2.
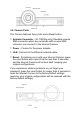
3.2. Camera Ports The Camera features three ports and a Reset button. y Antenna Connector : (IC-1500Wg only) Standard reverse SMA connector where any antennas with reverse SMA connector can connect to the Internet Camera. y Power : Connect to the power adapter. y LAN : Connect to the Ethernet network cable.
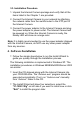
3.3. Installation Procedure 1. Unpack the Internet Camera package and verify that all the items listed in the Chapter 1 are provided. 2. Connect the Internet Camera to your network by attaching the network cable from the switch/router to the UTP port of the Internet Camera. 3. Connect the power adapter to the Internet Camera and plug the power adapter to power outlet. The Internet Camera will be powered on. When the Internet Camera is ready, the Ready LED will show an orange color.
The following installation steps are the demonstration of “IC-1500 and IC-1500Wg, now please Click the “Click To Setup Utilities” to continue. y The system will start the installation procedures. Click “Next” to continue installation.
y If you wish to install the software program in an alternate location, click “Change”; otherwise click “Next” to move on to the next step. y Click “Install” to start installing the program.
y The system will install the program automatically. y Click “Finish” to complete the software installation.
y When the installation is completed, the system will auto run ”Administrator Utility“. On the Internet Camera, first page, the cameras found in the network will be listed in the left window. Choose the one you want to configure and click “Setting Wizard” to proceed. N IC-1500 “N” means the camera is new and not configured. y Please enter the default password “1234” and click “OK” to login to the IP setup page. y Internet Camera is working through the network (TCP/IP Protocol).
You can accept the suggested value or enter the value manually. If you enter the value manually, please be aware that the “Subnet Mask” must be the same for both the camera and the PC. Click “Finish” to apply the configuration. y A window will pop up to ask you if you want to run the “Camera Viewer” and see the video of the Camera immediately. Select “OK” to run “Camera Viewer”.
y The “Camera Viewer” will show the video automatically. Congratulations, you can use the camera through the network to view the video from now on.