Network Camera User’s Manual PT-111E / PT-112E & MD-111E User manual 08-2013/ v1.
Network Camera User’s Manual Table of Contents Overview ............................................................................................................... 3 Package Contents................................................................................................. 4 Connections .......................................................................................................... 5 Hardware description ...................................................................................
Network Camera User’s Manual H.264 Pan/Tilt IR Network Camera Overview PT-111E / PT-112E & MD-111E / PT-112E is a Mini Dome P/T & Fixed dome network camera. Law in your country may prohibit the use of surveillance devices. The Network Camera is not only a high-performance web-ready camera but also can be part of a flexible surveillance system. It is the user‘s responsibility to ensure that the operation of such devices is legal before installing this unit for its intended use.
Network Camera User’s Manual Package Contents If any of the above items are missing, please contact your dealer immediately. Network Camera (Wired or PoE) Software CD Power adapter Quick installation guide Screws RJ45 Female Note: Using a power supply with a different voltage than the one included with the Network Camera will cause damage and void the warranty for this product.
Network Camera User’s Manual Connections Hardware description Outer View Wired cover Slide cover Inner View Light sensor Lens IR LED Reset button Internal Microphone Micro SD/SDHC card slot 5/59
Network Camera User’s Manual Hardware Installation 1. Attach the Network Camera with the included stand 2. Place the Camera fix it onto ceiling or wall Use screws to fix the Network Camera onto the ceiling or wall.
Network Camera User’s Manual 3. Power over Ethernet (PoE) Using a PoE-enabled switch The Network Camera is PoE-compliant, allowing transmission of power and data via a single Ethernet cable. Follow the below illustration to connect the Network Camera to a PoE-enabled switch via Ethernet cable.
Network Camera User’s Manual Connect to the Network Camera Locate the IP address of Network IP Camera You can use your new Network IP Camera by its web user interface via web browser. Currently the viewing system requirement for Network IP camera is: ■ OS: Microsoft Windows XP/Vista/7 ■ Browser: IE7, 8, 9 (32Bit) ■ Cell phone: 3GPP player Note: For best viewing experience we recommend that you use Microsoft Windows Internet Explorer 7, 8, or 9.
Network Camera User’s Manual Note: The contents of the CD-ROM can also be downloaded from the Edimax website: http://www.edimax.com/en/index.php 2. After the installation is complete, double-click the ―EdiView_Finder‖ icon to execute the application. 3. Press ‗Discover‘ button to search for all IP Cameras on your local network (make sure all IP Cameras are powered on and connect to local network first).
Network Camera User’s Manual Initial Access to the Network Camera (1) For the initial access to the Network Camera in Windows, the web browser may prompt for permission to install a new plug-in for the Network Camera. This plug-in has been registered for certificate and is used to display the video in the browser. Users may click on to proceed. 1.
Network Camera User’s Manual 2.The video will be displayed.
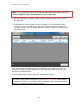
Network Camera User’s Manual Primary user’s capability Main Screen with Camera View The main page has three parts: 1. Configuration functions: The camera can be configured using these user interfaces. 2. Pan/Tilt & connection control buttons: These buttons provide the direction to control the pan and tile of camera. 3. Camera View: What the camera sees. Click the configuration in the bottom of left column to link to the configuration page.
Network Camera User’s Manual Camera view: On the top of image shows the connecting type of the Network Camera and the current date/time. View capabilities: 1. Click this button to capture and save still images. The captured images will be displayed in pop-up window. Right-click the image and choose Save Picture As to save it in JPEG format. 2. The button selection lets you open a digital zoom, and to control the window to enlarge a specified area in the camera view.
Network Camera User’s Manual Pan/Tilt & connection control buttons: (PT-111E / PT-112E only) 1. “Connection” User can choose Remote or Local mode for best connection quality. Proposal: Internet environment, switch Remote mode. 2. “Video Stream” User can choose stream1 or stream2. 3. “The direction buttons are” ―Left‖, ―Right‖, ―Up‖, ―Down‖, ―Cross Angles‖, and ―Home‖. Camera returns to center when click ―Home‖ button 4. “Pan Angle” User can choose the angles when the camera moves left and right each time.
Network Camera User’s Manual Client Setting 1. “Video output setting” Setting video output format. “Stream” Select use multiple stream video. “Picture” Select use serial video picture. 2. “Intranet Protocol Options” Setting camera in intranet mode of protocol. “UDP” Select use UDP protocol connect camera. “TCP” Select use TCP protocol connect camera. “HTTP” Select use HTTP protocol connect camera. 3. “Internet Protocol Options” Setting camera in internet mode of protocol.
Network Camera User’s Manual “Folder” Specify the storage destination for the recorded video files. “File name prefix” Enter the text that will be appended to the front of the video file name. “Add date and time suffix to file name” Select this option to append the date and time to the end of the file name. NOTE:Protocol Options which allows choices on connection protocol between client and server. There are three protocols choices to optimize your usage – UDP,TCP,HTTP.
Network Camera User’s Manual Definitions in Configuration Please note that only the Administrator can access the system configuration. System parameters Firmware version 1. “General Setting” (1) “Host name” The text displays the title on the top of the main page. (2) “LED indicator” Select turn on or turn off the led indicator.
Network Camera User’s Manual 2. “Time Setting” (1) “Time zone” Choose a time zone from the down arrow. (2) “Daylight saving” For summertime; It will be one hour ahead. (3) “Current Time” Network camera set the current time. (A) “Keep current date and time” Click on this to keep the current date and time of the Network Camera. An internal real-time clock maintains the date and time even when the power of the system is turned off.
Network Camera User’s Manual Security Security setting The administrator account name is ―root‖, which is permanent and can not be deleted. If you want to add more accounts in the Manage User column, please set a password for the ―root‖ account first. 1. “Change root password” Change the Administrator‘s password by typing in the new password identically in both text boxes. The typed entries will be displayed as asterisks for security purposes.
Network Camera User’s Manual setting. (2) “Delete a user” Select an existing user name. Click Finish to enable the setting. (3) “Update a existing user” Select an existing user name. Administrators can modify user‘s password and privilege. Click Finish to enable the setting. Access rights are sorted by user privilege (Administrator, Operator, and Viewer). Only administrators can access the Configuration page.
Network Camera User’s Manual Network Any changes made on this page will restart the system in order to validate the changes. Make sure every field is entered correctly before clicking on “finish” Network Setting “LAN” & “PPPoE” The default type is LAN. Select PPPoE if using ADSL 1. LAN The default status is Get IP address automatically. This could be tedious to perform software installation whenever the Network Camera starts.
Network Camera User’s Manual or you can use the UPnP function provided by the Network Camera (MS Windows XP provides UPnP function at My Network Place). (1) “Get IP address automatically” (2) “Use fixed IP address” - “IP address”: This is necessary for network identification. - “Subnet mask”: This is used to determine if the destination is in the same subnet. The default value is ―255.255.255.0‖. - “Default router”: This is a gateway used to forward frames to destinations in a different subnet.
Network Camera User’s Manual 6. “User name” The Username or E-mail field is necessary for logging in the DDNS server or notify the User of the new IP address. Note: when this field is input as ―User name‖, the following field must be input as ―Password‖. 7. “Password” Please input the password or key to get the DDNS service. 8. “finish” Click on this button to save modify settings for the DDNS service.
Network Camera User’s Manual Access list Access list setting 1. 2. “Add denied address” This rule allows the user to assign a range of IP addresses to the Deny List. “Delete denied address“ Delete IP address list from the Address List.
Network Camera User’s Manual Audio and Video setting General Setting 1. “Color mode” Select use color or monochrome video display. 2. “Video orientation” The orientation of video (1) “Flip” Vertically rotate the video.
Network Camera User’s Manual (2) “Mirror” Horizontally rotates the video. 3. “Environment” The orientation of video (1) “indoor” This option is usually selected when the Network Camera is placed in indoor environments. (2) “outdoor” This option is usually selected when the Network Camera is placed in outdoor environments. 4. “Power freq.” Select 50 Hz or 60Hz power line frequency. ※The fluorescent light will flash according to the power line frequency that depends on local utility.
Network Camera User’s Manual Video record Schedule mode (1) “Every day” Enable/Disable every day application. (2) “Week day” Enable/Disable week day application. (3)“Selected day” Enable/Disable selected day application. Schedule information (1) Enter the “Start time” and “Stop time” for day mode. Note that the time format is [hh:mm] and is expressed in 24-hour clock time. By default, the start and end time of day mode are set to 01:00:00 and 23:59:59.
Network Camera User’s Manual to overwrite the previously saved videos. Record parameters (1)Source: Select a stream for the recording source. (2)Recording interval: Select the recording time interval. (3)Prefix file name: You can setting the file name, and enable or disable to add the date and time on file name. Response mode There are two choices of server types available: NAS, Micro SD Card. Select the item to display the detailed configuration options.
Network Camera User’s Manual Stream Audio codec setting (1)“Audio codec type” There are two choices of audio codec types available: ”AMR”、 “AAC” and ”G.711”. (2) “Bit rate” -- “AMR” The bit rates are selectable at the following rates: 4750,5150,5900,6700,7400,7950,10200 and 12200. -- “AAC” The bit rates are selectable at the following rates: 8Kbps,16Kbps, 24Kbps and 32Kbps. -- “G.711” pcmu and pcma. Video codec setting (1) “Select Stream” The Network Camera supports “Stream 1”and “Stream 2”.
Network Camera User’s Manual (2) “Video codec” The Network Camera supports three kind of video compression mode: “H.264” or “MPEG4‖ or “MJPEG”. User can choose one of these compression modes based on requirement or application (3) “Video size” Click the down arrow to choose the quality of image (4) “Connection type” User can select this button to choose the better video & links quality. (Internet mode or Intranet mode) (5) “Frame rate” This limits the maximal refresh frame rate per second.
Network Camera User’s Manual Camera control (PT-111E / PT-112E only) Camera control The pan and tilt functions can be controlled with these buttons. The “Left” button controls the camera to the left; the “Right”, “Up”, and “Down” buttons control the camera accordingly. (1) “UL”, “UR”, “LL” and “LR” buttons control the camera to an oblique angle. And “Home” button controls the camera to the center. (2)“Pan angle” This sets the range of the horizontal movement of the camera.
Network Camera User’s Manual (3) “Tilt angle” This sets the range of the vertical movement of the camera. The larger value is setting, the larger movement of “Up” or “Down” is performing by the camera. (4) “Patrol cycle” It is the cycle of patrol function. (5) “Auto pan speed” This defines the speed of auto panning. The larger value is setting, the faster speed will run by the camera. (6) “Auto patrol speed” This defines the speed of auto patrol.
Network Camera User’s Manual Application Schedule mode (1) “Every day” Enable/Disable every day application. (2) “Week day” Enable/Disable week day application. (3) “Selected day” Enable/Disable selected day application. Schedule information (1) Enter the “Start time” and “Stop time” for day mode. Note that the time format is [hh:mm:ss] and is expressed in 24-hour clock time. By default, the start and end time of day mode are set to 01:00:00 and 23:59:59.
Network Camera User’s Manual week to perform the application. (3) ―Start day‖ and ―Start time‖ as the start timing the time. ―End day‖ and ―End time‖ as the end timing the time Trigger mode (1) “Video motion detection” Enable/Disable video motion application (2) “Periodically” This option allows the Network Camera to trigger periodically for every other defined minute. (3) “Video Tracking” is able to track dynamic objects within screen video.
Network Camera User’s Manual -- “User account” Enter the user name if necessary. -- “User password” Enter the password if necessary. (4)”NAS” --“NAS server address” Enter IP address of the NAS server. --“NAS shared directory” Enter the NAS shared directory path. --“Workgroup” Enter the NAS workgroup parameter. --“User account” Enter the login name of the NAS account --“User password” Enter the password of the NAS account.
Network Camera User’s Manual Storage Manage the storage device. 1 2 3 Storage Status Here show the storage device information. NAS server setting (1) ―NAS Host name‖ Choose and input the NAS Host name of this camera. (2) ―Workgroup‖ Input the name of Workgroup. You can see the NAS Host name you input in the same workgroup with your PC.
Network Camera User’s Manual camera. File operation Move the mouse over the file. Press the mouse right button that Right-click menu is displayed. You can delete files. Move the mouse over the directory. Press the mouse left button that the file structure expand. Press the mouse right button that Right-click menu is displayed. You can choose upload or delete files. NOTE:Allow the user to upload or delete files when the storage device is not writeprotected.
Network Camera User’s Manual Syslog The Network camera supports log the system messages on remote server. The protocol is compliant to RFC 3164. If you have external Linux server with sys log service, use ―-r‖ option to turn on the facility for receiving log from remote machine. Or you can use some software on Windows that is compliant to RFC 3164. An example is Kiwi Syslog Daemon. Visit http://www.kiwisyslog.com/kiwi-syslog-daemon-overview/.
Network Camera User’s Manual Status and Parameters User can find a lot of information about the system such as “Upnp port forwarding”, “Traversing NAT”, “Public IP”, and so on. User also can get the number of current viewer of the Network Camera here.
Network Camera User’s Manual Maintenance 1. “Reboot system” The “Reboot” button will reboot the Network Camera. It‘s useful while the Network Camera got problem. 2. “Restore system” Click on ―Restore‖ button on the configuration page to restore the factory default settings. Restore all settings to factory default except settings in ―Network type ‖ and ―Root Password‖. The system will restart and require the installer program to set up the network again. 3.
Network Camera User’s Manual 4. “Export/Import file” -- Export setting backup file: Click to export all parameters for the device and user-defined scripts. -- Upload setting backup file: Click Browse… to upload a setting backup file. Please note that the model and firmware version of the device should be the same as the setting backup file. If you have set up a fixed IP or other special settings for your device, it is not suggested to upload a settings backup file. 5.
Network Camera User’s Manual Appendix A. Troubleshooting & Frequently Asked Questions Q1: Status led does not light up. A1: First, make sure that「Configuration>System>Turn off the LED indicator」is disabled. If it is, check the item, and the led should light up. Second, if red led does not light up, please check that the power adapter in the package is plugged correctly. And last, if green led does not light up; please check that category 5 UTP cable is plugged correctly.
Network Camera User’s Manual 6.Type IP address:8080 at browser. Then you can see camera through Internet. 7.You can also type the ddns name at below label of camera on browser URL field. For example, you may type ah00001.ip-discovery.com:8080. (2) By Setting Port Forwarding Manually 1. Select a router. Set the port forwarding as following.
Network Camera User’s Manual PS. Port 80 is HTTP Port, port 53 is stream port, port 554 is RTSP port. and port 443 is HTTPS port. 2.Go to camera Network page. Disable UPnP port forwarding function.
Network Camera User’s Manual 3. Type IP address at browser. Then you can see camera through Internet. 4. You can also type the ddns name at below label of camera on browser URL field. For example, you may type ah00001.ip-discovery.com. Note: The firewall software at PC may block the transfer of network camera. Please remove or stop the kind software. Q4: How can I find the network camera in the local area network? A4: By using the IP Finder2 program or using UPnP to find it.
Network Camera User’s Manual default value. You can also press the button “Factory” in ―Maintenance‖ page to restore the default value. Q7: I cannot play the recorded video file. A7: Install the audio codec in the CD, and use the Windows Media Player 10 or later to play the *.ASF or *.AVI file recorded by the network camera. Q8: Infrared led does not light up? A8: Check 「 Configuration>Audio and Video>Infrared LED Control 」 is “Auto” or “Manual》Turn on”. Q9: The network camera cannot focus accurately.
Network Camera User’s Manual Camera from Internet Explorer A13: • May be due to the network cable. Try correcting your network cable and configuration. Test the network interface by connecting a local computer to the Network Camera via a crossover cable. • Make sure the Internet connection and setting is ok. • Make sure enter the IP address of Internet Explorer is correct. If Network Camera has a dynamic address, it may have changed since you last checked it.
Network Camera User’s Manual ip-discovery.com(Free DDNS service) 1. When you want to connect the network camera over Internet, you can use the service ―ip-discovery.com‖. The ―ip-discovery.com‖ is a free DDNS server for this camera. Make sure that the router must start UPnP and DHCP server functions. You can get the domain name which you wish very easily after registration.
Network Camera User’s Manual 2. The free server is acted as an internet IP finder. For more services from the free Server, just running IE browser and input the host name http://ip-discovery.com/ Select language.
Network Camera User’s Manual Current device In other cameras in the same registered e-mail will become a group.
Network Camera User’s Manual Federal Communication Commission Interference Statement This equipment has been tested and found to comply with the limits for a Class B digital device, pursuant to Part 15 of FCC Rules. These limits are designed to provide reasonable protection against harmful interference in a residential installation.
Network Camera User’s Manual EU Countries Intended for Use The ETSI version of this device is intended for home and office use in Austria, Belgium, Bulgaria, Cyprus, Czech, Denmark, Estonia, Finland, France, Germany, Greece, Hungary, Ireland, Italy, Latvia, Lithuania, Luxembourg, Malta, Netherlands, Poland, Portugal, Romania, Slovakia, Slovenia, Spain, Sweden, Turkey, and United Kingdom.
Network Camera User’s Manual EU Declaration of Conformity English: French: Czechian: Polish: Romanian: Russian: Magyar: Türkçe: Ukrainian: Slovakian: German: Spanish: Italian: Dutch: Portugese: Norwegian: Swedish: Danish: Finnish: This equipment is in compliance with the essential requirements and other relevant provisions of Directive 2004/108/EC. Cet équipement est conforme aux exigences essentielles et autres dispositions de la directive 2004/108/EC.
Network Camera User’s Manual --------------------------WEEE Directive & Product Disposal At the end of its serviceable life, this product should not be treated as household or general waste. It should be handed over to the applicable collection point for the recycling of electrical and electronic equipment, or returned to the supplier for disposal. Notice According to GNU General Public License Version 2 This product includes software that is subject to the GNU General Public License version 2.
Network Camera User’s Manual We protect your rights with two steps: (1) copyright the software, and (2) offer you this license which gives you legal permission to copy, distribute and/or modify the software. Also, for each author’s protection and ours, we want to make certain that everyone understands that there is no warranty for this free software.
Network Camera User’s Manual separate works. But when you distribute the same sections as part of a whole which is a work based on the Program, the distribution of the whole must be on the terms of this License, whose permissions for other licensees extend to the entire whole, and thus to each and every part regardless of who wrote it.
Network Camera User’s Manual 7. If, as a consequence of a court judgment or allegation of patent infringement or for any other reason (not limited to patent issues), conditions are imposed on you (whether by court order, agreement or otherwise) that contradict the conditions of this License, they do not excuse you from the conditions of this License.
Network Camera User’s Manual INCIDENTAL OR CONSEQUENTIAL DAMAGES ARISING OUT OF THE USE OR INABILITY TO USE THE PROGRAM (INCLUDING BUT NOT LIMITED TO LOSS OF DATA OR DATA BEING RENDERED INACCURATE OR LOSSES SUSTAINED BY YOU OR THIRD PARTIES OR A FAILURE OF THE PROGRAM TO OPERATE WITH ANY OTHER PROGRAMS), EVEN IF SUCH HOLDER OR OTHER PARTY HAS BEEN ADVISED OF THE POSSIBILITY OF SUCH DAMAGES.
Network Camera User’s Manual 59/59