802.11b/g/n Draft 2.0 Wireless LAN USB Adapter Quick Installation Guide Version: 1.
Multi-Languages QIG in CD ================================================== Český: Českého průvodce rychlou instalací naleznete na přiloženém CD s ovladači Deutsch: Finden Sie bitte das deutsche QIG beiliegend in der Treiber CD Español: Incluido en el CD el QIG en Español. Français: Veuillez trouver l’français QIG ci-joint dans le CD Italiano: Incluso nel CD il QIG in Italiano.
1. Product Introduction Thank you for purchasing nMAX Wireless LAN USB Adapter. This USB adapter is designed to comply with IEEE 802.11b/g/n draft 2.0 Wireless LAN standard and easy to carry with the Mini size. It is suitable for any Laptop or Desktop computers. This adapter supports higher data throughput than the IEEE 802.11b/g/n draft 2.0 standard (up to 300Mbps).
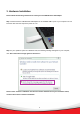
3. Hardware Installation Please follow the following instructions to install your new USB Wireless LAN Adapter: Step 1. Please insert the USB Wireless LAN Adapter into an available USB 2.0 port of your computer. You can insert the card when the computer is power off or on. Step 2. If your operation system is in Windows Vista, the following message will appear on your computer, click ‘Don’t show this message again for this device’.’.
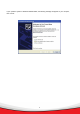
If your operation system in Windows 2000/XP/XP64, the following message will appear on your computer, click ‘Cancel’.
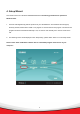
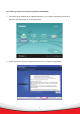
4. Setup Wizard This wizard can be run in Windows 2000/XP/XP64/Vista. The following procedures are operated in Windows Vista. 1. Insert the CD shipped along with the product into your CD-ROM drive. The Windows Vista will popup AutoPlay window, Please select “Install or run program” to execute Autorun.exe program. The Autorun.exe program should be executed automatically. If not, run Autorun.exe manually from “Autorun” folder in the CD. 2. The following screen will be displayed.
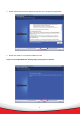
3. Please read the end user license agreement and click ‘Yes’ to accept license agreement. 4. Please click ‘install’ to run the driver installation process. If you see ‘Found New Hardware’ message again, please ignore it and wait. .
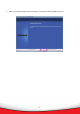
5. When you see this message, please click ‘Finish’ to complete the driver installation process.
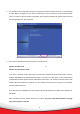
The following procedures are operated in Windows 2000/XP/XP64. 1. Insert device driver CDROM into the CD/DVD ROM drive of your computer, the following screen will be displayed. Click “Setup Utility” to run the setup wizard. 2. Please read the end user license agreement and click ‘Yes’ to accept license agreement.
3. You can choose the configuration tool used to configure the wireless network card here. It’s recommended to select ‘Edimax Configuration Tool’, which provides fully access to all function of this wireless network card. If you prefer to use the wireless configuration tool provided by Windows XP, please select ‘Microsoft Zero Configuration Tool’, then click ‘Next’. 4.
5. Please click ‘install’ to run the driver installation process.
6. Please wait while the install procedure is running. When you see this message, please click ‘Finish’ to complete the driver installation process. 7. A new icon will appear at lower-right corner of your computer desktop, you can put the mouse cursor on the icon, and the status of wireless card will be displayed as a popup balloon.
8. When you want to configure your wireless connection, please right click on this icon, and a popup menu will appear. You can click ‘Launch Config Utilities’ to start configuration program. If you want to close configuration utility, please click ‘Exit’.
5. Connect to Wireless Access Point Using Configuration Utility to Connect to Wireless Access Point 1. After installation is complete, wireless configuration utility will be shown as an icon at the lower-right corner of your windows desktop. Please click the icon by right mouse key, and select ‘Launch Config Utilities’ 2. Configuration utility will scan for wireless access points automatically, and all found access points will be displayed.
you want to connect is hidden, then click ‘OK’. The SSID you input here must be identical to the SSID setting of the wireless access point you want to connect. 4. If the wireless access point uses encryption, you have to input WEP passphrase or WPA preshared key. Please ask the owner of the wireless access point you want to connect, and input the correct passphrase / preshared key here, then click ‘OK’. If the value you inputted here is wrong, you will not be able to connect to wireless access point.
5. If the wireless access point is successfully connected, you’ll see a ‘Connected’ message displayed at the lower-left corner of wireless configuration utility window. Click ‘OK’ to exit. For advanced settings and other features of this USB wireless network card, please refer to user manual enclosed in supplied CD-ROM.