AI-1001W V2/V3 User Manual 09-2018 / v1.
Content I Installation Reminder / Safety Guide ..................................................... 1 II Cleaning the Unit .................................................................................. 2 II-1 II-2 Air Pump Cleaner........................................................................................... 2 Dust-off Canned Compressed Air .................................................................. 3 III Product Information .......................................................
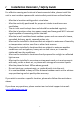
I Installation Reminder / Safety Guide For effective sensing and retrieval of environmental data, please install the unit in semi-outdoor spaces with certain safety restrictions outlined below: Must be in locations with good air circulation. Must be vertically positioned for proper air intake to achieve cross ventilation. The air inlet must be kept clear and should be rechecked regularly.
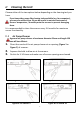
II Cleaning the Unit Choose either of the two options below depending on the cleaning tool you have. If you have other pump-like cleaning tools available (e.g. for computers), you may also utilize them. Please be careful to not exert extremes of force or temperature / humidity onto the sensors to prevent damaging them. It is recommended to clean the sensors every 3-6 months for maximum sensor functionality.
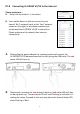
II-2 Dust-off Canned Compressed Air A general dust-off compressed air will be sufficient. 1. Direct the nozzle of the compressed air at an opening (Figure 5 or Figure 6) of a sensor. 2. 3. Keep the nozzle at 10cm from the sensor opening. 4. Make sure all sensor openings are cleaned. Use short bursts (1-2 seconds) of air spray a few times to clean the sensor. Figure 5a. AI-1001W V2 Figure 6a. AI-1001W V2 Figure 3b. AI-1001W V3 Figure 4b.
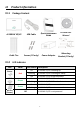
III Product Information III-1 Package Content AI-1001W V2/V3 USB Cable Quick Installation Guide CD with User Manual Cable Ties Screws (V2 only) Power Adapter Mounting Bracket (V3 only) III-2 LED Indicator LED Status Wi-Fi Internet All LED (Power) Color LED Status Description On Red Flashing Green AI-1001W V2/V3 setup completed On AI-1001W V2/V3 Wi-Fi connected On Flashing Off AI-1001W V2/V3 is waiting for setup Off Flashing Green AI-1001W V2/V3 is booting up AI-1001W V2/V3 Wi-Fi ac
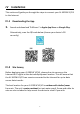
IV Installation This section will guide you through the steps to connect your AI-1001W V2/V3 to the Internet. IV-1 Downloading the App 1. Search and download "EdiGreen" in Apple App Store or Google Play. Alternatively, scan the QR code below (choose your device's OS correctly). iOS Android IV-2 Site Survey Before deploying your AI-1001W V2/V3, please do a site survey on the Internet Wi-Fi signal at the desired deployment location.
IV-2-1 Android OS 1. Please bring your android smart device to the desired deployment location. 2. Go to the Wi-Fi page on your android device (e.g. Settings Wi-Fi). 3. Please find your desired Wi-Fi connection and check the signal strength icon. If the icon displays 2 bars or more signal strength, please go to the next section. If the icon displays 1 bar or no signal strength, please consider changing the desired deployment location and go through the steps outlined in this section again.
IV-2-2 iOS 1. Please bring your iOS smart device to the desired deployment location. 2. Go to the Wi-Fi page on your iOS device (e.g. Settings Wi-Fi). 3. Please find your desired Wi-Fi connection and check the signal strength icon. If the icon displays 2 bars or more signal strength, please go to the next section. If the icon displays 1 bar or no signal strength, please consider changing the desired deployment location and go through the steps outlined in this section again.
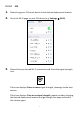
IV-3 Connecting AI-1001W V2/V3 to the Internet Please make sure… A. "Access to my location" is turned on. B. Your mobile device is able to connect to your home's Wi-Fi network (such as the "test" network shown on the right) or whichever network you anticipated the AI-1001W V2/V3 to connect to. Please make sure this network has internet connectivity. 1. Please plug the power adapter to a power socket and connect the AI-1001W V2/V3 (demonstrated on the left) using the USB cable.
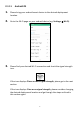
3. For iOS users, go to your device’s Wi-Fi settings and connect to your AI-1001W V2/V3’s SSID (PM2.5_Setup_**). The last two characters are unique to your device. Open the EdiGreen app and continue at Step 6. 4. For Android users, open the EdiGreen app and a privacy statement will be displayed once (This privacy statement appears once only when EdiGreen is opened for the first time), tap “YES” to continue, then tap the icon on the top right corner of the screen.
5. Select Add New Device and select your AI-1001W V2/V3 (PM2.5_Setup_**), from the Available wireless device list. The last two characters are unique to your device. 6. The app will prompt you to enter a new device name and password for better security. Tap the > icon to continue. After setup, you can use this new name and password to login, including from a second device.
7. Select your Wi-Fi network from the list and, where applicable, enter the Wi-Fi password. Tap the > icon to complete setup. If you cannot find the desired Wi-Fi network SSID, tap to refresh network list. If you are still unable to find the desired network due to complex Wi-Fi network environment, try manual connect by tapping "Connect to a hidden network", select the security type and, where applicable, enter the password. 8. Setup is complete.
You can also connect to your AI-1001W V2/V3 on a second Wi-Fi device. Just download the app and add it in the same way. If you’re connected to a different Wi-Fi network, then select “Add one manually” and input the MAC address printed on the AI-1001W V2/V3 label.
V V-1 Using EdiGreen App Options Tap the icon on the top right corner of the main screens to enter the App Option page. V-1-1 Location Filter Tap “Location Filter” to select your filter. Check or uncheck a station to display or not display the AI-1001W V2/V3 in that area.
An example is shown where “AirBox Station” is unchecked: V-1-2 Push Notification When air quality changes, the app will send push notifications according to the options. Tap “Push Notification” for notification options.
Tap the icon to enable / disable push notification. Check the AI-1001W V2/V3 you wish to get notifications from. The AI-1001W V2/V3 available on the list is acquired from “Favorite List”. V-1-3 Add New Device You can add more Added AI-1001W V2/V3 to your EdiGreen app. Tap “Add New Device” to begin. V-1-3-1 Add Brand New AI-1001W V2/V3 Follow the steps below to add brand new AI-1001W V2/V3 to your EdiGreen App. 1.
2. For Android users, open the EdiGreen app and tap the top right corner of the screen. 3. Select Add New Device and select your AI-1001W V2/V3 (PM2.5_Setup_**), from the Available wireless device list. The last two characters are unique to your device.
4. The app will prompt you to enter a new device name and password for better security. Tap the > icon to continue. After setup, you can use this new name and password to login, including from a second device. 5. Select your Wi-Fi network from the list and, where applicable, enter the Wi-Fi password. Tap the > icon to complete setup. If you cannot find the desired Wi-Fi network SSID, tap to refresh network list.
If you are still unable to find the desired network due to complex Wi-Fi network environment, try manual connect by tapping "Connect to a hidden network", select the security type and, where applicable, enter the password. 6. Setup is complete. Your AI-1001W V2/V3 will be listed in the All and Favorite Lists and Maps. You can tap on any AI-1001W V2/V3 for more detailed data.
2. Enter the MAC address, AI-1001W V2/V3 device name and password and tap the icon to complete adding the AI-1001W V2/V3 to your EdiGreen app.
1. Tap the desired AI-1001W V2/V3. 2. Enter the password and tap the icon to complete adding the AI-1001W V2/V3 to your EdiGreen app.
V-1-4 Information The information page includes “Privacy policy”, “Statement” and “APP Version”. APP Version is displayed on the page directly. Tap “Privacy policy” to display the text. Tap “Statement” to display the text.
V-2 All List A list exemplified below is shown when “All List” is selected: All the AI-1001W V2/V3 are listed here.
Refer to the picture above (Left side of the display): Nearest AI-1001W V2/V3 If your mobile device is able to retrieve your current location, an AI-1001W V2/V3 closest to you will be displayed on top of the list. The icon underneath the name of the AI-1001W V2/V3 indicates that it is the nearest AI-1001W V2/V3 to your location. Air Quality The facial expression displayed at the front of the list (example below) is an indication of how good the air quality is near the AI-1001W V2/V3. PM2.
V-2-1 Search AI-1001W V2/V3 Scroll down the list to reveal a search bar shown below: Use the search bar to search for an AI-1001W V2/V3.
The information page of Added AI-1001W V2/V3 and Other AI-1001W V2/V3 are respectively displayed below: The icons on the top right corner are slightly different. For Added AI-1001W V2/V3, please refer to V-2-3 Added AI-1001W V2/V3 below. For Other AI-1001W V2/V3, please refer to V-2-4 Other AI-1001W V2/V3 below. Certain air quality information is displayed on this page such as temperature, PM2.5, etc.
Options Tap the icon for added AI-1001W V2/V3 options: Tap “Change name” to change its on-map name. Enter the new name and tap “OK” to complete, or “CANCEL” to forfeit change. Tap “Change location” to change its location. Tap and drag the AI-1001W V2/V3 to the desired location. This option is not recommended as shifting the location of the AI-1001W V2/V3 manually may cause interruption to data collection (location error).
Tap “Remove from my favorites” to remove the AI-1001W V2/V3 from the Favorite List. Firmware Version is displayed here. Real-Time PM2.5 Display Tap the icon to display Real-Time PM2.5 display as exemplified below: Pin AI-1001W V2/V3 on Map Tap the Tap icon to Pin AI-1001W V2/V3 on Map as exemplified below: will bring you to your current location on the map.
V-2-4 Other AI-1001W V2/V3 Other AI-1001W V2/V3 are also displayed in “All List” to show all AI-1001W V2/V3 and their detected values. You can choose some AI-1001W V2/V3 to be your favorite AI-1001W V2/V3, and these will be displayed in the Favorite List tab (see V-4 Favorite List on page 31) and Favorite Map (see V-5 Favorite Map on page 33). V-2-4-1 Favorite AI-1001W V2/V3 To make an AI-1001W V2/V3 your favorite, follow the steps below: 1. Tap an AI-1001W V2/V3 to enter the page below: 2.
Favorite AI-1001W V2/V3s are listed in “Favorite List” (and “Favorite Map”) for you to quickly view them. You can change their displayed names on your EdiGreen app, but the actual on-map names are unchanged. Pin AI-1001W V2/V3 on Map Tap the Tap icon to Pin AI-1001W V2/V3 on Map as exemplified below: will bring you to your current location on the map.
V-3 All Map The “All Map” tab displays all the AI-1001W V2/V3 near your area. Tap will bring you back to your current location on the map. Tap will display the air quality level of PM2.5 (in a chart) and information of other AI-1001W V2/V3 on the map: Circles displayed on the map represent the AI-1001W V2/V3 stations. The number inside the circles is the PM2.5 air quality level, as shown: Diamonds displayed on the map represent the EPA stations. The number inside the diamonds is the PM2.
V-4 Favorite List Favorite List displays all the Added AI-1001W V2/V3 and Favorite AI-1001W V2/V3 in a list as exemplified below: For quick information of each item, please refer to V-2 All List on page 22. For information on Added AI-1001W V2/V3, tap any of the Added AI-1001W V2/V3 and refer to V-2-3 Added AI-1001W V2/V3 on page 25.
Tap the - icon for favorite AI-1001W V2/V3 options: Tap “Change name” to change its on-app display name. Enter the new name and tap “OK” to complete, or “CANCEL” to forfeit change. For a Favorite AI-1001W V2/V3, you can only change the display name ON your EdiGreen app, the display name of this AI-1001W V2/V3 on other EdiGreen map will still keep its original on-map name. If you wish to change its on-map name, please add this AI-1001W V2/V3 to your EdiGreen app.
V-5 Favorite Map The “Favorite Map” tab displays the favorite AI-1001W V2/V3 near your area. Tap will bring you back to your current location on the map. Tap will display the air quality level of PM2.5 (in a chart) and information of other AI-1001W V2/V3 on the map: Circles displayed on the map represent the AI-1001W V2/V3 stations. The number inside the circles is the PM2.5 air quality level, as shown: Diamonds displayed on the map represent the EPA stations. The number inside the diamonds is the PM2.
Reset to Factory Default Settings If you experience problems with the AI-1001W V2/V3, try rebooting the AI-1001W V2/V3 by reconnecting the power. If rebooting does not work, try resetting it back to its factory default settings. This resets all settings back to the default settings. 1. Press and hold the reset button on the back panel for at least 10 seconds (indicated in the picture below). Release the button when the Status LED is turns on in Red and wait a couple of minutes for the unit to restart. 2.
VI Replace PM 2.5 Sensor 1. Disconnect the AI-1001WV3 from power and remove it from the wall-mound stand. Then unplug the power adaptor before cleaning moderately. 2. Remove the bottom screws. 3. Carefully pull out the PM2.5 sensor. 4. After the ribbon cable is removed, take off the existing sensor and replace with the new one. Then install the new sensor in accordance with installation guideline stated above.
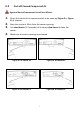
From this viewing angle, the cable color orientation is Purple, Orange, White, Blue, Green, Yellow, Brown, Red (Insert the ribbon cable from its tip) VII Wall-Mount Stand Installation The installation of wall-mount stand for AI-1001W V3 is shown as figure below: 36
VIII FAQs 1. A: How do I add my AI-1001W V2/V3 to another mobile device? After setup, you can add your AI-1001W V2/V3 to the EdiGreen app on another mobile device, from any network. Tap the main menu icon on the top right and select Add New Device. If your mobile device is on the same Wi-Fi as your AI-1001W V2/V3, your AI-1001W V2/V3 will display in the Available Device List. Select it and enter the username and password.
38
COPYRIGHT Copyright Edimax Technology Co., Ltd. all rights reserved. No part of this publication may be reproduced, transmitted, transcribed, stored in a retrieval system, or translated into any language or computer language, in any form or by any means, electronic, mechanical, magnetic, optical, chemical, manual or otherwise, without the prior written permission from Edimax Technology Co., Ltd. Edimax Technology Co., Ltd.
Federal Communication Commission Interference Statement 15.21 You are cautioned that changes or modifications not expressly approved by the part responsible for compliance could void the user’s authority to operate the equipment. 15.105(b) This equipment has been tested and found to comply with the limits for a Class B digital device, pursuant to part 15 of the FCC rules. These limits are designed to provide reasonable protection against harmful interference in a residential installation.
EU Declaration of Conformity English: This equipment is in compliance with the essential requirements and other relevant provisions of Directive 2014/53/EU, 2014/35/EU. Français: Cet équipement est conforme aux exigences essentielles et autres dispositions de la directive 2014/53/EU, 2014/35/EU. Čeština: Toto zařízení je v souladu se základními požadavky a ostatními příslušnými ustanoveními směrnic 2014/53/EU, 2014/35/EU.
Declaration of Conformity We, Edimax Technology Co., Ltd., declare under our sole responsibility, that the equipment described below complies with the requirements of the European Radio Equipment directives. Equipment: Air Box Model No.: AI-1001W V2/V3 The following European standards for essential requirements have been followed: Directives 2014/53/EU Spectrum : EN 300 328 V2.1.1 (2016-11) EMC : EN 301 489-1 V2.2.0 (2017-03) EN 301 489-17 V3.2.