AI-1001W V2, V3, V4 User Manual 12-2019 / v1.
Contents I. Safety Information ...............................................1 II. Product Information .............................................2 II-1. Package Content .............................................................................. 2 II-2. LED Indicator ................................................................................... 3 II-3. Hardware Introduction .................................................................... 4 II-4. System Requirement .....................
V-4. Information ................................................................................ 37 V-5. Logout ........................................................................................ 39 VI. All List........................................................................................... 40 VII. All Map ...................................................................................... 45 VIII. Favorite List ...........................................................................
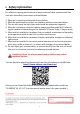
I. Safety Information For effective sensing and retrieval of environmental data, please install the unit with the safety restrictions outlined below: 1. 2. 3. 4. 5. 6. 7. 8. Must be in locations with good air circulation. Must be positioned for proper air intake to achieve cross ventilation. The air inlet must be kept clear and should be rechecked regularly. Must be in locations close to a power supply and has good Wi-Fi internet signal capable of connecting to the Internet 24 hours a day, 7 days a week.
II. Product Information The AI-1001W V2, V3 and V4 (4-in-1) Multi-Sensor Outdoor Air Quality Detector is your best air quality solution – with the EdiGreen Cloud Service, the AI-1001W V2, V3 and V4 provides a comprehensive air quality monitoring solution to help the improvement of outdoor air quality. II-1.
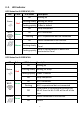
II-2.
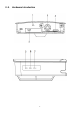
II-3.
II-4. No. Description 1 Reset Button 2 Micro USB Port (Power 5V/1A) 3 Fan 4 Sensor 5 LED Internet 6 LED Wi-Fi 7 LED Status System Requirement - Internet with Wi-Fi Connection 2.4G (802.
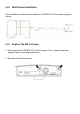
III.Hardware Installation This section will guide you through the steps to connect your air quality detector to the Internet. III-1. AirBox Installation 1. Please plug the power adapter to a power socket and connect the AI-1001W V2, V3, V4 using the USB cable. (The red status LED will turn on) 2. Please wait a moment for the device to boot up (red status LED will stay on during boot up). The red status LED and green internet LED will start flashing to indicate that factory default is completed.
III-2. Wall Bracket Installation The installation of wall-mount stand for AI-1001W V3, V4 is shown as figure below: III-3. Replace The PM 2.5 Sensor 1. Disconnect the AI-1001W V3, V4 from power. Then unplug the power adaptor before cleaning moderately. 2. Remove the bottom screws.
3. Carefully pull out the PM2.5 sensor. 4. After the ribbon cable is removed, take off the existing sensor and replace with the new one. Then install the new sensor in accordance with installation guideline stated above. Please remember the color orientation of the cable and insert the cable back according to its color orientation. During the removal of the sensor, please pull out the latch gently to prevent it from breaking off.
IV. EdiGreen App Installation Search and download "EdiGreen" in the Apple App Store or Google Play Store. Launch the "EdiGreen" in your smart mobile device. For the Internet connection procedure, please follow the instructions below, according to your mobile device. Please make sure "Access to my location" is turned on. Android OS iOS ˙ Your mobile device is able to connect to your home's Wi-Fi network or whichever network you anticipated the detector to connect to.
IV-1. EdiGreen Account First time users, please follow the steps below to register the EdiGreen account, 1. Tap the icon in the top right corner of the homepage. 2. Tap “Add New Device”.
3. Click on “Sign Up” below to register an account. 4. Enter a valid email and password. Validate your password again and tap “Next”. Please make sure the email address is valid.
5. Please check your email for a message with your code. (Your code is 6 numbers long). 6. Enter the 6 digits code and tap “OK“.
7. You will see “Setup Successful”, please tap “Ok”. 8. Enter your email and password. Login your account.
NOTE: If you need help resetting your password, please follow the steps below, 1. Visit “Forgot password”. 2. Enter the email address and select “Forgot password”.
3. Check your email for a password reset email. 4. Enter your verification code and click the “OK” button.
5. Enter a new password. And re-enter the new password in the Confirm password field. Click the “Next” button. IV-2. Adding Devices (Wi-Fi, Android) 1. Turn on Wi-Fi in your Android phone. 2. Open the EdiGreen App.
3. A pop-up Declaration and Statement will be displayed on screen, please press “AGREE” to continue. (This Declaration appears only once when EdiGreen is opened for the first time). 4. Tap the icon in the top right corner of the homepage.
5. Tap “Add New Device”. 6. Select a model.
7. The app will start searching for available Wi-Fi network for the detector. Tap the desired Wi-Fi network. 8. Choose either “ACCURATE LOCATION” or “INACCURATE LOCATION”.
9. Enter a device name, password and validate the password again. NOTE: AI-1001W V4 does not have“device name/ password”page. 10. Select a Wi-Fi network.
11. Enter the Wi-Fi password and press “OK” to continue. NOTE: Please find the unique SSID of your detector on the product label. The final two digits ** of the SSID "PM2.5_Setup_**" is the final two digits of the detector's “Setup WiFi SSID”. Setup Complete! Now you are able to monitor the air quality near your unit, anywhere with your mobile device. NOTE: Please wait while setup is exiting. This may take a few minutes.
IV-3. AI-1001W V4 (NB-IoT, Android) Please follow the steps below to add your AI-1001W V4 to the EdiGreen. 1. Select AI-1001W_V4. 2. Select the NB-IoT mode.
3. Select your device from the device list. 4. Choose “ACCURATE LOCATION” or “INACCURATE LOCATION”.
NOTE: Please wait while setup is exiting. This may take a few minutes. Setup Complete! You are successfully connect to your AI-1001W V4 to EdiGreen via NB-IoT. IV-4. Adding Devices via Wi-Fi (iOS) 1. Open the EdiGreen App.
2. A pop-up Statement and Declaration will be displayed on screen, please press “OK” and “Agree” to continue. (This Declaration appears once only when EdiGreen is opened for the first time) 3. Tap the icon in the top right corner of the homepage.
4. Tap “Add New Device”. 5. Select a model.
6. Pop-up Wi-Fi Connection tutorial will be displayed on screen. 7. Go to Wi-Fi settings and choose the SSID “PM2.5_Setup_XX” of your detector. Please find the unique SSID of your detector on the product label. The final 2 digits ** of the SSID "PM2.5_Setup_**" is the final two digits of the detector's “Setup WiFi SSID”.
8. Open the EdiGreen again. Choose either “ACCURATE LOCATION” or “INACCURATE LOCATION”. 9. Enter a device name, password and validate the password again. NOTE: AI-1001W V4 does not have“device name/ password”page.
10. The app will start searching for available Wi-Fi network for the detector. Tap the desired Wi-Fi network and enter the Wi-Fi password and press “OK” to continue. Setup Complete! Now you are able to monitor the air quality near your unit with your mobile device anywhere. NOTE: Please wait while setup is exiting. This may take a few minutes.
IV-5. AI-1001W V4 (NB-IoT, iOS) Please follow the steps below to add your AI-1001W V4 to the EdiGreen. 1. Select AI-1001W_V4. 2. Select NB-IoT mode.
3. Pop-up Wi-Fi Connection tutorial will be displayed on screen. 4. Go to Wi-Fi settings and choose the SSID “PM2.5_Setup_XX” of your detector. Please find the unique SSID of your detector on the product label. The final 2 digits ** of the SSID "PM2.5_Setup_**" is the final two digits of the detector's “Setup WiFi SSID”.
5. Choose either “ACCURATE LOCATION” or “INACCURATE LOCATION”. 6. Open the EdiGreen again to start the installation. NOTE: Please wait while setup is exiting. This may take a few minutes.
Setup complete! You are successfully connect to your AI-1001W V4 to EdiGreen via NB-IoT.
V. EdiGreen Settings Tap the icon on the top right corner of the main screens to enter the setting page. V-1. Location Filter Create your own filter that AirBox can only be viewed at a certain station.
An example is shown below where “AirBox Station” is checked: V-2. Air Quality Index An air quality index (AQI) is used by government agencies to communicate to the public how polluted the air currently is or how polluted it is forecast to become. Different countries have their own air quality indices, corresponding to different national air quality standards. For example, you can choose either “PM2.5 Daily Air Quality Index of UK” or “PM2.5 Index of Taiwan AQI” in EdiGreen.
PM2.5 Daily Air Quality Index of UK: PM2.
V-3. Add New Device Please refer to section IV-2 Adding Devices (Android OS) and IV-4 Adding Devices (iOS) for more details. V-4. Information The information page includes “Air Quality Data Collection and Usage Declaration”, “Statement” and “APP Version”.
Tap the “Air Quality Data Collection and Usage Declaration” to display the dialog box. Tap the “Statement” to display the dialog box.
V-5. Logout Tap “Logout” to sign off your account.
VI. All List You will get a list of all the added AiBox from you and others that are respectively displayed.
Nearest AirBox: If your mobile device is able to retrieve your current location, an AirBox closest to you will be displayed on top of the list. The icon underneath the name of the AirBox indicates that it is the nearest AirBox to your location. Air Quality: The facial expression displayed at the front of the list (example below) is an indication of how good the air quality is near the AirBox. PM2.5: The value displayed below the name of the AirBox indicates PM2.5 information.
Time Distance and Direction Humidity Temperature Time: Displays the time the data was last retrieved. Distance and Direction: The distance and direction of the AirBox compared to your current location. Temperature: Temperature is displayed in degrees Celsius. Humidity: Relative humidity is displayed as a percentage. Search Location: Enter the keywords of a place. You will see search results below the search bar.
Tap an AirBox to see more information: : Show the current location of the AirBox on Google map. : Click the icon to find the current location of the AirBox.
: This page shows the Airbox information including Real-Time PM2.5, temperature and humidity.
VII. All Map The “All Map” tab displays all the AirBox that in your area. Tap will bring you back to your current location on the map. Tap will display the air quality level of PM2.
PM2.5 Index of Taiwan AQI PM2.5 Daily Air Quality Index of UK Displayed on the map represent the AirBox stations. Displayed on the map represent the EPA stations. Displayed on the map represent the LASS stations. Displayed on the map represent the data is different from the surrounding environment.
Displayed on the map represent the machine needs to maintenance. Shows the current wind direction on the map. VIII.
To add devices to Favorite List from your All List: 1. Go to All List. 2. Select a desired AirBox. Tap the right corner the favorite list.
To remove the devices from the Favorite List: 1. Tap the right corner icon to remove the devices. 2. Click the “YES” button to continue. You can change name, change location, remove the devices or check the firmware version of your AirBox in Favorite List too.
Change Name: Tap “Change name” to change its on-map name. Enter the new name and tap “OK” to complete, or “CANCEL” to forfeit change. Change Location: Tap “Change location” to change its location. Tap and drag the AirBox to the desired location. (Must within the circle 100M) NOTE: This option is not recommended as shifting the location of the AirBox manually may cause interruption to data collection (location error).
Delete: Tap “Delete” or “Remove device” to remove the device. Android iOS NOTE: - Please be aware you cannot change the AirBox’s name which are not added from you. - For AI-1001W V4, remove the device will restore a device to its factory default settings. Firmware Version: Display the current firmware version of your AirBox.
IX.Favorite Map Favorite Airbox are shown in the “Favorite Map”. Tap will bring you back to your current location on the map. Tap will display the air quality level of PM2.5 and information of other Airboxon the map.
X. Reset to Factory Default Settings If you experience problems with the device, try rebooting it by reconnecting the power. If rebooting does not work, try resetting it back to its factory default settings. This resets all settings back to the default settings. To perform a factory reset, please follow steps below: 1. Press and hold the reset button on the back panel for at least 10 seconds.
XI.Cleaning the Unit Choose either one of the two options below depending on the cleaning tool you have. It is recommended to clean the sensors every 3-6 months for optimal sensor functionality. If you have other pump-like cleaning tools available (e.g. for computers), you may also utilize them. Please be careful to not exert extremes of force or temperature / humidity onto the sensors to prevent damaging them. XI-1. Air Pump Cleaner 1. Direct the nozzle of the air pump cleaner at an opening of a sensor.
XI-2. Dust-off Canned Compressed Air 1. 2. 3. 4. Direct the nozzle of the compressed air at an opening of a sensor. Keep the nozzle at 10cm from the sensor opening. Use short bursts (1-2 seconds) of air spray a few times to clean the sensor. Make sure all sensor openings are cleaned. AI-1001W V2 AI-1001W V2 AI-1001W V3, V4 AI-1001W V3, V4 A general dust-off compressed air will be sufficient.
COPYRIGHT Copyright Edimax Technology Co., Ltd. all rights reserved. No part of this publication may be reproduced, transmitted, transcribed, stored in a retrieval system, or translated into any language or computer language, in any form or by any means, electronic, mechanical, magnetic, optical, chemical, manual or otherwise, without the prior written permission from Edimax Technology Co., Ltd. Edimax Technology Co., Ltd.
Federal Communication Commission Interference Statement 15.21 You are cautioned that changes or modifications not expressly approved by the part responsible for compliance could void the user’s authority to operate the equipment. 15.105(b) This equipment has been tested and found to comply with the limits for a Class B digital device, pursuant to part 15 of the FCC rules. These limits are designed to provide reasonable protection against harmful interference in a residential installation.
EU Declaration of Conformity English: This equipment is in compliance with the essential requirements and other relevant provisions of Directive 2014/53/EU, 2014/35/EU. Français: Cet équipement est conforme aux exigences essentielles et autres dispositions de la directive 2014/53/EU, 2014/35/EU. Čeština: Toto zařízení je v souladu se základními požadavky a ostatními příslušnými ustanoveními směrnic 2014/53/EU, 2014/35/EU.
Declaration of Conformity We, Edimax Technology Co., Ltd., declare under our sole responsibility, that the equipment described below complies with the requirements of the European Radio Equipment directives. Equipment: Air Box Model No.: AI-1001W V2/V3 The following European standards for essential requirements have been followed: Directives 2014/53/EU Spectrum : EN 300 328 V2.1.1 (2016-11) EMC : EN 301 489-1 V2.2.0 (2017-03) EN 301 489-17 V3.2.