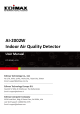
AI-2002W Indoor Air Quality Detector User Manual 07-2018 / v2.
Content I Safety Information ................................................................................ 4 II Product Information .............................................................................. 5 II-1 II-2 Package Content............................................................................................ 5 LED Indicator ................................................................................................. 5 III Installation..........................................
VII-2 Dust-off Canned Compressed Air ................................................................
I Safety Information For effective sensing and retrieval of environmental data, please install the unit with the safety restrictions outlined below: - Must be in locations with good air circulation. Must be positioned for proper air intake to achieve cross ventilation. The air inlet must be kept clear and should be rechecked regularly. Must be in locations close to a power supply and has good Wi-Fi internet signal capable of connecting to the Internet 24 hours a day, 7 days a week.
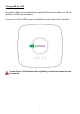
II Product Information II-1 Package Content Air Quality Detector Device Stand Power Adapter (12V/1A) II-2 Quick Installation Guide CD with User Manual LED Indicator LED Color Red System Status PM2.
Turning LED On / Off Air quality LEDs and consolidated air quality LED can be turned on or off. By default, the LEDs are turned on. To turn on / off the LEDs, press and hold the center button for 5 seconds. System Status LED will always be on (flashing or stayed on) when the unit is powered.
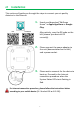
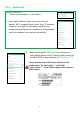
III Installation This section will guide you through the steps to connect your air quality detector to the Internet. 1. iOS Android Search and download "EdiGreen Home" in Apple App Store or Google Play. Alternatively, scan the QR code on the left (choose your device's OS correctly). 2. Please connect the power adapter to the unit (demonstrated on the left) and a power socket. 3. Please wait a moment for the device to boot up.
III-1 Android OS Please make sure… A. "Access to my location" is turned on. B. Your mobile device is able to connect to your home's Wi-Fi network (such as the "test_5" network shown on the right) or whichever network you anticipated the detector to connect to. Please make sure this network has internet connectivity. 1. Before starting the EdiGreen Home App, go to your mobile device’s Wi-Fi settings and connect to the Wi-Fi SSID of your detector (AirBox.Setup.**).
2. 3. Open the EdiGreen Home App. 4. The app will start searching for available Wi-Fi network for the detector. Tap "Setup". If you cannot find the desired Wi-Fi network SSID, tap to refresh network list. Alternatively, tap "Connect to a hidden network" to manually connect to the desired Wi-Fi network. 5. Tap the desired Wi-Fi network. 6. Enter the Wi-Fi network password and tap continue.
Please wait a moment for the setup process. 7. Enter a device name, password, and confirm the password. 8. Tap "Yes" to continue. Setup Complete! Please wait a moment for the app to take you back to its home screen.
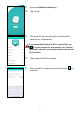
Congratulations! Your air quality detector is up and running! The home screen is as shown on the left. The system status LED should be turned on in blue. Now you are able to monitor the air quality near your unit with your mobile device anywhere (as long as you have access to the Internet). CO2 and TVOC sensors require up to 72 hours to self-calibrate after the installation.
III-2 iOS Please make sure… A. "Access to my location" is turned on. B. Your mobile device is able to connect to your home's Wi-Fi network (such as the "test" network shown on the right) or whichever network you anticipated the detector to connect to. Please make sure this network has internet connectivity. 1. Before starting the EdiGreen Home App, go to your mobile device’s Wi-Fi settings and connect to the Wi-Fi SSID of your detector (AirBox.Setup.**).
2. 3. Open the EdiGreen Home App. 4. The app will start searching for available Wi-Fi network for the detector. Tap "Setup Device". If you cannot find the desired Wi-Fi network SSID, tap to refresh network list. Alternatively, tap "Connect to a hidden network" to manually connect to the desired Wi-Fi network. 5. Tap the desired Wi-Fi network. 6. Enter the Wi-Fi network password and tap “OK” to continue.
Please wait a moment for the setup process. 7. Enter a device name, password, and confirm the password. 8. Tap "OK" to continue. Setup Complete! Please wait a moment for the app to take you back to its home screen.
Congratulations! Your air quality detector is up and running! The home screen is as shown on the left. The system status LED should be turned on in blue. Now you are able to monitor the air quality near your unit with your mobile device anywhere (as long as you have access to the Internet). CO2 and TVOC sensors require up to 72 hours to self-calibrate after the installation.
III-3 Deploying the Unit After connecting to the Internet (and your mobile device's EdiGreen Home app), you can choose how to place your air quality detector. Rubber Legs Simply place the unit with the center button facing upwards on a bench or flat surface. The rubber legs (shown below) act as shock prevention and anti-slide support.
Using Device Stand Use the Device Stand to hold the device on a surface. 1. Locate the anchors on the Device Stand and the anchor holes on the device. Insert the anchors into the device. anchor holes anchors 2. Push the anchors towards the smaller ends of the anchor holes to fix the Device Stand.
3. Place the unit at your desired location in the position shown below: The bottom of the stand has rubber to act as anti-slide support.
IV Home Screen Information and Functions Home screen of the app features a few simple functions and real-time data for users to quickly understand current air quality near the device. Different mobile operating systems will have slightly different display cosmetic-wise. 0 錯誤! 找 不到參照 來源。 The following sections will explain IV-3 錯誤! 找不到 參照來 the源。 featured 19 functions and information.
IV-1 Menu Tap to enter Menu as shown below: IV-1-1 Device Management This submenu displays the device(s) added to the app. Users can go into one single device for further configurations or add more Devices to this app.
IV-1-1-1 Tap the Device Configuration icon to go into the configuration page shown below: LED Tap the icon to turn on / off the display of all air quality LED (Note: System Status LED is always on). Push Notification Tap the icon to turn on / off Push Notifications. FW Version a. Tapping will initiate firmware version check. b. If new version is available, the app will ask if you would like to upgrade to the newest version. c. Tap "OK" to continue.
IV-1-1-2 Remove Device If you wish to remove a particular device, go to the "Device Management" page and swipe the name of the device to the left. The app will ask if you would like to remove the device as shown below: Tap "YES" to remove, or tap "NO" to forfeit the option. IV-1-1-3 Add Device Option Tap to add more devices to the app and refer to the steps in III Installation to add more devices.
IV-1-2 Show Nearby Air Quality Tap this option to display nearby air quality. The map will display AI-1001W devices in the area. If the area does not have any AI-1001W devices, no air quality information is displayed. Tap will bring you back to your current location on the map. Tap will display the air quality level of PM2.5 (in a chart) and information of other devices on the map: Circles displayed on the map represent the detection stations. The number inside the circles is the PM2.
Diamonds displayed on the map represent the EPA stations. The number inside the diamonds is the PM2.5 air quality level, as shown: Triangles displayed on the map represent the LASS stations. The number inside the triangles is the PM2.5 air quality level, as shown: IV-1-3 HELP If you need more information, please contact your local service provider. Tapping "Help" will take you to the contact information page of Edimax.
Tap "Privacy Policy" to see privacy policy: Android 25 iOS
IV-2 Device Name This displays the name of the device. If you wish to understand the air quality information around you using the map (), it is advisable to name your device a unique name (IV-4-1 Change Device Name).
IV-4 Current Air Quality Information Temperature and humidity is respectively displayed on top with their corresponding icons. The displayed time is the time the data was last retrieved from the server. The 5 figures below the retrieval time are the 5 air pollutant (PM2.5 / PM10 / CO2 / HCHO / TVOC) values.
IV-4-1 Change Device Name Tap to change the device name Tap "OK" to confirm the change, or "Cancel" to forfeit the change. IV-4-2 Choosing Air Quality Timeline Tapping any of the four options will display the air quality history on their corresponding timeline: Timeline Options: - 1 hour (60m) - 1 day (24H) - 1 week (7d) - 1 month (31d) IV-4-3 Air Quality VS Time Users can swipe up or down to look at a particular air quality information against the chosen timeline.
IV-4-4 Air Quality Information Chart Tap to see individual air quality information. PM2.
V Reset to Factory Default Settings If you experience problems with the device, try rebooting it by reconnecting the power. If rebooting does not work, try resetting it back to its factory default settings. This resets all settings back to the default settings. 1. Within 3 minutes of reconnecting power to the device, press and hold the center button (indicated in the picture below) for at least 10 seconds, where the System Status LED is turned on in Red.
VI Advance Feature VI-1 Adding Already-Connected Devices "Connected Device" referred here is defined as a detector device already connected to a mobile device's EdiGreen Home app. The EdiGreen Home App can add other connected devices. Refer to below on ways to add connected devices. VI-1-1 1. Scan QR Code Tap to enter Menu Device Management. Tap to enter the page shown below: 2. Tap “Add new device with QR code generated”. 3. The app will start up QR Code scanner.
VI-1-2 1. Add Via Local Network Tap to enter Menu Device Management. Tap to enter the page shown below: 2. Please go to the Wi-Fi settings of your mobile device and connect to the Wi-Fi network the detector is connected to.
3. Go back to the app and tap to see all the detectors connected to this network (exemplified on the left). 4. Tap the unit you wish to add to your EdiGreen Home app. If you cannot find the desired unit, tap refresh the list. 5. to The app will prompt you to enter the unit's password (this is the password entered during the unit's initial installation process). Enter the password and tap "OK" to continue.
VII Cleaning the Unit Choose either of the two options below depending on the cleaning tool you have. If you have other pump-like cleaning tools available (e.g. for computers), you may also utilize them. Please be careful to not exert extremes of force or temperature / humidity onto the sensors to prevent damaging them. It is recommended to clean the sensors every 3-6 months for maximum sensor functionality.
VII-2 Dust-off Canned Compressed Air A general dust-off compressed air will be sufficient. 1. Direct the nozzle of the compressed air at an opening (Figure 3 or Figure 4) of a sensor. 2. 3. Keep the nozzle at 10cm from the sensor opening. 4. Make sure all sensor openings are cleaned. Use short bursts (1-2 seconds) of air spray a few times to clean the sensor.
Federal Communication Commission Interference Statement This equipment has been tested and found to comply with the limits for a Class B digital device, pursuant to Part 15 of FCC Rules. These limits are designed to provide reasonable protection against harmful interference in a residential installation. This equipment generates, uses, and can radiate radio frequency energy and, if not installed and used in accordance with the instructions, may cause harmful interference to radio communications.
None This device complies with part 15 of the FCC Rules. Operation is subject to the following two conditions: (1) This device may not cause harmful interference, and (2) this device must accept any interference received, including interference that may cause undesired operation.
EU Declaration of Conformity English: This equipment is in compliance with the essential requirements and other relevant provisions of Directive 2014/53/EU, 2014/30/EU, 2014/35/EU, 2011/65/EU. Français: Cet équipement est conforme aux exigences essentielles et autres dispositions de la directive 2014/53/EU, 2014/30/EU, 2014/35/EU, 2011/65/EU. Čeština: Toto zařízení je v souladu se základními požadavky a ostatními příslušnými ustanoveními směrnic 2014/53/EU, 2014/30/EU, 2014/35/EU, 2011/65/EU.
Declaration of Conformity We, Edimax Technology Co., Ltd., declare under our sole responsibility, that the equipment described below complies with the requirements of the European Radio Equipment Directive . Equipment: Indoor Air Quality Detector Model No.: AI-2002W The following European standards for essential requirements have been followed: Spectrum: ETSI EN 300 328 V2.1.1 EMC: EMF: Safety (LVD): EN 301 489-1 V2.2.0 EN 301 489-17 V3.2.
Notice According to GNU General Public License Version 2 This product includes software that is subject to the GNU General Public License version 2. The program is free software and distributed without any warranty of the author. We offer, valid for at least three years, to give you, for a charge no more than the costs of physically performing source distribution, a complete machine-readable copy of the corresponding source code.
intact all the notices that refer to this License and to the absence of any warranty; and give any other recipients of the Program a copy of this License along with the Program. You may charge a fee for the physical act of transferring a copy, and you may at your option offer warranty protection in exchange for a fee. 2.
Therefore, by modifying or distributing the Program (or any work based on the Program), you indicate your acceptance of this License to do so, and all its terms and conditions for copying, distributing or modifying the Program or works based on it. 6. Each time you redistribute the Program (or any work based on the Program), the recipient automatically receives a license from the original licensor to copy, distribute or modify the Program subject to these terms and conditions.