Multi-Languages QIG on the CD =============================== Český: Českého průvodce rychlou instalací naleznete na přiloženém CD s ovladači Deutsch: Auf der beiliegend Treiber CD finden Sie deutsche Anleitung zur Schnellinstallation. Español: Incluido en el CD el G.R.I. en Español. Français: Veuillez trouver l’français G.I.R ci-joint dans le CD Italiano: Incluso nel CD il Q.I.G. in Italiano. Magyar: A magyar telepítési útmutató megtalálható a mellékelt CD-n Nederlands: De nederlandse Q.I.G.
Copyright© by Edimax Technology Co, LTD. all rights reserved.
Product Introduction Thank you for purchasing an Edimax product. This router is a cost-effective router, an ADSL2+ modem, Ethernet network switch and wireless access point (for wireless model only). You can surf the Internet and share the connection through the Edimax router without investing in other devices. This router can support downstream transmission rates of up to 24Mbps and upstream transmission rates of up to 1Mbps.
1. Minimum Requirements The following devices are required to configure the ADSL2+ Router: z A PC with an Ethernet Adapter and a Web-Browser (Internet Explorer 4.0 or higher) z RJ-45 Ethernet cable z RJ-11 Phone Line 2.
z If problems persisted or you forgot your router’s password, press the reset button for 20 seconds with power on. The router will reset to the factory default settings. (Warning: all your current settings will be lost and replaced by the factory default settings) 3) Power Jack Please plug-in the supplied power adapter to the ADSL Router’s power jack.
3. Install ADSL Router Step 1. Connect the ADSL Line Use the supplied RJ-11 telephone cable, connect the router from the ADSL port to your telephone socket with an ADSL micro filter plugged in. Step 2. Connect the router to your LAN network Connect the router to your PC, hub or switch by attached the Ethernet cable to the LAN port of the router. Step 3. Connect the Power Adapter to the Router Connect the power adapter to the power jack on the rear panel of the router and switch on the power. Step 4.
Step6 : PC LAN IP Configuration 1. Configure the PC LAN setting to automatically obtain an IP address from the router by following the below steps. z Click “Start” in the task bar then select the “Control Panel” . z Click “Switch to Classic View” on the left top to see more setting icons.
z z z Find an icon “Network Connection” then Double-Click to open the network connection setting.
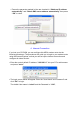
z Ensure the parameter marked in blue are checked in “Obtain an IP address automatically” and “Obtain DNS server address automatically” then press “OK” to close. 4. Internet Connection If you lost your CD-ROM, you can configure this ADSL modem router via the following procedures. The procedures will guide you to login to your modem router using the Internet Explorer, so that you can set up the Internet connection and configure all others function. 1. Enter the router’s default IP address: “192.168.2.
The main page will appear, click “Quick Setup” to setup the Internet connection. Step 1:In the Quick Start, click “Run Wizard” to start the configuration. Please follow the four steps in the setup wizard. Begin by clicking “Next”.
Step 2:Please enter the router’s new password and confirm the new password again. If you wish to keep the router’s default password, enter ‘1234’ and confirm ‘1234’. Click “Next”.
Step 3:Please select the time zone where you are located. Click “Next”. Please select your ISP’s Connection Type . Step 4: Input the data supplied by your ISP If you are not sure about the connection type, please contact your ISP. Wrong connection type will prevent you from connecting to the Internet.
Step 5: Re-start your ADSL router Click “Next” to save the settings and please wait for the router to restart. Click “Close” when changes have been saved successfully and the Internet will be connected.
5. Wireless Setup ( For Wireless Model only ) SSID is the name of the wireless router. You may change your SSID to a meaningful name so that you can identify your wireless router from others. You can use any alphanumeric characters, up to 32 characters. By default the ESSID is ‘default’. It’s very important to set wireless security settings properly! If you don’t, hackers and malicious users can reach your network and valuable data without your consent and this will cause serious security problem.
6. Backup and Firmware Upgrade To upgrade the firmware, please download the latest firmware from Edimax website. Save and unzip the firmware file to a directory in your computer. Click on “Maintenance”>”Firmware”>”New Firmware Location”, click “Browse” to browse to the file firmware you have downloaded. Then, click “Upgrade” to upgrade. It may take few minutes, don't power off the router while it’s upgrading. The router will stop responding and then restarts automatically.
Note: Please refer to the User Manual in the CD-ROM for more details information on Internet connection type and to configure all others setting.
Federal Communication Commission Interference Statement This equipment has been tested and found to comply with the limits for a Class B digital device, pursuant to Part 15 of FCC Rules. These limits are designed to provide reasonable protection against harmful interference in a residential installation. This equipment generates, uses, and can radiate radio frequency energy and, if not installed and used in accordance with the instructions, may cause harmful interference to radio communications.