AR-7182WnA / AR-7182WnB Quick Installation Guide 8-2013 / v1.
COPYRIGHT Copyright Edimax Technology Co., Ltd. all rights reserved. No part of this publication may be reproduced, transmitted, transcribed, stored in a retrieval system, or translated into any language or computer language, in any form or by any means, electronic, mechanical, magnetic, optical, chemical, manual or otherwise, without the prior written permission from Edimax Technology Co., Ltd. Edimax Technology Co., Ltd.
Multi-Language Quick Installation Guide (QIG) on the CD Čeština: Českého průvodce rychlou instalací naleznete na přiloženém CD s ovladači Deutsch: Finden Sie bitte das deutsche S.A.L. beiliegend in der Treiber CD Españ ol: Incluido en el CD el G.R.I. en Español. Franç ais: Veuillez trouver l’français G.I.R ci-joint dans le CD Italiano: Incluso nel CD il Q.I.G. in Italiano. Magyar: A magyar telepítési útmutató megtalálható a mellékelt CD-n Nederlands: De nederlandse Q.I.G.
PRODUCT INTRODUCTION Package Contents Before you start using this product, please check if there is anything missing in the package and contact your dealer to claim the missing item(s): ADSL2+ router (AR-7182WnA or AR-7182WnB) 12V power adapter 1 meter RJ-45 Ethernet cable 1.8M RJ-11 telephone line x 2 Quick installation guide CD containing setup wizard, user manual & multi-language QIG Splitter 5dBi antenna System Requirements A 10/100 base-T Ethernet card installed in your PC.
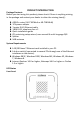
LED Color Status Power Green On ADSL2+ router is on. Off ADSL2+ router Is off. Red On ADSL broadband initial self-test failed or upgrading firmware. Green On ADSL line is synchronized and ready to use. ADSL Description Slow Flashing ADSL synchronization failed ( please refer to Note i. below) Quick Flashing ADSL negotiation is in progress. Internet Green On Flashing LAN Device in bridged mode. Red On Internet not connected in router mode (Please refer to Note ii. below).
ii. If the Internet LED is red, please check your ADSL LED first. If the ADSL LED is off, refer to Note 1. If the green ADSL LED is ON, please check your Internet configuration. You may need to check with your ISP that your Internet is configured correctly. Rear Panel: Item Power On/Off Button Power Wireless On/Off Button WPS Button LAN Reset Button Line Description Switches the router on or off. Power port for included 12V power adapter. Switch the wireless signal on or off.
GETTING STARTED A. Hardware Installation 1. Connect the ADSL line. Connect the line port of the router of the device to the modem interface of a splitter using a telephone cable. Connect a telephone to the Phone interface of the splitter using a telephone cable. Connect the Line interface of the splitter to your existing, incoming line. The splitter has three interfaces: Line: Connect to a wall phone jack (RJ-11 jack). Modem: Connect to the ADSL jack of the device. Phone: Connect to a telephone set.
4. Check the ADSL LED status. Please check the ADSL LED on the front panel. This light indicates the status of your ADSL broadband through your telephone line. If the light is on, you can continue setup. However if the light is flashing, there is no broadband line detected. Please call your Internet Service Provider (ISP) and inform them about the flashing ADSL light to resolve the issue. 5. Firewall settings.
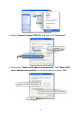
2. Click “Switch to Classic View” in the top left to show additional setting icons. 3. Locate the “Network Connections” icon and double-click to open network connection settings. 4. Select the “Local Area Connection” icon and right-click it to open the sub-menu, then select “Properties”.
5. Select “Internet Protocol (TCP/IP)” and then click “Properties” 6. Ensure that “Obtain an IP address automatically” and “Obtain DNS server address automatically” are selected and then press “OK”.
B. Internet Connection You can configure the router by running the setup wizard on the CD-ROM included in the package contents. The wizard enables you to configure your Internet connection, upgrade the firmware and change the router’s password. When you start the setup wizard, you will see the following screen. Please choose a language and follow the on screen instructions until setup is complete.
2. The login screen below will appear. Enter the default username “admin” and default password “1234” and click “OK”. 3. You will arrive at the system status page as shown below.
4. In the navigation bar across the top of the screen, click “Quick Start” and then “RUN WIZARD”. The Wizard page of the web-based interface allows fast configuration of the Internet connection and other parameters. Please refer to the user manual for detailed information on these parameters. 5. Follow the on screen instructions until the wizard is complete. Note: Please refer to the User Manual on the included CD-ROM for more detailed information regarding configuration and Internet connection type.
EU Declaration of Conformity English: This equipment is in compliance with the essential requirements and other relevant provisions of Directive 1999/5/EC, 2009/125/EC. French: Cet équipement est conforme aux exigences essentielles et autres dispositions de la directive 1999/5/CE, 2009/125/CE Czechian: Toto zařízení je v souladu se základními požadavky a ostatními příslušnými ustanoveními směrnic 1999/5/ES, 2009/125/ES.
Declaration of Conformity We, Edimax Technology Co., LTD., declare under our sole responsibility, that the equipment described below complies with the requirements of the European Council directive (1995/5/EC, 2006/95/EC). Equipment : Model No. : N150 Wireless ADSL Modem Router AR-7182WnA & AR-7182WnB The following European standards for essential requirements have been followed: Spectrum : ETSI EN 300 328 : V1.7.1(2006-10) EMC : EN 301 489-1 V1.9.2(2011-09) EN 301 489-17 V2.2.
15