EW-7612PIn V2 User Manual 11-2011 / v1.
COPYRIGHT Copyright Edimax Technology Co., Ltd. all rights reserved. No part of this publication may be reproduced, transmitted, transcribed, stored in a retrieval system, or translated into any language or computer language, in any form or by any means, electronic, mechanical, magnetic, optical, chemical, manual or otherwise, without the prior written permission from Edimax Technology Co., Ltd. Edimax Technology Co., Ltd.
Contents Chapter I: Product Information .................................................................................................1 1-1 Introduction and safety information ............................................................................................... 1 1-2 Safety Information ........................................................................................................................... 1 1-3 System Requirements ..............................................................
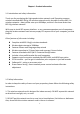
Chapter I: Product Information 1-1 Introduction and safety information Thank you for purchasing this high-speed wireless network card! Excepting common wireless standards 802.11b/g, this wireless network card is also able to access 802.11n wireless networks - data transfer rate up to 300Mbps, and that’s five times faster than 802.
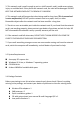
3. This network card is small enough to put in a child’s mouth, and it could cause serious injury or could be fatal. If they throw the network card, the card will be damaged. PLEASE KEEP THIS NETWORK CARD OUT THE REACH OF CHILDREN! 4. This network card will become hot when being used for long time (This is normal and is not a malfunction). DO NOT put the network card on a paper, cloth, or other flammable objects after the network card has been used for a long time. 5.
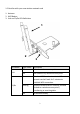
1-5 Familiar with your new wireless network card 1. Antenna 2. WPS Button 3. Link and Tx/Rx LED Definitions 1 2 LED Name Link Tx/Rx 3 Light Status On Description Link to a wireless access point Off Not linked to any wireless access point On Wireless WPS function is activated. The network card will wait for 2 minutes to establish WPS connection. Wireless network card is normally installed /Linked to a wireless access point / Transferring or receiving data.
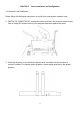
CHAPTER II: Driver Installation and Configuration 2-1 Network Card Installation Please follow the following instructions to install your new wireless network card: 1. SWITCH THE COMPUTER OFF, remove the cover and insert the wireless network card into an empty PCI express slot of your computer and then replace the cover. 2. Install the antenna on the wireless network card, and make sure the antenna is securely installed. To improve radio reception, please adjust antenna to the proper position.
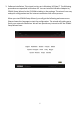
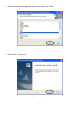
3. Software Installation, This wizard can be run in Windows XP/Vista/7. The following procedures are operated in Windows XP. You can install the Wireless Adapter by EZMAX Setup Wizard in the CD-ROM including in the package. The wizard is an easy and quick configuration tool for internet connection with series process. When you start EZMAX Setup Wizard, you will get the following welcome screen. Please choose the language to start the configuration.
If you prefer the traditional setup procedure, please follow the instruction as following step. 1. Insert device driver CDROM into the CD/DVD ROM drive of your computer, and execute ‘Setup.exe’ program in ‘Utility’ folder.
2. Please select the language you wish to use, then click ‘Next’. 3. Click ‘Next’ to continue.
4. Installation procedure needs few minutes to complete, please be patient. 5. Click ‘Finish’ to reboot your computer to complete installation procedure. If you don’t want to reboot computer now, select ‘No, I’ll restart my computer later’ option and click ‘Finish’. Please note you have to reboot your computer before you can use your new wireless network card.
6. After installation is complete, wireless configuration utility will be shown in the desktop of your computer automatically. You will also see an icon at the lower-right corner of your windows system. If you put the mouse cursor on the icon, the status of wireless card will be displayed as a popup balloon. 7. When you want to configure your wireless connection, please right click on this icon, and a popup menu will appear. You can click ‘Open Config Utility’ to start configuration program.
2-2 Connect to Wireless Access Point After the driver is correctly installed, it will try to connect to any unencrypted wireless access point automatically. If you want to connect to a specific wireless access point, or the access point you wish to connect uses encryption, you have to configure the wireless network card and input required parameters, to get connected to the wireless access point you wish to connect.
2-2-1 Using Edimax Utility Please follow the following instructions to use Edimax configuration utility to connect to wireless access point. 1. Left-click the Edimax configuration utility icon located at lower-right corner of computer desktop, and configuration menu will appear: 2. Wireless utility will appear. Click ‘Available Network’ menu to search for wireless access points nearby.
3. Please wait for a while, and all wireless access points which can be reached by this wireless network card will be displayed here. If the wireless access point you wish to connect does not appear here, you can click ‘Refresh’ button to scan for wireless access points again; if the wireless access point you’re looking for still not appear, try to move the computer closer. When the access point you’re looking for is on the list, left-click it and then double click it or click ‘Add to Profile’. 4.
All options in this page will be filled automatically according to the access point you wish to add to profile. However, you can still modify any of them to meet your requirement. Profile name You can give a name to this profile, so you can remember its purpose easily. It can be any phrase to help you remember. Network Name (SSID) The SSID (Service Set IDentifier, i.e. access point’s name). This field will be filled as the access point you selected when SSID is not hidden and grayed out.
Data encryption ASCII / PASSPHRASE Select the data encryption type from drop-down menu. This setting must be identical with the setting of wireless access point you with to connect. When the encryption type is ‘WEP’, it’s required to input a set of ‘passphrase’ to connect to wireless access point. Check ‘ASCII’ or ‘PASSPHRASE’ depends on the security setting of access point, and input it in the box; if you select ‘PASSPHRASE’ you also need to select the length of the key.
5. Network card will attempt to connect to access point now, this may require few seconds to minutes, please be patient. When the ‘Status’ become ‘Associated’, your computer is connected to access point you selected. Click ‘Close’ to close configuration menu. NOTE: If you connected to an access point but the connection has been dropped soon, please check security settings and re-check password spelling.
2-2-2 Using Windows Zero Configuration Windows XP and Vista has a built-in wireless network configuration utility, called as ‘Windows Zero Configuration’ (WZC). You can also use WZC to configure your wireless network parameter: 1. Right-click Edimax configuration utility icon, and click ‘Open Config Utility’. 2. Check ‘Windows Zero Config’ box.
3. A message indicating that you’ve been switched to Windows Zero Configuration mode will appear. Click ‘OK’ to continue. NOTE: To return to use Edimax utility, uncheck ‘Windows Zero Config’ box. 4. Click ‘Start’ button (should be located at the bottom-left corner of windows desktop), click ‘Control Panel’, then click ‘Network and Internet Connections’ in Control Panel.
5. Double click ‘Network Connections’. 6. Right-click ‘Wireless Network Connection’ (it may have a number as suffix if you have more than one wireless network card, please make sure you right-click the ‘Edimax 802.11n Wireless LAN Card), then select ‘View Available Wireless Networks’.
7. All wireless access points in proximity will be displayed here. If the access point you want to use is not displayed here, please try to move your computer closer to the access point, or you can click ‘Refresh network list’ to rescan access points. Click the access point you want to use if it’s shown, then click ‘Connect’. 8. If the access point is protected by encryption, you have to input its security key or passphrase here. It must match the encryption setting on the access point.
9. If you can see ‘Connected’ message, the connection between your computer and wireless access point is successfully established. 2-3 Connection Profile Management If you need to connect to different wireless access points at different time, like of access point of your home, office, cybercafe, or public wireless service, you can store the connection parameters (encryption, passphrase, security etc, etc.
Click the ‘Profile’ menu. 2-3-1 Add a new profile By this function you can setup the connection parameters for a specific wireless access point in advance, without contacting it first. If you want to create a new profile, click ‘Profile’ menu, then click ‘Add’ button.
You’ll be prompted to input connection parameters for the wireless access point you wish to connect: Required parameters are: Profile name You can give a name to this profile, so you can remember its purpose easily. It can be any phrase to help you remember. Network Name (SSID) The SSID (Service Set IDentifier, i.e. access point’s name). This must be identical with the SSID of the access point you wish to connect.
ASCII / PASSPHRASE drop-down menu. This setting must be identical with the setting of wireless access point you with to connect. When the encryption type is ‘WEP’, it’s required to input a set of ‘passphrase’ to connect to wireless access point. Check ‘ASCII’ or ‘PASSPHRASE’ depends on the security setting of access point, and input it in the box; if you select ‘PASSPHRASE’ you also need to select the length of the key.
2-3-2 Remove an existing profile When you no longer need an existing profile, you can remove it. If you want to remove a profile, click ‘Profile’ menu, then select an existing profile which you wish to remove, and then click ‘Remove’ button.
2-3-3 Edit an existing profile If you have added a profile before, and you wish to change the content of the profile, you can use this function. Please select a profile from the list first, then click ‘Edit’ button. You’ll be provided with the contents of selected profile, and you can edit them. Click ”OK” to save changes, or click “Cancel” to discard changes.
2-3-4 Make a copy of existing profile If you need to make a copy of a specific profile, you can use this function. This function is very convenient when you need to build a new profile which parameters are similar to any existing profile. To do this, select an existing profile, then click ‘Duplicate’ button. You’ll be prompted to input a profile name, please use an identical name that does not exist in profile list.
2-3-5 Set as default profile If you wish to use a specific profile as default connection, you can select a profile in the list, and click ‘Set Default’. Selected profile will become default selection and Edimax configuration utility will attempt to connect to selected access point.
2-4 View Network Statistics, General Information, and Status The configuration utility provides information about network statistics and link status. If you want to know how your wireless network card works, you can use these functions to get detailed information about the wireless connection you’re using.
2-4-2 Status If you want to know the status of your wireless network card, click ‘Status’ menu: 2-4-3 View Network Statistics To view the statistical data of wireless network card, click ‘Statistics’ menu, and the statistics of wireless connection will be displayed: All connection-related statistics is displayed here. You can click ‘Reset’ button, to reset the statistics of all items back to 0.
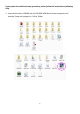
2-5 Miscellaneous Settings There are few functions provided by Edimax configuration utility, you can access these functions from the bottom of configuration menu: The descriptions of these function are listed as follow: Show Tray Icon Check this box to show an icon on system tray. HERE! Radio Off Disable Adapter Windows Zero Config Uncheck this box to hide it. Switch wireless radio off. Wireless network functionalities are disabled. Disable wireless network adapter.
2-6 Establish secure connection with AP by WPS Wi-Fi Protected Setup (WPS) is the latest wireless network technology which makes wireless network setup become very simple. If you have WPS-enabled wireless access point, and you want to establish a secure connection to it, you don’t have to configure the wireless access point and setup data encryption by yourself.
2. Click ‘Wi-Fi Protect Setup’ menu. 3. You can use PIN code or Push-Button configuration, and WPS-compatible wireless access point must use the same type of WPS. For instructions on setup each type of WPS, see next 2 chapters for detailed instructions.
2-6-1 PIN Code To use PIN Code, please click ‘Pin Input Config (PIN)’ button: You’ll be prompted to select an access point you wish to connect. If you know its SSID, click ‘Yes’, otherwise click ‘No’.
If you select ‘Yes’, a list of all WPS-compatible AP nearby will be displayed; you can click ‘Refresh’ to rescan, then select an AP and click ‘Select’ button. If you select ‘No’, wireless network card will prompt you to enter 8-digit PIN code into your AP, without selecting an AP in advance. After you select ‘Yes’ or ‘No’ in previous step, network card will attempt to connect to WPS-compatible AP, and an 8-digit number will appear.
2-6-2 Push Button To use Push-Button WPS configuration, please click ‘Push Button Config (PBC)’ button. This is the easiest way to establish secure connection by WPS, but if there’re more than one WPS-compatible AP using Push-Button config, please use PIN Code instead. After you click Push Button Config, a message box will appear: Please activate Push-Button function on wireless access point now, and wireless network card will establish secure connection with access point within one minute.
CHAPTER III: Soft-AP Function Excepting become a wireless client of other wireless access points, this wireless card can act as a wireless service provider also! You can switch this wireless card’s operating mode to ‘AP’ mode to simulate the function of a real wireless access point by software, and all other computers and wireless devices can connect to your computer wirelessly, even share the internet connection you have! Please follow the instructions in following chapters to use the AP function of your w
2. Select ‘Mode’, and then select ‘Access Point’. It requires few seconds to switch to AP mode, please be patient.
After mode switch is complete, you’ll see general information of software AP, which shows AP’s SSID and connected wireless clients.
The ‘Wireless Network Properties’ is displayed. Please note that Ad-Hoc mode is not available when network card is in AP mode. The description of major setup items are listed below: Network Name (SSID) Please input the SSID (the name used to identify this wireless access point) here. Up to 32 numerical characters can be accepted here, excepting space. Channel Please select the wireless channel you wish to use, from 1 to 13.
3-1-2 Setup Soft-AP Security To setup security options for Soft-AP, configure ‘Wireless Network Security’ section as follow: The description of setup items about wireless security are listed below: Network Authentication Data Encryption ASCII / PASSPHRASE Key Index Network key / Confirm network key Select network authentication mode from dropdown menu. Select data encryption method from dropdown menu.
3-2 Advanced Settings If you want to setup advanced settings of software access point, select ‘Advanced’ menu. If you don’t know the meaning and affects of these settings, keep them untouched. The description of all setup items are listed below: Beacon Interval DTIM Period Preamble Mode Set Defaults Apply Please input wireless beacon time interval here. Please input DTIM (Delivery Traffic Indication Message) here. Select wireless frame preamble mode (long or short) from dropdown menu.
3-3 Wireless Statistics Select ‘Statistics’ menu and the data statistics about software access point will be displayed. Click ‘Reset’ to reset the value of every item back to ‘0’.
CHAPTER IV: Appendix 4-1 Hardware Specification Standards: IEEE 802.11b/g/n Interface: PCI Express interface Frequency Band: 2.4000 ~ 2.4835GHz (Industrial Scientific Medical Band) Data Rate: 11b: 1/2/5.5/11Mbps 11g: 6/9/12/24/36/48/54Mbps 11n (20MHz): MCS0-7 (Up to 144Mbps) 11n (40MHz): MCS0-7 (Up to 300Mbps) Securities: WEP 64/128, WPA, WPA2 and IEEE 802.1x Antenna: 3dBi detachable antenna (2T2R) Drivers: Windows XP/Vista/Windows 7 LED: Link, Tx/Rx Transmit Power: 11b: 16±1.5dBm , 11g: 12±1.
4-2 Troubleshooting If you encounter any problem when you’re using this wireless network card, don’t panic! Before you call your dealer of purchase for help, please check this troubleshooting table, the solution of your problem could be very simple, and you can solve the problem by yourself! Scenario I can’t find any wireless access point / wireless device in ‘Site Survey’ function. Solution 1. Click ‘Rescan’ for few more times and see if you can find any wireless access point or wireless device. 2.
3. 4. The network is slow / having problem when transferring large files 1. 2. have to input correct SSID of the access point you wish to connect. Please contact the owner of access point to ask for correct SSID. You have to input correct passphrase / security key to connect an access point with encryption. Please contact the owner of access point to ask for correct passphrase / security key.
4-3 Glossary 1. What is the IEEE 802.11g standard? 802.11g is the new IEEE standard for high-speed wireless LAN communications that provides for up to 54 Mbps data rate in the 2.4 GHz band. 802.11g is quickly becoming the next mainstream wireless LAN technology for the home, office and public networks. 802.11g defines the use of the same OFDM modulation technique specified in IEEE 802.11a for the 5 GHz frequency band and applies it in the same 2.4 GHz frequency band as IEEE 802.11b. The 802.
6. What is BSS ID? A specific Ad hoc LAN is called a Basic Service Set (BSS). Computers in a BSS must be configured with the same BSS ID. 7. What is WEP? WEP is Wired Equivalent Privacy, a data privacy mechanism based on a 40 bit shared key algorithm, as described in the IEEE 802 .11 standard. 8. What is TKIP? TKIP is a quick-fix method to quickly overcome the inherent weaknesses in WEP security, especially the reuse of encryption keys. TKIP is involved in the IEEE 802.
13. What is Spread Spectrum? Spread Spectrum technology is a wideband radio frequency technique developed by the military for use in reliable, secure, mission-critical communication systems. It is designed to trade off bandwidth efficiency for reliability, integrity, and security.
49