EW-7416APn v2 & EW-7415PDn Windows Quick Installation Guide 09-2012 / v2.
Getting Started Before you start using this access point, please check if there’s anything missing in the package, and contact your dealer of purchase to claim any missing items.
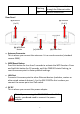
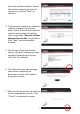
Flashing Off Data is being transmitted through the Ethernet cable. No valid connection. Rear Panel (a) Antenna (1 of 2) (b) WPS/Reset Button (a) Antenna (2 of 2) (c) LAN Port (d) Power Port a. Antenna Connector This is where you connect the antennas. It is a round connector (standard reverse SMA). b. WPS/Reset Button Press this button for less than 5 seconds to activate the WPS function.
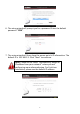
Installation for Windows PC 1. Connect one end of an Ethernet cable to the Ethernet port on your computer. Connect the other end to an Ethernet port on the access point. 2. Plug the power adapter into the device’s 5V power port, and plug the adapter into a wall socket. The PWR LED should light up. 3. Insert the Edimax CD into your computer’s CD drive. When the AutoPlay screen appears, select “Run Autorun.exe”.
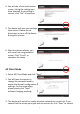
6. The setup wizard will prompt you for a password. Enter the default password “1234”. 7. The setup wizard will then show the access point’s IP information. The default IP is 192.168.2.1. Click “Next” to continue. Note: Please do not select “Automatically assign an IP address from your network” unless you are performing more advanced setup. For first-time installation, please use the default IP address.
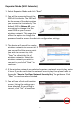
8. You now have the option of selecting which mode you want to use. Access Point Mode 1. Select Access Point Mode and click “Next”. 2. You will be prompted to set the SSID of this access point. The SSID will be the name of the access point when you connect to it wirelessly. The default SSID is Edimax AP. This page also offers the option to change the password used to access the device’s configuration settings. For first time setup, please simply click “Next” without changing anything. 3.
4. You will see a final confirmation screen, listing the settings you have selected. If everything is correct, click “Set” to continue. 5. The device will save your settings, then reboot. Please do not disconnect or turn off the device during this process. 6. After the device reboots, you will see a final congratulation screen. Click “Finish” to complete the setup. AP Client Mode 1. Select AP Client Mode and click “Next”. 2.
the list of wireless networks. Select the wireless network you wish to connect to, and click “Next” to continue. 4. If the wireless network you selected requires a network security key, enter it here. If you do not know the network security key then please refer to Appendix “How to Find Your Network Security Key” for guidance. Click “Next” to continue when finished. 5. You will see a final confirmation screen, listing the settings you have selected. If everything is correct, click “Set” to continue. 6.
Repeater Mode (WiFi Extender) 1. Select Repeater Mode and click “Next”. 2. You will be prompted to set the SSID of this device. The SSID will be the name of the device when you connect to it wirelessly. The default SSID is Edimax AP, you are option to change it to the same SSID as your current wireless network. This page also offers the option to change the password used to access the device’s configuration settings. 3. The device will search for nearby wireless networks to connect to.
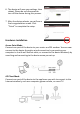
6. The device will save your settings, then reboot. Please do not disconnect or turn off the device during this process. 7. After the device reboots, you will see a final congratulation screen. Click “Finish” to complete the setup. Hardware Installation Access Point Mode Connect one port of the device to your router or xDSL modem.
Repeater Mode Position the device in a location for optimal wireless extension, such as the middle of your house. You can connect to the device wirelessly by searching and connecting to the device name you set up. Appendix How to Find Your Network Security Key Note: These instructions are for Windows 7/Vista. If you are using Windows XP or earlier, you need to contact the manufacturer or ISP. 1. Open “Control Panel” and click “Network and Internet” in the top menu. 2.
3. Click on “Manage wireless networks” in the left menu. 4. You should see the profile of your Wi-Fi network in the list. Right click on your Wi-Fi network and then click on “Properties”. 5. Click on the “Security” tab, then check the box labeled “Show characters”. This will show your network security key. Click the “Cancel” button to close the window.
COPYRIGHT Copyright Edimax Technology Co., Ltd. all rights reserved. No part of this publication may be reproduced, transmitted, transcribed, stored in a retrieval system, or translated into any language or computer language, in any form or by any means, electronic, mechanical, magnetic, optical, chemical, manual or otherwise, without the prior written permission from Edimax Technology Co., Ltd. Edimax Technology Co., Ltd.
Federal Communication Commission Interference Statement This equipment has been tested and found to comply with the limits for a Class B digital device, pursuant to Part 15 of FCC Rules. These limits are designed to provide reasonable protection against harmful interference in a residential installation. This equipment generates, uses, and can radiate radio frequency energy and, if not installed and used in accordance with the instructions, may cause harmful interference to radio communications.
EU Declaration of Conformity English: This equipment is in compliance with the essential requirements and other relevant provisions of Directive 2004/108/EC, 2006/95/EC, 2009/125/EC. Français: Cet équipement est conforme aux exigences essentielles et autres dispositions de la directive 2004/108/CE, 2006/95/CE, 2009/125/CE. Čeština: Toto zařízení je v souladu se základními požadavky a ostatními příslušnými ustanoveními směrnic 2004/108/ES, 2006/95/ES, 2009/95/ES.
Notice According to GNU General Public License Version 2 This product includes software that is subject to the GNU General Public License version 2. The program is free software and distributed without any warranty of the author. We offer, valid for at least three years, to give you, for a charge no more than the costs of physically performing source distribution, a complete machine-readable copy of the corresponding source code.
intact all the notices that refer to this License and to the absence of any warranty; and give any other recipients of the Program a copy of this License along with the Program. You may charge a fee for the physical act of transferring a copy, and you may at your option offer warranty protection in exchange for a fee. 2.
6. Each time you redistribute the Program (or any work based on the Program), the recipient automatically receives a license from the original licensor to copy, distribute or modify the Program subject to these terms and conditions. You may not impose any further restrictions on the recipients’ exercise of the rights granted herein. You are not responsible for enforcing compliance by third parties to this License. 7.