
User Manual


5
II-1-2 Desktop Mounting
Please install the four rubber feet (included) on the bottom of the switch and place the
switch at the desired location.
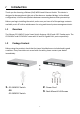
Figure 6 - Desktop Installation
II-1-3 Rack Mounting
You can mount the switch in any standard size, 19-inch (about 48 cm) wide rack. The
switch requires 1 rack unit (RU) of space, which is 1.75 inches (44.45 mm) high.
For stability, load the rack from the bottom to the top, with the heaviest devices on the
bottom. A top-heavy rack is likely to be unstable and may tip over.
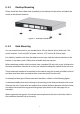
When mounting smaller switch products into a standard 19-inch rack, a pair of extension
brackets (sometimes referred to as ears) are needed to adapt the switch to the rack size.
These extension brackets are mounted on the switch using the screws provided in the kit,
and have two holes that are used to then screw the switch into the rack.
An example of one type of these extension brackets is shown in the following figure.
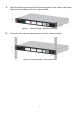
A common problem that occurs during rack mounting is the distance between the screw
holes on the rack. Some racks are made with a uniform distance between all of the holes,
and others have the holes organized into groups (see photo on the next page for an
example).
When organized into groups, the switch must be placed in the rack so that the holes in
the extension brackets line up correctly.