IC-3140W Quick Installation Guide (English) 12-2015 / v2.
Copyright @ Edimax Technology Co., Ltd. all rights reserved. No part of this publication may be reproduced, transmitted, transcribed, stored in a retrieval system, or translated into any language or computer language, in any form or by any means, electronic, mechanical, magnetic, optical, chemical, manual or otherwise, without the prior written permission from Edimax Technology Co., Ltd. Edimax Technology Co., Ltd.
Product Information I-1. Package Contents IC-3140W Power Adapter I-2.
I-3. Back Panel MAC/Cloud ID & Setup SSID Speaker MicroSD Card Slot WPS/Reset Button LAN Port 12V DC Power Port I-4. LED Status LED LED Color LED Status Description Network camera is on and connected to cloud server. On Power Green Quick Flashing Slow Flashing (1 x per second) On LAN Green Quick Flashing Slow Flashing (1 x per second) On Internet Orange Network camera is restarting. Network camera is starting up OR network camera is not connected to cloud server.
I-4. Product Label The product label located on the back of the camera displays the MAC address, cloud ID and setup SSID of your network camera. The MAC address and cloud ID are the same for easy reference. The cloud ID allows you to view a live stream from your network camera remotely (from any Internet connection) as described later in III-4. Myedimax.com. I-5. Reset If you experience problems with your network camera, you can reset the camera back to its factory default settings.
I. Hardware Installation II-1. Mounting Kit A stand for your network camera is included in the package contents. The stand requires some assembly. 1. Assemble the included camera stand as shown below. The camera stand can stand by itself or be mounted to a wall: 2. Secure the network camera to the included camera stand using the mounting hole on the rear of the camera. You can also mount the network camera to a tripod using the mounting hole.
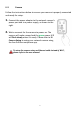
II-2. Camera Follow the instructions below to ensure your camera is properly connected and ready for setup. 1. Connect the power adapter to the network camera’s power port and to a power supply, as shown to the right. 2. Wait a moment for the camera to power on. The camera will make a sound and the green power LED will flash slowly when it’s ready. Please refer to III. Camera Setup to setup your network camera using the free EdiLife smartphone app.
II. Camera Setup Your network camera can be up and running in just a few minutes. Follow the instructions in the next chapter to install your camera using the free EdiLife app on Android or iPhone. Then, you can also use the web based management interface to watch a live stream and further configure the camera if you need (refer to the user manual for help). And you can additionally view the camera’s live image from any Internet connection and web browser using the cloud ID (see III-3.).
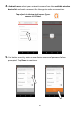
2. For iOS users, go to your iPhone’s Wi-Fi settings and connect to your network camera’s SSID (EdiView.Setup **), before opening the EdiLife app. Continue to Step 5. 3. Android users open the EdiLife app and tap the + icon in the top-right corner of the screen.
4. Android users select your network camera from the available wireless device list and wait a moment for the app to make a connection. Tap refresh in the top right corner if your camera isn’t listed. 5. For better security, enter a new device name and password when prompted. Tap Done to continue.
6. Select your Wi-Fi from the list and enter your Wi-Fi password. Tap OK to continue. Tap refresh in the top right corner if your Wi-Fi isn’t listed. 7. Please wait a moment while your camera connects to your Wi-Fi. When you see the Setup complete screen, click the LIVE icon or tap the arrow to continue.
8.Setup is complete. The camera’s LED should display on and green. Your camera should be listed on the EdiLife home screen. Tap your camera to see a live stream which you can view anytime you are connected to the Internet. You can configure your camera’s settings and functions using the icons below the live image. 9.
III-2. WPS (Wi-Fi Protected Setup) The WPS button is a quick and easy method to establish a secure wireless connection between your network camera and your wireless router/access point. 1. Press and hold the WPS button on your wireless router/access point for the correct length of time to activate its WPS. Please check the instructions for your wireless router/access point for how long you need to hold down its WPS button to activate WPS. 2.
III-3. Myedimax.com You can use your network camera’s Myedimax.com cloud ID to monitor your camera remotely using a web browser from any Internet connection. The network camera’s green power LED must display on for this function to work. 1. Identify your network camera’s cloud ID. The cloud ID is displayed on the product label on the back of the network camera (see I-4.). The cloud ID is a string of 12 characters consisting of numbers 0 – 9 and letters A – F which is unique to your network camera. 2.
If any other security warnings/prompts appear, please select “Run” or “Allow” or similar, depending on your browser. 4. Enter your camera’s password (default password: 1234) and click “OK” to see a live stream from your network camera.
Federal Communication Commission Interference Statement This equipment has been tested and found to comply with the limits for a Class B digital device, pursuant to Part 15 of FCC Rules. These limits are designed to provide reasonable protection against harmful interference in a residential installation. This equipment generates, uses, and can radiate radio frequency energy and, if not installed and used in accordance with the instructions, may cause harmful interference to radio communications.
EU Declaration of Conformity English: French: Czechian: Polish: Romanian: Russian: Magyar: Türkçe: Ukrainian: Slovakian: German: Spanish: Italian: Dutch: Portugese: Norwegian: Swedish: Danish: Finnish: This equipment is in compliance with the essential requirements and other relevant provisions of Directive 2004/108/EC, 2006/95/EC, 2009/125/EC.
Declaration of Conformity We, Edimax Technology Co., Ltd., declare under our sole responsibility, that the equipment described below complies with the requirements of the European R&TTE directive (1999/5/EC, 2006/95/EC) Equipment: Internet Camera Model No.: IC-3140W The following European standards for essential requirements have been followed: Spectrum EMC : ETSI EN 300 328 V1.8.1 (2012-06); : EN 301 489-1 V1.9.2 (2011-09) EMF Safety(LVD) EN 301 489-17 V2.2.
Notice According to GNU General Public License Version 2 This product includes software that is subject to the GNU General Public License version 2. The program is free software and distributed without any warranty of the author. We offer, valid for at least three years, to give you, for a charge no more than the costs of physically performing source distribution, a complete machine-readable copy of the corresponding source code.
intact all the notices that refer to this License and to the absence of any warranty; and give any other recipients of the Program a copy of this License along with the Program. You may charge a fee for the physical act of transferring a copy, and you may at your option offer warranty protection in exchange for a fee. 2.
6. Each time you redistribute the Program (or any work based on the Program), the recipient automatically receives a license from the original licensor to copy, distribute or modify the Program subject to these terms and conditions. You may not impose any further restrictions on the recipients’ exercise of the rights granted herein. You are not responsible for enforcing compliance by third parties to this License. 7.