Mechanical Pan & Tilt IP Camera User Manual 1
CATALO G Chapter I: Familiar with your Internet IP Camera ............................................................4 1.1 Package Contents.....................................................................................................4 1.2 Basic Introduction......................................................................................................4 1.3 Product Highlights .....................................................................................................5 1.
-9 Snapshot .....................................................................................................66 3-10 Recording ..................................................................................................66 3-11 Video Playback ..........................................................................................67 Chapter IV: Appendix.......................................................................................................68 4.1 Specification.......................
Chapter I: Familiar with your Internet IP Camera 1.1 Package Contents Thank you for purchasing this IP camera! Before you start to use this IP camera, please check the package contents. If anything is missing, please contact the dealer of purchase and return the package to claim for missing contents. 1 2 3 4 5 Item Name IP Camera Antenna Power Adapter Ethernet Cable Driver and User Manual CD-ROM Quantity 1 2 1 1 1 1.
1.3 Product Highlights No pre-loaded software required - all you need is a browser like Internet Explorer 6 (and above, with plug-in installed). With supplied video surveillance software, you can connect up to 16 video cameras and view images captured by every camera at the same time. Supports 3 video resolutions: XGA (1024 x 768), VGA (640 x 480), and QVGA (320 x 240). Anti-flicker function (eliminates flash caused by fluorescent lights, 50 / 60Hz selectable).
1.
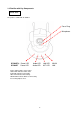
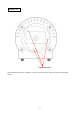
Back View Ethernet Connector Antenna Power Connector WPS Button SD Card Slot Audio Connector Antenna: Connects to supplied antenna (IC-7000PTn only) Power Connector: Connects to A/C power adapter z SD Card Slot: Accepts SD / SD-HC memory card for image / video storage z WPS Button: click the bottom on IP Cam and click it on the AP you want to connect for wireless z Audio Connector: Connects to external speaker for audio output z Ethernet Connector: Connect to your local area network z z 7
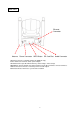
Side View Reset Button Reset Button: Press the button with pen nib and hold for 5 seconds to reset the camera settings to factory default value.
Bottom View Tripod Connector Tripod Connector: Connects to tripod to secure the camera when the camera is not put on a horizontal surface.
1.5 Descriptions for LED Indicators For IC-7000PTn LED Name Status Power Off On Description Camera is not powered (camera off) Camera is correctly powered (camera on) LAN Off On LAN port not in use LAN port in use Flash Off On WLAN Flash at low speed Flash Off Audio For IC-7000PT LED Name On Flash Waiting for WPS connection from AP and flash speed is once a second.
1.6 Camera Installation Please follow the following instructions to set your IP camera up. 1. Unpack the product package and check if anything’s missing. Connect the Ethernet cable to your local area network, and connect the other end to the LAN jack of this IP camera. NOTE: You can skip this step if you plan to use wireless LAN only. 2. Plug the power adapter to wall socket, and connect the power connector to the power jack located at the bottom of the IP camera.
3. Connect two antennas to the antenna bases, which is located at the back of this IP camera. 4. Place the camera at a secure place, and point the camera to the place you wish to monitor. If you wish to hang the camera on the ceiling or wall, please use the tripod connector (located at the bottom of the camera) to secure the camera.
5. Launch Internet Explorer on your computer, and following the instructions given in next section to set the IP camera.
Chapter II: Using Web Management Interface 2.1 Camera Settings The first menu after you logged onto web management interface is ‘Camera’, and this is the only menu you can see the real-time image from camera. You can always back to this menu by clicking ‘Camera’ on the top of web management interface.
The descriptions of every setting in this menu will be given below: Item Pan/Tilt Speed Description Specifies the moving speed when you use pan / tilt function to point the camera to a new direction. Available options are 1 (fastest) to 5 (slowest). Select 1 to move the camera by a faster speed, but you will not be able to control the movement precisely. If you wan to move the camera in a more accurate manner, select a slower speed. Specifies the video resolution.
NOTE: When you change any setting(s) listed above, please click ‘Apply’ button so the change(s) will take effect. For following functions, changes will take effect right away. Pan / Tilt Control Preset Points Moves camera to a new direction. Press one of 8 directional buttons to move the camera, and press ‘H’ to move the camera back to ‘home’ (original) position. You can set up to 9 preset points of camera position; press the number to move the camera to preset point instantly.
2.2 Pan and Tilt This IP camera supports pan and tilt function, as you explored in last section. You can also make the camera move automatically in pan and tilt menu by defining a set of pre-defined path. You can access this menu by clicking ‘PTZ’ on the top of web management interface. 2.2.1 Preset Points You can define the camera position and save the position so you can recall the position later again.
2.2.2 Grand Tour You can make the camera move between many pre-defined positions, and define the time you wish to pause at every position; this is called as ‘Grand Tour’. Before you can use this function, you have to define at least 2 positions in ‘Preset Points’ section (refer to last section for detailed information). The descriptions of every setting in this menu will be given below: Item Description Add Add a new set of grand tour (see instructions below) Edit Edit a selected grand tour.
The descriptions of every setting in this menu will be given below: Item Description Name Input the name of this set of grand tour here. As you may have many sets of grand tour, please give it a meaningful name so you can remember the main purpose of this set. View with random Do not visit all positions in this grand tour by order; visit them randomly instead. order Select preset points from dropdown menu here, then click ‘Add to list’ to add this position to this grand tour.
2.2.3 Multi-Camera Display If you have more than one IC-5010 IP camera, you can view up to 9 videos captured by every camera, so you can monitor up to 9 places at the same time. Before you do this, please collect the following information: a. The IP address of each camera b.
Please note that the upper-left camera view always show the video of the camera you connected to and cannot be changed. The following example uses four-camera view as example, and the video of the camera you connected to is displaying at upper-left view: The IP address and port will be displayed at the top of camera’s view: When IP and port information is displayed on the top of camera’s view, indicates the camera is configured.
A new popup window will appear to allow you to set the information of camera. If you have popup blocker installed, you may have to disable it temporarily so you can see the popup window: Please input the information in respective field (Camera IP, HTTP Port etc.), then click ‘Add new IPCam’ button to connect to this IP camera and display it’s view in camera view. If you don’t want to add the camera now, click ‘Close’ button and the popup window will be closed.
2.3 Network Settings All network-related settings can be found in this menu, and you have to specify TCP/IP parameters in this menu if you want to change IP address, use PPPoE, Dynamic DNS, and activate UPnP function. You can access this menu by clicking ‘LAN’ on the top of web management interface. After you selected ‘Network’, network setting menu will appear. There are 5 sub-menus available here: Please click the network setting you wish to set, and then refer to instructions given below: 2.3.
The descriptions of every setting in this menu will be given below: Item Network Type Description This camera can obtain the IP address from DHCP server automatically (if you have one), or set a fixed IP address. Select ‘DHCP’ to obtain IP address automatically or ‘Static IP Address’ to assign this IP camera with a fixed IP address. When ‘DHCP’ is selected, IP address parameters below will be grayed out. IP Address Subnet Mask Gateway Primary DNS Specify the IP address for this IP camera here.
2.3.2 WLAN The descriptions of every setting in this menu will be given below: Item Wireless Connection Network Type Description Select ‘Enable’ to activate wireless network function of this IP camera, select ‘Disable’ to disable it. Select the network type of wireless connection.
MAC Address: If you there are many wireless access points in proximity or some wireless access point hides it’s SSID, you can use MAC address to distinguish them. Signal: Shows the radio signal strength in percent. Channel: Shows the radio channel of this wireless access point. Encryption: Shows the encryption type used by this wireless access point. You must use the same encryption type if you wish to connect to a certain wireless access point.
2.3.3 Dynamic DNS If your ISP does not give you a fixed Internet IP address (i.e. the Internet address you’re using when you access the Internet is not always the same – ask your ISP for detailed information), you can use this function to help you locate the IP address of this IP camera when you’re away from home or office. Before you can use this function, you’ll need to apply for an account at dyndns.org (http://www.dyndns.org). Detailed instructions of how to apply a new account can be found on dyndns.
2.3.4 UPnP When UPnP function is activated, all UPnP-compatible computers / network devices will be able to discover this IP camera automatically (only those in the same local network). This function is useful and you don’t have to remember the IP address of this IP camera.
2.3.5 Login Free This camera provides a method to let unauthorized users to view the image captured by this camera, which is called as ‘LoginFree’. When you wish to let everyone to view the image captured by this camera, or integrate the image with your own web application, you can use this function: Input the filename here, and click ‘Apply’ to save settings, then other users can access the image by this filename with .jpg extension with the camera’s IP address as prefix.
2.4 Motion Detection When you wish to use this camera to monitor the activities, motion detection function will be very useful. Camera will detect the motion in captured image, and take a snapshot when motion is detected. So you can use this camera to keep the safety of the belongings you have. To use motion detection, click the following link from the top of menu: After you selected ‘Motion Detection’, a sub-menu will appear.
2.4.1 Motion Detection You can use this menu to setup basic motion detection settings: The descriptions of every setting in this menu will be given below: Item Enable Motion Detection Description Select ‘Enable’ to enable motion detection, and select ‘Disable’ to disable this function. Select the time interval between two motions from dropdown menu. When a Motion Detection motion is detected, camera will not detect any motion again within the time interval Interval you specified here.
2.4.2 Motion Region You can define the motion detection region within the image that camera captures, so this camera will ignore motions which are not covered by the motion region setting, and reduce the chances of false alarm. The descriptions of every setting in this menu will be given below: Item Description Region 1 – 3 Check the box to enable motion detection region 1 to 3. You can check multiple boxes to enable multiple motion detection regions.
2.4.3 Email You can define the destination address of E-mail sending and mail server parameters here. The descriptions of every setting in this menu will be given below: Item Recipient E-Mail Address E-Mail Subject Description Input the email recipient’s Email address here. Specify the title of sending email, so you can identify the mail sent from this camera from others quickly. Input the IP address or host name of the SMTP server (the server that delivers the Email for you) here.
2.4.4 FTP Configuration You can set FTP server’s parameters here. The descriptions of every setting in this menu will be given below: Item FTP Server FTP Port Description Input the IP address or host name of the FTP server you wish to use here. Input the port number of the FTP server you wish to use here. User Name Input the user name of the FTP server you wish to use here. Password Input the password of the FTP server you wish to use here. Input the remote folder name on the FTP server here.
2.4.5 SD Card Configuration You can define the filename and destination folder when saving a file in SD card. The descriptions of every setting in this menu will be given below: Item Description File Name Prefix Specify the filename prefix (the texts which will be added before the file sequence number). Destination Folder Specify the folder name that camera will store the saved image or video clip. Click ‘Apply’ to save settings and make the new settings take effect.
2.5 System Info You can use this menu to get the operational information of this camera: … After you selected ‘System Info.’, a sub-menu will appear. There are 4 sub-menus available here: Detailed descriptions of every setting will be given below. 2.5.1 Camera Information Camera information allows you to set the name and administrator’s password of this camera. The descriptions of every setting in this menu will be given below: Item Description Please specify the name of this IP Camera here.
2.5.2 Date / Time Setting This setting allows you to change the date and time of the real time clock in this IP camera. You can set the time manually, or use network time protocol (NTP) to set the time automatically. The descriptions of every setting in this menu will be given below: Item Description If you select ‘Set Date/Time manually’, you can set the date and time of this camera manually. Please input the date and time you wish to set here.
2.5.3 Utilities This menu allows you to upgrade firmware, clear all settings, reboot the IP camera, and switch LED lights on/off. The descriptions of every setting in this menu will be given below: Item Description If you downloaded latest firmware file from our website, you can click ’Browse’ button to pick a firmware file located on your computer’s hard drive and you can upload the firmware file to the IP camera later.
2.5.4 Status This menu provides all information about this IP camera, like firmware version, system uptime, date / time, and network information.
2.6 Account If you wish to allow other people to view the live image captured by this camera, but don’t want to allow them to modify system settings, you can give them user-level user name and password, so they can only view the image and can not change any system setting. When they want to click menus other than ‘Camera’, they will see the following message informing that they don’t have permission to do that: This camera supports up to 4** users.
When a user is added, it will be listed: The descriptions of every setting in this menu will be given below: Item Description Yes / No Enable or disable this user account. If you just want to remove the access privilege of certain account and will give the privilege back later, you don’t have to delete it, you can set to ‘No’ for this account when you want to remove the privilege temporarily, and set to ‘Yes’ for this user when you want to give the privilege back.
2.7 SDHC … After you selected ‘System Info.’, a sub-menu will appear. There are 4 sub-menus available here: Please click the SD card setting you wish to set, then refer to instructions given below: 2.7.1 Status Here shows the remaining card space for you.
2.7.2 Space Alarm When you’re using SD card to store captured image and video clip, you can have this camera to send an E-mail to you when there’s only little remaining space left on SD card. Please note: If you have set E-mail settings in ‘Motion Picture’ function, you can click ‘Copy Mail Config’ button to use the same setting. However, you can use a different setting here.
Chapter III: Using Surveillance Software 3-1 Installing IP Camera Surveillance Software The IP camera surveillance software provides various functions like video recording, after this software is installed, you can use your IP camera to safeguard your property. Please follow the following instructions to install the surveillance software. 1. Double click the setup file located in ‘xxx’ folder in supplied CD-ROM, when the following window appears, click ‘Next’. 2.
3. If you need installation program to create a desktop icon or a quick launch icon for you, click all items you need here, than click ‘Next’ to continue. 4. Here lists all options you chose in previous steps, if everything’s correct, click ‘Install’ to start installing procedure, or click ‘Back’ to go back to previous step to modify installing settings.
6. The installing procedure will take some time, please be patient. 6. When you see this window, it means the software installing procedure is complete. Please click ‘Finish’ to finish the procedure (IP camera surveillance software will start after you click ‘Finish’ button, if you want to start it later, uncheck ‘Launch IPCam Surveillance Software’ box).
3-2 Using IP camera surveillance software You can click ‘IPCam Surveillance Software’ icon from desktop, quick launch bar, or start menu to start the IP camera surveillance software. Before you start: IP camera surveillance software will only work when your monitor’s resolution is ‘1024 x 768’. Please change the resolution before you use IP camera surveillance software, or it won’t start.
Full screen Click this button to switch to full screen mode (only display all camera’s image), press ‘ESC’ key to quit full screen mode. Scan Click this button and the IP camera surveillance software will switch displaying the image of all connected camera automatically. Click this button once to activate scan function (scan icon will become blue ), click again to stop ). scanning (scan icon will become white Zoom out Zoom-out (To see more objects).
3-3 Configure IP camera surveillance software 3-3-1 Configure cameras Before you use this IP camera surveillance software, you must configure the camera(s) you wish to connect.
3-3-1-1 ‘Camera’ tab In this tab you can configure all cameras you wish to connect. Up to 16 cameras can be connected simultaneously: Here are the descriptions of all setting items: Item Channel Camera Search Description Select the channel number you wish to set. All cameras found on your local network will be displayed in ‘Camera Search’ box. Select Select a camera listed in ‘Camera Search’ box, and click ‘Select’ button to fill all parameters of selected camera in every camera configuration fields.
After you’ve set all channels you wish to set, click ‘OK’ to save settings, and if everything’s correct, you’ll see the camera’s image in IP camera surveillance software’s main menu: 3-3-1-2 Schedule Recording In this tab, you can setup scheduled video recording, so you can record the video captured by all cameras you have by a pre-defined schedule.
Here are the descriptions of all setting items: Item Channel One Time Schedules Description Select the channel number you wish to set. You can specify the one-time schedule for selected camera; this schedule will be executed once only. Click this button and a new window will appear: New (One Time Schedules) Please specify the time duration of this one-time schedule (the date and time of ‘From’ and ‘To’), then click ‘OK’ to save settings.
3-3-1-3 Audio For cameras that support audio, you can use this tab to decide if you wish to hear the audio captured by selected camera. Here are the descriptions of all setting items: Item Channel Mute Audio Record Video Only OK Cancel Description Select the channel number you wish to set. Check this box and the IP camera surveillance software will not play the audio captured by this camera. Check this box and the IP camera surveillance software will not record the audio captured by this camera.
3-3-1-4 Motion Record With this function activated, only motions captured by the camera will be recorded, so you don’t have to waste hard disk storage space on images you don’t need to pay attention to. WARNING: For applications that security is highly concerned, it’s not recommended to use this function since some tiny changes you may need to know may not be able to trigger the camera and the camera will not start recording.
3-3-2 General Settings You can set system-wide settings of this IP camera surveillance software in this menu. 3-3-2-1 ‘General’ tab All general settings like file storage directory and recording spaces can be set here. Here are the descriptions of all setting items: Item Data Directory Free Recording Space Description Set the directory (folder) you wish to store the recorded video and captured image. You can click ‘Browse’ button to pick a directory in your hard disk. Displays remaining storage space.
3-3-2-2 ‘E-Mail Setting’ tab If you want to use motion detection function and wish to get an email that contains the image captured by the camera, please setup your email related parameters here first. Here are the descriptions of all setting items: Item E-Mail Subject Description Specify the subject of sending email. Recipient E-Mail Here lists all email addresses you set. Address Click this button and you’ll be prompted to input the email address. Click ‘OK’ to save changes.
SMTP port Specify the port number of the SMTP server you wish to use here. By default (and the setting of most of SMTP servers) it’s ‘25’. SMTP Auth Select ‘Enable’ if your SMTP server requires authentication, select ‘Disable’ if it’s not required. If you don’t know if your SMTP server requires authentication, please refer to the setting of your email software or ask your ISP / network administrator. SMTP Account Input the SMTP account (username) of your SMTP server here.
3-3-2-3 Security If you don’t want other people to access this IP camera surveillance software, you can set a password to protect it. You’ll need to input the password every time you wish to use this IP camera surveillance software: To set password, please use ‘Security’ tab in ‘General Options’ menu: Here are the descriptions of all setting items: Item Description Enable Requires password authentication when this software starts.
3-3-2-4 About This tab shows the version number of the IP camera surveillance software you’re using.
3-4 Change Display Layout This IP camera surveillance software provides 8 kinds of display layout: Every layout displays different number of camera and camera arrangement, you can click the icon that presents a specific kind of layout, and the video displaying area will change accordingly. Displays the video of 1 camera only. Layout style 1: 1 Camera only Displays the video of up to 4 cameras. Layout style 2: 4 Cameras Displays the video of up to 6 cameras.
Displays the video of up to 8 cameras. Layout style 4: 8 Cameras Displays the video of up to 9 cameras. Layout style 5: 9 Cameras Displays the video of up to 10 cameras. Layout style 6: 10 Cameras Displays the video of up to 13 cameras. Layout style 7: 13 Cameras Displays the video of up to 16 cameras.
3-5 Full-screen modes If you want to use all available spaces on your monitor to display surveillance image, you can click ‘Full Screen’ button to switch display mode to full-screen mode. To exit full-screen mode, press ‘ESC’ key.
3-6 Scan If you have more than one camera configured, and you wish to switch the displaying image between cameras, you can click ‘Scan’ button to switch between all configured cameras. NOTE: If a camera is configured but disconnected, it will still be displayed in a scan sequence (you’ll see nothing and you’ll see ‘Disconnected’ text displayed at the upper-left corner of display image). Click ‘Scan’ button once to activate scan function (scan icon will become blue ).
3-7 Zoom-in / Zoom-out For cameras that support zoom-in / zoom-out function, you can use this function to see more objects that fall in the scope of camera’s view, or enlarge the image size of a certain object to see its detail.
3-8 PTZ For cameras that support pan - tilt function, you can change the position that camera points to, to see different places that fall in the scope of camera’s view. Please select a camera in video displaying area by clicking on its image, and then click the directions you wish the camera to move to (total 8 directions available). Click ‘Home’ button ( (default) position.
3-9 Snapshot You can take a snapshot of selected camera and save it to ‘Snapshot’ sub-folder of pre-defined data directory. Click snapshot button once to take a snapshot; you can take as much snapshot as you want before hard disk is full.
3-11 Video Playback You can playback all recorded video by clicking this button. A new window will appear: You have to search the video file before you can play it. There are two kinds of video search: Time Search (search all videos file that falls in a specific period of time) and Motion Search (search all videos recorded by motion detection function and falls in a specific period of time).
Chapter IV: Appendix 4.1 Specification Max Resolution: 640 x 480 pixels Sensor: 300K pixels 1/4" color CMOS sensor Gain control: Automatic Exposure: Automatic White Balance: Automatic Focal Length: 4.8 mm Aperture: F=1.8 Image (Video Setting) Image compression: MJPEG Image Video Digital 24-bit Color Frame rate: 30fps@QVGA, 20fps@VGA Video resolution: 176 x 144, 320x240, 640x480 System Hardware LAN Connector: One RJ-45 port to connect to 10/100Mbps Ethernet Wireless: IEEE 802.
4.2 Troubleshooting If the IP camera is not working properly, before you contact the dealer of purchase for help, please check the troubleshooting list here, this may help you to solve the problem by yourself and therefore saves your valuable time. Scenario Possible Solution a. Please confirm the IP address setting of the computer you’re using. If they’re not in the same subnet, they will not be able to communicate with each other. b.
to send image by anti-spam mechanism. Email or FTP, but nothing is received b. Please make sure you have enough permission for FTP uploading (You can try this by clicking ‘Upload a test file’ button). c. Make sure the user name and / or password of SMTP server is correct, if your SMTP server requires authentication (You can try this by click ‘Send a test Email’ button). d.