2Mpx PoE True Day & Night Bullet Netzwerkkamera Schnellinstallationsanleitung Vielen Dank, dass Sie dieses Produkt erworben haben! Bevor Sie dieses Produkt nutzen, überprüfen Sie bitte die Packungsinhalte. Falls Teile fehlen, kontaktieren Sie bitte Ihren Händler, um das/die fehlende(n) Teil(e) zu reklamieren. Verpackungsinhalt Nein Beschreibung 1 IP-Netzwerkkamera 3 Sonnenschutz 4 Schraube für Sonnenschutz 5 Halterungen-Set (nur IR-112E) 6 Benutzerhandbuch auf CD-ROM 7 Schnellinstallationsanleitung Anz.
Kennenlernen der IP-Kamera Nr. Beschreibung 1 Infrarot-LED 2 Tag-/Nachtsensor 3 Linse: Feste Brennweite.
Hardware-Ü berprüfung Befolgen Sie bitte die Anweisungen unten, um sich zu überzeugen, dass Ihre neue IP-Kamera richtig arbeiten kann. 1. Schließen Sie das Ethernet-Kabel an den LAN-Port an. 2. Schließen Sie das DC-Netzkabel an den DC-Netzstecker der IP-Kamera an. 3. Stecken Sie den DC-Netzadapter in die Wandsteckdose. 4. Wenn alles in Ordnung ist, sollte die linke LED am LAN-Port aufleuchten.
Montage von Zubehör --- IR-112E 1. Suchen Sie die Schrauben in der Verpackung und befestigen Sie mit einem Schraubenzieher den Sonnenschutz am Hauptkörper des Geräts. 2. Befestigen Sie die Metallhalterung zur Wandmontage an der Wand, dann befestigen Sie die Kugelkamera an der Halterung. Dazu stehen zwei Stellen zur Verfügung.
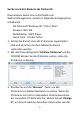
Suche nach der Kamera im Netzwerk Diese Kamera bietet eine Schnittstelle zum Web-UI-Management. Zurzeit ist folgendes Anzeigesystem erforderlich: ˙OS: Microsoft Windows XP / Vista / Win7 ˙Browser: IE8 / IE9 ˙Mobiltelefon: 3GPP Player ˙Quick Time: 7.0 oder höher 1. Achten Sie darauf, dass alle IP-Kameras angeschaltet sind und als erstes mit dem lokalen Netzwerk verbunden werden. 2. Mit dem Dienstprogramm ‘EdiView Finder.exe’ auf der CD-ROM können Sie die IP-Kamera suchen, ohne die IP-Adresse zu kennen: 3.
PC zuzuweisen. Dann haben Sie Zugriff auf die IP-Kamera, indem Sie im Webbrowser auf die ‘Link’-Taste klicken. 4. Klicken Sie auf die ‘Exit’-Taste, um EdiView Finder zu schließen. Zugriff auf die Web-UI der Kamera und Installation des ActiveX Plugins 1. Wenn sich die IP-Adresse im selben Unternetzwerk wie der verwaltete PC befindet. 2. Wählen Sie die IP-Kamera aus der Liste im IPFinder und klicken Sie auf ‘Link’, um auf das Gerät zuzugreifen.
Diese Meldung fordert zur Installation des ActiveX-Plugins auf, die nötig ist, um das Video von der IP-Kamera zu erhalten. Die Benachrichtigung wird unten am Internet Explorer angezeigt: 5. Wenn das Popup-Fenster ‘Die Windows-Firewall hat einige Funktionen dieses Programms blockiert’ erscheint, Klicken Sie auf ‘Allow access’, (Zugriff erlauben)', sonst kann die UI-Image-Funktion nicht richtig arbeiten. 6.
Klicken Sie auf ‘Yes’, um Änderungen zu erlauben. 7. Nach der Installation des After ActiveX-Plugins kann der Videostream von der Kamera angezeigt werden. Detaillierte Anweisungen finden Sie im Benutzerhandbuch.
COPYRIGHT Copyright Edimax Technology Co., Ltd. all rights reserved. No part of this publication may be reproduced, transmitted, transcribed, stored in a retrieval system, or translated into any language or computer language, in any form or by any means, electronic, mechanical, magnetic, optical, chemical, manual or otherwise, without the prior written permission from Edimax Technology Co., Ltd. Edimax Technology Co., Ltd.
For example, if you distribute copies of such a program, whether gratis or for a fee, you must give the recipients all the rights that you have. You must make sure that they, too, receive or can get the source code. And you must show them these terms so they know their rights. We protect your rights with two steps: (1) copyright the software, and (2) offer you this license which gives you legal permission to copy, distribute and/or modify the software.
distribution of the whole must be on the terms of this License, whose permissions for other licensees extend to the entire whole, and thus to each and every part regardless of who wrote it. Thus, it is not the intent of this section to claim rights or contest your rights to work written entirely by you; rather, the intent is to exercise the right to control the distribution of derivative or collective works based on the Program.
through you, then the only way you could satisfy both it and this License would be to refrain entirely from distribution of the Program. If any portion of this section is held invalid or unenforceable under any particular circumstance, the balance of the section is intended to apply and the section as a whole is intended to apply in other circumstances.
Federal Communication Commission Interference Statement This equipment has been tested and found to comply with the limits for a Class B digital device, pursuant to Part 15 of FCC Rules. These limits are designed to provide reasonable protection against harmful interference in a residential installation. This equipment generates, uses, and can radiate radio frequency energy and, if not installed and used in accordance with the instructions, may cause harmful interference to radio communications.
English: French: Czechian: Polish: Romanian: Russian: Magyar: Türkçe: Ukrainian: Slovakian: German: Spanish: Italian: Dutch: Portugese: Norwegian: Swedish: Danish: Finnish: This equipment is in compliance with the essential requirements and other relevant provisions of Directive 2004/108/EC. Cet équipement est conforme aux exigences essentielles et autres dispositions de la directive 2004/108/EC. Toto zařízení je v souladu se základními požadavky a ostatními příslušnými ustanoveními směrnic 2004/108/EC.
Declaration of Conformity We, Edimax Technology Co., Ltd., declare under our sole responsibility, that the equipment described below complies with the requirements of the European EMC directive (2004/108/EC). Equipment: 2M IP CAMERA BULLET Model No.: IR-112E Report No.: T130711D02-E The following European standards for essential requirements have been followed: EN 55022: 2010 (Class A) CISPR 22:2008(Ed6.