OAP1750 Quick Installation Guide 11-2020 / v1.
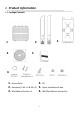
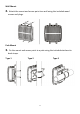
I. Product Information I-1. Package Contents 3 2 1 4 5 6 1. 2. 3. Access Point Antennas (2.4G x 3 & 5G x 3) Wall Mount Bracket x 1 4. 5. 6.
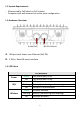
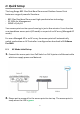
I-2. System Requirements - Ethernet cable, PoE Switch or PoE Injector - Computer with web browser for access point configuration I-3. Hardware Overview A LAN (PoE) B 3 LEDs & Reset A. LAN port with Power over Ethernet (PoE PD) B. 3 LEDs + Reset M-smart interface I-4. LED Status Power LAN Wireless Green Off Green Flashing Off Green Flashing Off LED Behavior The access point is on. The access point is off. LAN port is connected. Activity (transferring and receiving) LAN port is unconnected.
I-5. Reset If you experience problems with your access point, you can reset the device back to its factory settings. This resets all settings back to default. 1. Press and hold the reset button on the access point for at least 10 seconds. Then release the button. You may need to use a pencil or similar sharp object to push the reset button. 2. Wait for the access point to restart. The access point is ready for setup when the LED is green. I-6.
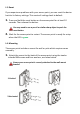
Wall Mount 2. Attach the mount and access point to a wall using the included wood screws and plugs. Pole Mount 3. Fix the mount and access point to a pole using the included stainless tie back straps.
II. Quick Setup The Long Range 802.11ac Dual-Band Concurrent Outdoor Access Point features a range of powerful functions: - 802.11ac Dual-band Concurrent high speed wireless technology - 32 SSIDs for Management - SNMP v1/v2c/v3 Your access point can be up and running in just a few minutes. It can function as a standalone access point (AP mode) or as part of an AP array (Managed AP mode).
3. Set your computer’s IP address to 192.168.2.x where x is a number in the range 3 – 100. Please ensure there are no other active network connections on your computer (disconnect Wi-Fi connections and Ethernet cables). 4. Enter the access point’s default IP address 192.168.2.2 into the URL bar of a web browser. 5. You will be prompted for a user name and password. Enter the default username “admin” and the default password “1234”. 6. You will arrive at the “System Information” screen shown below.
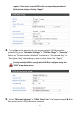
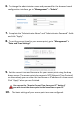
The next steps will help you to configure the following basic settings of the access point: - LAN IP Address 2.4GHz & 5GHz SSID & Security Administrator Name & Password Time & Date It is recommended you configure these settings before using the access point. 1. To change the access point’s LAN IP address, go to “Network Settings” > “LAN-side IP Address” and you will see the screen below. 2. Enter the IP address settings you wish to use for your access point.
require. Then enter a new SSID in the corresponding numbered fields below, before clicking “Apply”. 4. To configure the security of your access point’s 2.4GHz wireless network(s), go to “Wireless Settings” > “2.4GHz 11bgn” > “Security”. Select an “Authentication Method” and enter a “Pre-shared Key” or “Encryption Key” depending on your choice, then click “Apply”. If using multiple SSIDs, specify which SSID to configure using the “SSID” drop down menu. 5.
6. To change the administrator name and password for the browser based configuration interface, go to “Management” > “Admin”. 7. Complete the “Administrator Name” and “Administrator Password” fields and click “Apply”. 8. To set the correct time for your access point, go to “Management” > “Date and Time Settings”. 9. Set the correct time and time zone for your access point using the drop down menus.
III. Edimax Pro NMS Edimax Pro Network Management Suite (NMS) supports the central management of a group of access points, otherwise known as an AP Array. NMS supports up to 16 Edimax Pro access points with no additional wireless controller required or 32 access points with the APC 500 AP controller reducing costs and facilitating efficient remote AP management. Edimax Pro NMS is simple to setup.
When using an Edimax NMS AP controller, other connected APs are automatically set to Managed APs. In the case that the AP Controller cannot find your OAP1750 as a Managed AP, you can configure the setting manually as below: 1. Ensure all APs including your OAP1750 are connected to an Ethernet or PoE switch which is connected to a gateway/router. You can use your router as a DHCP server or you can later configure your AP Controller as a DHCP server. 2. Ensure all APs are powered on and check LEDs.
3. Ensure you have setup and designated one AP as the AP Controller which will manage all other connected APs (up to 32 depending on model). 4. Connect a computer to the OAP1750 via PoE switch using an Ethernet cable.
5. Open a web browser and enter the OAP1750’s IP address in the address field. The default IP address is 192.168.2.2 Your computer’s IP address must be in the same subnet as the OAP1750. Refer to the user manual for more help. If you changed the AP Controller’s IP address, or if your gateway/router uses a DHCP server, ensure you enter the correct IP address. Refer to your gateway/router’s settings. 6. Enter the username & password to login. The default username & password are admin & 1234. 7.
8. Click “Apply” to save the settings and your AP Controller & Managed APs should be fully functional. Use Edimax NMS on your AP controller to manage & monitor your Managed APs. Refer to your AP controller’s user manual for help with Edimax NMS.
COPYRIGHT Copyright Edimax Technology Co., Ltd. all rights reserved. No part of this publication may be reproduced, transmitted, transcribed, stored in a retrieval system, or translated into any language or computer language, in any form or by any means, electronic, mechanical, magnetic, optical, chemical, manual or otherwise, without the prior written permission from Edimax Technology Co., Ltd. Edimax Technology Co., Ltd.
Federal Communication Commission Interference Statement This equipment has been tested and found to comply with the limits for a Class B digital device, pursuant to Part 15 of FCC Rules. These limits are designed to provide reasonable protection against harmful interference in a residential installation. This equipment generates, uses, and can radiate radio frequency energy and, if not installed and used in accordance with the instructions, may cause harmful interference to radio communications.
EU Declaration of Conformity English: This equipment is in compliance with the essential requirements and other relevant provisions of Directive 2014/53/EU, 2014/35/EU. Français: Cet équipement est conforme aux exigences essentielles et autres dispositions de la directive 2014/53/EU, 2014/35/EU. Čeština: Toto zařízení je v souladu se základními požadavky a ostatními příslušnými ustanoveními směrnic 2014/53/EU, 2014/35/EU.
Declaration of Conformity We, Edimax Technology Co., Ltd., declare under our sole responsibility, that the equipment described below complies with the requirements of the European Radio Equipment directives. Equipment: 11ac Dual Band Concurrent Outdoor AP Model No.: OAP1750 The following European standards for essential requirements have been followed: Directives 2014/53/EU Spectrum EMF : EN 300 328 V2.1.1 (2016-11) EN 301 893 V2.1.1 (2017-05) : Draft EN 301 489-1 V2.2.
Notice According to GNU General Public License Version 2 This product includes software that is subject to the GNU General Public License version 2. The program is free software and distributed without any warranty of the author. We offer, valid for at least three years, to give you, for a charge no more than the costs of physically performing source distribution, a complete machine-readable copy of the corresponding source code.
1. You may copy and distribute verbatim copies of the Program’s source code as you receive it, in any medium, provided that you conspicuously and appropriately publish on each copy an appropriate copyright notice and disclaimer of warranty; keep intact all the notices that refer to this License and to the absence of any warranty; and give any other recipients of the Program a copy of this License along with the Program.
5. You are not required to accept this License, since you have not signed it. However, nothing else grants you permission to modify or distribute the Program or its derivative works. These actions are prohibited by law if you do not accept this License. Therefore, by modifying or distributing the Program (or any work based on the Program), you indicate your acceptance of this License to do so, and all its terms and conditions for copying, distributing or modifying the Program or works based on it. 6.