Office 1-2-3 Quick Installation Guide 11-2020 / v1.
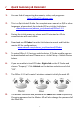
I Quick Summary & Reminder 1. You can find all supporting documents, video, and programs: http://office123.edimax.com 2. This is a Quick Install Guide. For complete user manual or QIG in other languages, please check the included CD or visit the link below: www.edimax.com/edimax_pro/download/Office1-2-3 3. During the initial power up, please wait 10 minutes for APs to communicate with each other. 4. Download our IP Finder from the link below to search and find the master AP for configurations. www.
9. 10. It is recommended that you use the default settings whenever possible. Just add user accounts and the Wi-Fi passwords where necessary. It is recommended to use import and export list for simple management of guest and office accounts. 11. When configuring, please check for a “Progress Circle” on the upper right hand side of the page. Please wait until the progress circle is finished before further configurations. 12.
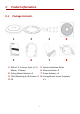
II Product Information II-1 Package Contents 1 2 3 4 5 6 7 8 1. Office 1-2-3 Access Point x 3 (1 5. Quick Installation Guide Master, 2 Slaves) 6. Ethernet Cable x 3 2. Ceiling Mount Bracket x 3 7. Power Adapter x 3 3. T-Rail Mounting Kit & Screws x 3 8. Ceiling Mount Screw Template x3 4.
II-2 System Requirements - Existing cable/DSL modem & router.
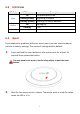
II-4 LED Status LED Color Blue Amber Off II-5 LED Status On Flashing Slowly Flashing Quickly On Flashing Off Description The access point is on. Upgrading firmware. Resetting to factory defaults. Starting up. Error. The access point is off. Reset If you experience problems with your access point, you can reset the device back to its factory settings. This resets all settings back to default. 1. Press and hold the reset button on the access point for at least 10 seconds then release the button.
III Quick Setup This quick setup is a guide to setting up your Office 1-2-3 high speed Wi-Fi network. Please note that these sections can be revisited later on for further configurations, but will serve as the basics of the system. III-1 Initial Setup– Computer The initial setup is a simple step-by-step process to start up the web user interface. Please follow the steps below: 1. Connect your computer to the PoE Switch using an Ethernet cable. 2.
3. Please wait for 10 minutes for the APs to communicate between themselves. 4. Download and Install the Edimax Cloud Discovery Tool (IP Finder) on your computer from the link below: www.edimax.com/edimax_pro/download/IPfinder 5.
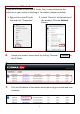
Unable to open IP Finder Tool If you were unable to open the IP Finder Tool, it may be because the antivirus on your system is blocking it. To unblock, please see below: 1. Right-click on the IP Finder tool and click “Properties” 2. Locate “Security” at the bottom of the window. Click the Unblock button. 6. Locate your master access point by clicking “Discover” the IP finder. 7. Click the IP address of the master access point to go into the web user interface.
Upon entering the webpage, you should be prompted to enter the username and password, enter them (default username: admin, password: 1234) to proceed: The web user interface is shown below: 8. Click “Wizard” and go to the next section to go through the setup wizard.
III-2 Initial Setup – Mobile Device The initial setup for mobile device is a simple step-by-step process to start up the mobile web user interface. 1. Connect the 3 access points to the PoE Switch using Ethernet cables. Please make sure the Ethernet cable is connected to the PoE port of the access point as shown below: NOTE: One of the APs has a Master sticker while the other two have Slave stickers, indicating their relationships. If you need to, remove the cap from the underside of the access point.
4. On your mobile device, connect to the device network. The device network SSID is “device”. 5. Open the “Office123” app. 6. Locate the Master AP and tap it.
7. The browser will be at the login page of Office 1-2-3. Upon entering the webpage, you should be prompted to enter the username and password, enter them (default username: admin, password: 1234) to proceed: The web user interface is shown below: 8. Tap “Wizard” and go to the next section to go through the setup wizard. NOTE: Please remember to assign a WPA-PSK2 password to the Device Network later to prevent others from accessing the network freely.
III-3 Setup Wizard The wizard aims to help you with setting the basic settings of the Office 1-2-3 network including Office Accounts, Guest Accounts and Device Network, etc. NOTE: In most cases, simply go through the steps below by clicking “Next” except editing password, Wi-Fi key, and accounts. 1. Click “Wizard” on the web interface to start the setup wizard: 2. Change the password for Administrator and Frontdesk account.
3. Time Settings: Set the time of your access point. NOTE: It is highly recommended to turn on the NTP server so the device can remain on time even after power recycling. Choose an NTP server that is close to your country. Date and Time Settings Local Time Set the access point’s date and time manually using the drop down menus. Acquire Click to acquire time and date automatically from your PC. Current Time from your PC Use NTP Check to enable automatic time and date sync to an NTP server.
Auto Daylight Check / uncheck to enable / disable daylight saving function. Saving Server Name Use the drop down menu to select a region. A server will be shown after selecting the region. Choose the region according to your location. Update Specify how often (in hours) the access point synchronizes Interval with the NTP server. Time Zone Select the time zone of your country/region. If your country/region is not listed, please select another country/region whose time zone is the same as yours. 4.
SSID Hide SSID Enter an SSID name for the guest network. Enable: the SSID will be hidden. Clients must manually enter the SSID in order to connect. Disable: the SSID will be visible (default) Encryption Select from WPA/WPA2-PSK, WPA2-PSK, WPA-PSK or None. Type Select “TKIP/AES”, “TKIP” or “AES” encryption type. The “TKIP/AES” is the default encryption type. WiFi Password Please enter a Wi-Fi password. Bandwidth Limit This function limits the aggregated speed of the entire SSID.
5. Office Network: Configure the office network settings. Use the drop down menu to select whether you want “Same settings for both Radios” or “Different settings for each Radio”. Please refer to the previous section for explanation of the settings. NOTE: It is recommended to leave the settings as it is (default values) and press “Next”. 6. Device Network: Configure the device network settings.
MAC Address Controls Select “Allow List” from the drop down menu to have an “Allow List”. Enter the Device Name, MAC Address and click “Add” to add the device into the allow list. Import List or Export List You can Import or Export list of MAC addresses. The list is in .CSV format so you can edit it using a spread sheet program such as Microsoft Excel. 7. Guest Accounts: Configure the guest account settings.
Manage User Account Click “Setup” for the page options below: Add or Edit Click “Add” to add a new user, or “Edit” to edit an existing user: Name Description Password Confirm Password Valid Time Enter a user name. Enter a description for possible future reference Enter a password Enter the same password as above Select a valid time in days or hours. Or you can select “Always” to always allow this account’s access to the network.
Generate Printed Ticket Click “Setup” for the page options below: This section configures the information required to generate random accounts to be printed out. The print out is the easiest way to create account for your guests on demand. Valid Time Select a valid time in days or hours. Or you can select “Always” to always allow this account’s access to the network. Account Select a number from the drop down menu for the number Number of guest accounts to generate.
Customized Ticket Click the “Setup” button beside the “Customize Ticket”. This section allows you to change the content of the printed ticket. In the “Printout Content” section, enter your desired messages. You can preview the message by clicking the “Preview” button. A window will pop up with the preview.
Going back to the Generate Printed Ticket section, click “Next” for the page below: Click “Print All” to print all available tickets out, or click “Back” to go back to the previous page for more configuration. Captive Portal Click “Setup” Landing Page Default Language Idle Timeout Login for the page options below: Check either “Redirect to the original URL” or the http:// field. If http:// field is checked, enter a website such as your company’s website. Choose a default language.
Password Retry Lockout password retry. If login password has been entered incorrectly for the number entered here, it will be locked. Customize Login Portal Click the “Edit” button beside the “Login Portal” for the page below: Header Image Logo Image Title Message Background Color Click “Choose File” to select a file as the header image. Click “Choose File” to select a file as the logo image. Enter / edit a title message. Click on the field where color selection will be available.
Accept by Default Terms of use Check / uncheck to enable / disable auto-accepting terms of use agreement. Enter / edit the terms of use message Click “Preview” for captive portal preview in another page (example below). If you are sure of the content, click “Confirm” to confirm customization of the captive portal, or “Cancel” to forfeit the changes. SMS Service Click “Setup” for the page options below: Select your SMS service provider and enter necessary fields for the service. 8.
Add or Edit Click “Add” to add a new user, or “Edit” to edit an existing user: Name Enter a user name. Description Enter a description for possible future reference Password Enter a password Confirm Enter the same password as above Password Click “Apply” to apply the settings, or “Cancel” to forfeit the changes. Delete If you wish to delete certain users, check the user entries and click “Delete”. Upload List or Download List You can upload or download list of office accounts. The list is in .
IV Office 1-2-3 Deployment Once you have completed the setup wizard outlined in Quick Setup, you will have to determine how you will deploy your Office 1-2-3 Access Points. 1. Install the Master AP in a less crowded area. This will reduce the loading of the Master AP. Due to the fact that the Master AP being the controller of the network, having a reduced loading will benefit.
2. Install the slave APs in more crowded areas. Since the APs will only be extending the Wi-Fi signals (no need to manage the network), they can be installed where connections are in greater demand. The distance between the Master AP and the Slave APs is recommended to be between 20-25 meters. 3. Install Master/Slave AP Hardware on the POE switch. Connect a PoE switch to the Master and Slave AP’s LAN 1 (PoE) port using an Ethernet cable.
FAQ 1. What needs to be prepared to quickly setup the Office 1-2-3 Wi-Fi system? A Device Network We will be setting up MAC Address Control List for the device network. Please prepare the list. Guest Network We will be setting up captive portal for your guest network. Please prepare the associated guest user account list, captive portal header image (size: 800x200 pixels), logo image (size: 200x50 pixels), Title Message, background color, terms of use message and landing page. 2.
COPYRIGHT Copyright Edimax Technology Co., Ltd. all rights reserved. No part of this publication may be reproduced, transmitted, transcribed, stored in a retrieval system, or translated into any language or computer language, in any form or by any means, electronic, mechanical, magnetic, optical, chemical, manual or otherwise, without the prior written permission from Edimax Technology Co., Ltd. Edimax Technology Co., Ltd.
Federal Communication Commission Interference Statement This equipment has been tested and found to comply with the limits for a Class B digital device, pursuant to Part 15 of FCC Rules. These limits are designed to provide reasonable protection against harmful interference in a residential installation. This equipment generates, uses, and can radiate radio frequency energy and, if not installed and used in accordance with the instructions, may cause harmful interference to radio communications.
equipment. All guidelines of this and of the computer manufacture must therefore be allowed at all times to ensure the safe use of the equipment. EU Countries Intended for Use The ETSI version of this device is intended for home and office use in Austria, Belgium, Bulgaria, Cyprus, Czech, Denmark, Estonia, Finland, France, Germany, Greece, Hungary, Ireland, Italy, Latvia, Lithuania, Luxembourg, Malta, Netherlands, Poland, Portugal, Romania, Slovakia, Slovenia, Spain, Sweden, Turkey, and United Kingdom.
EU Declaration of Conformity English: This equipment is in compliance with the essential requirements and other relevant provisions of Directive 2014/53/EU, 2014/35/EU. Français: Cet équipement est conforme aux exigences essentielles et autres dispositions de la directive 2014/53/EU, 2014/35/EU. Čeština: Toto zařízení je v souladu se základními požadavky a ostatními příslušnými ustanoveními směrnic 2014/53/EU, 2014/35/EU.
Declaration of Conformity We, Edimax Technology Co., Ltd., declare under our sole responsibility, that the equipment described below complies with the requirements of the European Radio Equipment Directive. Equipment: AC1300 DBDC Ceiling-mount AP Model No.: Office 1-2-3 The following European standards for essential requirements have been followed: Directives 2014/53/EU Spectrum EMF : EN 300 328 V2.1.1 (2016-11) EN 301 893 V2.1.1 (2017-05) : Draft EN 301 489-1 V2.2.1 (2019-03) Draft EN 301 489-17 V3.2.
Notice According to GNU General Public License Version 2 This product includes software that is subject to the GNU General Public License version 2. The program is free software and distributed without any warranty of the author. We offer, valid for at least three years, to give you, for a charge no more than the costs of physically performing source distribution, a complete machine-readable copy of the corresponding source code.
intact all the notices that refer to this License and to the absence of any warranty; and give any other recipients of the Program a copy of this License along with the Program. You may charge a fee for the physical act of transferring a copy, and you may at your option offer warranty protection in exchange for a fee. 2.
Therefore, by modifying or distributing the Program (or any work based on the Program), you indicate your acceptance of this License to do so, and all its terms and conditions for copying, distributing or modifying the Program or works based on it. 6. Each time you redistribute the Program (or any work based on the Program), the recipient automatically receives a license from the original licensor to copy, distribute or modify the Program subject to these terms and conditions.