SP-1101W Quick Installation Guide 10-2013 / v1.
I. Productinformatie ................................................................................. 1 I-1. Inhoud van de verpakking .......................................................................................................1 I-2. I-3. I-4. I-5. I-6. Voorzijde .................................................................................................................................1 LED-status ............................................................................................
I. Productinformatie I-1. Inhoud van de verpakking Smart Plug Switch I-2.
I-3. LED-status LED Kleur Switch Status Status Beschrijving Smart plug stopcontact is ingeschakeld. Aan Groen Voeding Uit Smart plug stopcontact is uitgeschakeld. Aan Smart plug is ingeschakeld. Uit Smart plug is uitgeschakeld. Groen Smart plug is aan het opstarten of aan het herstarten. Smart plug bevindt zich in installatiemodus en is klaar voor setup. Smart plug is verbonden met het draadloze netwerk en cloud. Smart plug is verbonden met het draadloze netwerk maar niet met de cloud.
I-5. Productlabel Het productlabel, dat zich aan de achterzijde van de smart plug switch bevindt, geeft de inkomende en uitgaande voeding weer en het standaard wachtwoord van uw smart plug. Het wachtwoord dient om veiligheidsredenen gewijzigd te worden zodra u het installatieproces doorlopen heeft. Het wachtwoord is vereist om externe toegang te krijgen tot de smart plug. I-6. Resetten Als u problemen ondervindt met uw smart plug kunt u de plug terugzetten naar de standaard fabrieksinstellingen.
II. Hardware installatie Volg de onderstaande instructies om ervoor te zorgen dat uw smart plug op de juiste manier is aangesloten en klaar is voor de set-up. Als u meerdere smart plug's wilt installeren, steek dan maar een stekker in het stopcontact en installeer één smart plug tegelijk. 1. Steek de smart plug in een stopcontact. 2. Wacht even terwijl de smart plug opstart. De smart plug is gereed voor set-up als de netwerk LED langzaam knippert rood om de installatiemodus aan te geven.
III. Smart Plug set-up Om uw smart plug te installeren met de gratis EdiPlug app, download a.u.b. de EdiPlug app en volg de set-up instructies voor iOS of Android. Na installatie, kunt u de EdiPlug app gebruiken om uw smart plug switch op afstand aan- en uit te schakelen, en u kunt automatische schema's en e-mailmeldingen instellen. 1. Zoek in de Apple-app-store of Google Play naar “EdiPlug”. 2. Download en installeer de app. 3. Volg de onderstaande instructies voor iOS of Android.
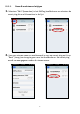
III-1. iOS Volg de onderstaande instructies om een nieuwe smart plug toe te voegen aan de EdiPlug app op iOS: U dient zich binnen het Wi-Fi bereik van de smart plug te bevinden. Als u meerdere smart plug's heeft, steek er dan maar een in het stopcontact en installeer één smart plug tegelijkertijd. 1. Zoek naar een Wi-Fi netwerk met de naam "EdiPlug.Setup" en maak hier verbinding mee, zoals hieronder weergegeven: 2.
3. Voer uw Wi-Fi wachtwoord in en tik op "OK". Het volgende scherm geeft aan dat de set-up voltooid is! 4. Uw smart plug wordt nu weergegeven op het EdiPlug hoofdscherm. Schuif de schakelaar om uw smart plug (of elk elektrisch apparaat dat u erop aangesloten hebt) aan of uit te schakelen. 5. De netwerk LED van de smart plug zou moeten weergegeven: aan en groen om aan te geven dat er een netwerk en cloud verbinding tot stand is gekomen.
III-1-1. Naam & wachtwoord wijzigen 1. Selecteer "Edit" (bewerken) in het EdiPlug hoofdscherm en selecteer de smart plug die u wilt bewerken in de lijst. 2. Voer een nieuwe naam en wachtwoord in voor uw smart plug en tik op "Back" (terug) om terug te gaan naar het hoofdscherm. Uw smart plug wordt nu weergegeven onder de nieuwe naam.
III-1-2. Een bestaande smart plug toevoegen aan het hoofdscherm 1. Binnen het EdiPlug hoofdscherm, klik op het "+" icoon in de rechterbovenhoek en selecteer een plug uit de lijst. 2. Voer uw smart plug wachtwoord in en tik op "OK". Klik op "Back" (terug) op het volgende scherm om te voltooien.
III-2. Android Volg de onderstaande instructies om een nieuwe smart plug toe te voegen aan de EdiPlug app op Android: U dient zich binnen het Wi-Fi bereik van de smart plug te bevinden. Als u meerdere smart plug's heeft, steek er dan maar een in het stopcontact en installeer één smart plug tegelijkertijd. 1. Open de EdiPlug app en klik op het "+" icoon in de rechterbovenhoek van het scherm. 2.
3. Voer uw Wi-Fi wachtwoord in en tik op "OK". Het volgende scherm geeft aan dat de set-up voltooid is! 4. Uw smart plug wordt nu weergegeven op het EdiPlug hoofdscherm. Schuif de schakelaar om uw smart plug (of elk elektrisch apparaat dat u hierop aangesloten hebt) aan of uit te schakelen.
5. De netwerk LED van de smart plug zou moeten weergegeven: aan en groen om aan te geven dat er een netwerk én cloud verbinding tot stand is gekomen. U kunt gebruik maken van de EdiPlug app om uw smart plug te beheren vanuit elke willekeurige internetverbinding.
III-2-1. Naam & wachtwoord wijzigen 1. Selecteer "Edit" (bewerken) in het EdiPlug hoofdscherm en selecteer de smart plug die u wilt bewerken in de lijst. 2. Voer een nieuwe naam en wachtwoord in voor uw smart plug en tik op "Back" (terug) om terug te gaan naar het hoofdscherm. Uw smart plug wordt nu weergegeven onder de nieuwe naam.
III-2-2. Een bestaande smart plug toevoegen aan het hoofdscherm 1. Binnen het EdiPlug hoofdscherm, klik op het "+" icoon in de rechterbovenhoek en selecteer een plug uit de lijst. 2. Voer het wachtwoord van uw smart plug in en tik op "OK". Klik op "Back" (terug) op het volgende scherm om te voltooien.
Federal Communication Commission Interference Statement This equipment has been tested and found to comply with the limits for a Class B digital device, pursuant to Part 15 of FCC Rules. These limits are designed to provide reasonable protection against harmful interference in a residential installation. This equipment generates, uses, and can radiate radio frequency energy and, if not installed and used in accordance with the instructions, may cause harmful interference to radio communications.
EU Declaration of Conformity English: This equipment is in compliance with the essential requirements and other relevant provisions of Directive 2006/95/EC, 2011/65/EC. Français: Cet équipement est conforme aux exigences essentielles et autres dispositions de la directive 2006/95/CE, 2011/65/CE. Čeština: Toto zařízení je v souladu se základními požadavky a ostatními příslušnými ustanoveními směrnic 2006/95/ES, 2011/65/ES.
EU Declaration of Conformity English: This equipment is in compliance with the essential requirements and other relevant provisions of Directive 2006/95/EC, 2011/65/EC. Français: Cet équipement est conforme aux exigences essentielles et autres dispositions de la directive 2006/95/CE, 2011/65/CE. Čeština: Toto zařízení je v souladu se základními požadavky a ostatními příslušnými ustanoveními směrnic 2006/95/ES, 2011/65/ES.
Declaration of Conformity We, Edimax Technology Co., Ltd., declare under our sole responsibility, that the equipment described below complies with the requirements of the European R&TTE directive 2006/95/EC, and directive 2011/65/EC(RoHS) . Equipment: Smart Plug Switch Model No.: SP-1101W The following European standards for essential requirements have been followed: ETSI EN 300 328 V1.7.1: 2006 ETSI EN 301 489-17 V2.1.1: 2009 ETSI EN 301 489-1 V1.9.
Notice According to GNU General Public License Version 2 This product includes software that is subject to the GNU General Public License version 2. The program is free software and distributed without any warranty of the author. We offer, valid for at least three years, to give you, for a charge no more than the costs of physically performing source distribution, a complete machine-readable copy of the corresponding source code.
1. You may copy and distribute verbatim copies of the Program’s source code as you receive it, in any medium, provided that you conspicuously and appropriately publish on each copy an appropriate copyright notice and disclaimer of warranty; keep intact all the notices that refer to this License and to the absence of any warranty; and give any other recipients of the Program a copy of this License along with the Program.
5. You are not required to accept this License, since you have not signed it. However, nothing else grants you permission to modify or distribute the Program or its derivative works. These actions are prohibited by law if you do not accept this License. Therefore, by modifying or distributing the Program (or any work based on the Program), you indicate your acceptance of this License to do so, and all its terms and conditions for copying, distributing or modifying the Program or works based on it. 6.
22