VD-233ED User Manual 08-2013 / v1.
- CONTENTS - Chapter I Introduction ................................................................................................ 3 1.1 Highlights of your new Network IP Camera ..........................................................3 1.2 Key feature of this network IP camera include: .....................................................4 1.3 Safety Instructions ...............................................................................................5 1.4 Packaging Contents ...........
-8 PTZ Control .............................................................................................................. 47 3-9 Event ....................................................................................................................... 49 3-9-1 Settings ...................................................................................................................... 50 3-9-2 Media ....................................................................................................
Chapter I Introduction 1.1 Highlights of your new Network IP Camera This Vandal Dome network camera provides super image quality and remarkable bandwidth efficiency. The camera supports H.264 High Profile, Main Profile, and Baseline Profile video stream compression technology. With H.264 higher video compression performance, the file size of transmitted video stream is extremely reduced so as to optimize the network bandwidth efficiency.
1.2 Key feature of this network IP camera include: IR Illumination Distance over 15~20 Meters. Mechanical IR-Cut Filter Removable. Up to QXGA Resolution at 20 FPS. H.264 /MPEG4 /MJPEG Multiple Stream Output for Simultaneously Live Monitoring and High Resolution Recording. Built-in Micro SD Memory Card Slot for Local Storage. Event Management by Motion Detection, Alarm Trigger. Support Two Way Audio. Support Mobile Phone Remote Monitoring. Power over Ethernet. WDR support.
1.3 Safety Instructions Please follow the safety instructions listed below when you’re using this Network IP Camera, or you would harm this camera and / or yourself! Also, the warranty will become void if you disobey these safety instructions. This Network IP Camera is sophisticated electronic device; do not drop it from high places. Do not place this IP Camera at hot / humid places, and avoid direct sunlight. This IP Camera is not a toy; keep it out from the reach of children.
1.4 Packaging Contents Please check the contents of your new Network IP Camera when you unpack the package. If any item is missing, please contact your dealer of purchase for help. 1 2 5 6 3 4 Item No.
1.5 Familiar with your new Network IP Camera 2 Item Description 1.Front Cover Bubble cover, metal cover. 2.Rear Cover Metal cover. 1 Front cover: 1 2 3 Item Description 1. Bubble Cover Transparent bubble cover, for lens and LEDs protection. 2. Black inner cover Inside protection. 3. Anti - drop line Protective front cover drop during installation.
Rear Cover: 5 1 6 7,8 3 2 4 11 10 12 9 Item Description 1. IR LED Board IR illumination 2. Top Mount For Rotated function 3. Mid Mount For tilt function 4. Down Mount For pan function 5. LENS Vari-focal Lens 6. Main Board PCBA platform 7. SD Board Micro SD card slot 8. Reset button For resetting function (on SD card board) 9. Power Terminal Block J15, details in Ch 1-1.5 10. GPIO Terminal Block J17, details in Ch 1-1.5 11. GPIO Terminal Block J18, details in Ch 1-1.5 12.
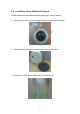
1.6 Installation of the Network IP Camera Please follow the instructions below to setup your new IP camera. 1. Unscrew your front cover by using the tool from the tools package. 2. Attach your PU foam pad on the bottom of your rear cover. 3. Create your GPIO, Power cable with Terminal blocks.
2-1. Please refer to the definition of the terminal blocks chart below. It is also printed on the motherboard. GPIO Terminal Block (J17, 5pins) GPIO Terminal Block (J18, 5pins) Power Terminal Blocks (J15, 2pins) Pin No. Function Pin No. Function Pin No. Function Pin 1 AGND Pin 1 GND Pin 1 DC 12V Pin 2 Audio Out Pin 2 Alarm In1 Pin 2 GND Pin 3 Ext MIC In Pin 3 Alarm In2 Pin 4 RS485 D+ Pin 4 Alarm Out Pin 5 RS485 D- Pin 5 GND 4.
A B 5. Connect all your cables to their respective terminals. Insert your micro SD/SDHC card for option. Please see the location refer to the chart in chapter 1-1.4. 6. If this camera is connected to a PoE switch then the device can be powered on without using the power adapter. 7. Repower on the camera and refer to the following procedures in chapter 2 to access and configure it. 8. If everything works fine, you can put the camera on the wall or ceiling by using the screw in the tools package. 9.
10.See the above image and find the location of reset button on the SD card board. Press the button 0ver 10 seconds to reboot the device when needed.
Chapter II Using Network IP Camera by Web Interface 2.1 Locate the IP address of Network IP Camera You can use your new Network IP Camera by its web user interface via web browser. Currently the viewing system requirement for Network IP camera is: ■ OS: Microsoft Windows XP/Vista/7 ■ Browser: IE7, 8, 9 (32Bit) ■ Cell phone: 3GPP player Note: For best viewing experience we recommend that you use Microsoft Windows Internet Explorer 7, 8, or 9.
Note: The contents of the CD-ROM can also be downloaded from the Edimax website: http://www.edimax.com/en/index.php 2. After the installation is complete, double-click the “EdiView_Finder” icon to execute the application. 3. Press ‘Discover’ button to search for all IP Cameras on your local network (make sure all IP Cameras are powered on and connect to local network first). When you find any IP Camera, you can double click on it or click ‘Link’ button to connect to it by your web browser.
If you need to change a certain IP Camera’s IP address, you can also click on the IP Camera you wish to change IP address, then click ‘Change IP’ button to change select IP Camera’s IP address setting. If you no longer need to use this utility, click ‘Exit’ button to close it.
2.2 Connect to IP Camera’s Web User Interface and Install ActiveX Plugin When you know the IP address of IP Camera, you can connect to it by Internet Explorer web browser by entering its IP address in address bar. The use login screen will appear when you get connected: IP Camera’s administrator username and password are both ‘admin’ (lower case) by default. Click ‘OK’ button or press ‘ENTER’ key on your keyboard when you finish entering username and password.
For IE 9: Click ‘Install’ button located at the bottom of IE to install ActiveX plugin.
Click ‘Allow access’, or IP Camera will not be able to function properly. When you’re installing Internet Explorer plugin, you may also be prompted that if you want to allow changes to be made to your computer: Click ‘Yes’ to allow changes. After ActiveX plugin is installed, you should be able to see the video stream from camera.
NOTE: If this is the first time you use this IP Camera, you can refer to chapter 2.4 for instructions on Setup Wizard, which will guide you to complete the software setup of your new IP Camera.
2.3 Viewing Live Video After ActiveX control is installed, you can view IP camera’s video by web browser. Just connect to IP camera by web browser and login, then you can see live video from IP camera: There are various controls on web page, here are descriptions of every control item: Item Description ‘Home’ button This button is visible in all setup pages of IP camera, and you can go back to live video view by clicking this button when you’re in other page. Stream Select video stream type: H.
‘Connect’ button If you want to see video in detail, switch to original size. If your computer monitor’s resolution is not enough and you want to see full image view, switch to fit screen and image size will adjust automatically. Start live video view. ‘Disconnect’ button Stop live video view. / ‘Snapshot’ button Take a snapshot or camera video and save image file on your computer.
Start / Stop talk Button volume. Start or stop playing your voice through IP camera’s audio output. When talk is stopped, people at IP camera will not hear you. / Please note: you need a microphone connected to your computer, and computer’s mixer setting must enable microphone recording, or nothing will be outputted by IP camera.
2.4 Client Settings In ‘Client Settings’ menu, you configure basic IP camera settings like data transfer protocol and data storage folder. To access ‘Client Settings’ menu, click ‘Client Settings’ button on the left.
Here are the descriptions of every setup item: Item Description RTSP Select this option to use RTSP (Real-Time Streaming Protocol) to transfer video data. This protocol allows for more real-time audio and video streams. However, network packets may be lost due to network burst traffic and images may be broken. HTTP Select this option to use HTTP (Hyper-Text Transfer Protocol) to transfer video data. If you don’t know which one you should use, select ‘RTSP’.
Chapter III Advanced Configuration If you wish to configure IP camera’s settings, you can access IP camera’s ‘Configuration’ menu, which provides various kinds of system setting. To access configuration menu, click ‘Configuration’ button on the left. The ‘Configuration’ submenu will appear, please pick a setup item you wish to configure.
3-1 System In this menu, you can configure basic IP camera settings like hostname and time. Here are the descriptions of every setup item: Item Description Host Name Input the IP camera’s hostname here, it can be any meaningful words or characters that will help you to identify this IP camera. You can use IP camera’s installation location as host name, and this will help you to identify IP camera when you have many IP cameras installed.
Daylight Saving Keep the current date and time Synchronize with computer time Synchronize with NTP Server If the area you live uses daylight saving, check this box; otherwise do not check this box to keep time correct. Select this option and date / time setting will not be changed when you click ‘Apply’ in the page. You can check ‘Camera Date and Time’ item in this page to know IP camera’s current date and time setting. Select this item and IP camera will use your computer’s time as its time.
3-2 Security In this menu, you can configure IP camera’s login account. There are three kinds of account: - Administrator (Can view IP camera’s video and make changes of camera setting) - User (Can view IP camera’s video and see LOG, and change Client Setting and language) - Guest (Can view IP camera’s video , and change language ) There can be multiple users, but only one administrator is allowed, and you can’t change administrator’s user name (it will always be ‘administrator’).
Here are the descriptions of every setup item: Item Description Password / Retype Input administrator’s new password in both ‘Password’ and Password ‘Retype Password’ field, and click ‘Modify’ button to change (Administrator) administrator’s password. Please note: Don’t forget administrator’s password! Or you’ll need to reset IP camera’s all settings to get administrator’s password recovered. Account List Here lists all users existed in IP camera.
3-3 Network In this menu, you can configure IP camera’s network setting. 3-3-1 ‘General’ setup page Setup IP address for this IP camera. This IP camera supports both IPv4 and IPv6 IP address. Here are the descriptions of every setup item: Item LAN Description Select this option to assign an IP address to LAN port (or obtain an address from DHCP server automatically). Available options are: DHCP IPv4: Obtain an IPv4 IP address from DHCP server on LAN automatically.
DHCP IPv4 / IPv6: Obtain both IPv4 and IPv6 address from DHCP server on LAN automatically. Static IPv4 / IPv6: Assign an IPv4 / IPv6 address to IP camera manually. If you don’t have a DHCP server on your local area network, you must use this option to specify an IP address.
RTP Data Port must change corresponding settings in external network devices (NVR or CMS software) so they can receive this IP camera’s video. Input RTP data port number here. When you finish with above settings, click ‘Apply’ button to save changes.
3-3-2 ‘Advanced’ setup page You can setup advanced network settings in this page. This page is intended for advanced settings only, and this IP camera will work fine even you don’t make any changes to this page. Here are the descriptions of every setup item: Item Multicast Description Enable video multicast: Multicast Group Address: Input multicast group address here, must be an address between 232.0.0.0 to 232.255.255.255. Multicast video port: Input port number for video multicast here.
Multicast audio port: Input port number for audio here. Multicast RCTP audio port: Input port number for RCTP audio here. Bonjour QoS DDNS Multicast TTL: Input TTL value for multicast here. If you’re using MacOS and you have Bonjour installed, you can use it to discover this IP camera. Enable QoS to improve the data transfer priority of this IP camera (Your local area network must support QoS). You can select Video / Audio’s QoS DSCP value (0 to 63), or both video and audio.
3-4 IP Filter When this IP camera is directly connected to Internet and not protected by firewall, this function acts like a mini built-in firewall to protect the safety of this IP camera and avoid attacks from hackers. Here are the descriptions of every setup item: Item Description Enable Filter Check this box to enable IP address filter, uncheck this Box to disable this function. Accepted IP list Here lists all IP address that can build connections to this IP camera.
Click ‘New’ button to add IP address into accepted IP list. Deny IP list Here lists all IP address that cannot build connections to this IP camera. If you want to remove a set of IP address from the list, click on the IP address and click ‘Remove’ button. IP Address Input the starting and ending IP address of IP address you (Accepted IP list) wish to deny connections here. IP camera will deny connections established from these IP address.
3-5 Video You can adjust the image of the IP camera in this menu.
3-5-1 Image Setting You can adjust the image parameters in this page. Here are the descriptions of every setup item: Item Description Brightness / Control the image parameters. Click ‘ - ‘ to decrease value, or click Contrast / ‘ + ‘ to increase value. You can also input the value in the field Saturation / directly. Sharpness Default Set all above values to default value ‘128’.
Power Line Frequency Condition (ABW) WDR IR-cut (Day/Night) Day Select the frequency of power line of the place you’re using this IP camera. This will help to reduce the flicker of certain lights in the image. Select the condition that you’ll be using this IP camera from dropdown menu. - Outdoor: Outdoor environment using. - Auto: IP camera will adjust its parameters automatically. - Night: You’ll be using this IP camera in dark places where lights are insufficient.
3-5-2 Video Setting You can adjust the video transfer parameters in this page. Here are the descriptions of every setup item: Item Description H.264 Select the compression of main stream: H.264 / MPEG4. /MPEG4 Video Select video resolution. Resolution - H.
640x480 (VGA) / 320x240 (QVGA) Please note that some video resolution is not available when video encoder is ‘MPEG4’. When network speed is insufficient, select a lower video resolution will help. Frame Rate Select video frame rate. Please note that some frame rate is not available when video encoder is ‘H.264’. When network speed is insufficient, select a lower frame rate will help. Rate Select video bit rate.
3-5-3 Overlay Setting You can adjust the video overlay parameters in this page. Here are the descriptions of every setup item: Item Description Enable Time Check this box to enable overlaying time stamp on video. Stamp Remove the Check this box to remove time stamp’s background color. You background color may find this will help the readability of time stamp text in of the text some cases.
Overlay show certain text / picture on the video and help people to identify this IP camera. Click ‘Browse’ button to pick a picture on your computer, then click ‘Update’ button to use the picture. Please note that there are certain restrictions: - Select .bmp / .jpg / .jpeg image files only. - Image’s resolution should be less than 160 x 128, and can be divided by 4. - Do not upload image files that size is greater than 64KB. When you finish with above settings, click ‘Apply’ button to save changes.
3-6 Audio You can adjust audio input / output parameters here. Here are the descriptions of every setup item: Item Description Enable Check this box to enable microphone. If you don’t want to hear Microphone voice from IP camera, you can uncheck this box to disable it. Audio Type The format is fixed as G.711 (Microphone) Microphone If the voice received by microphone is too loud or silent, you can Gain use this function to improve voice volume, so you can hear voice from IP Camera Module more clearly.
3-7 Motion This IP camera is capable to detect object’s motion, so IP camera will only record when there’s motion and save disk storage space. Motion detection is performed by examine the movement of objects in rectangular motion detection area. You can define up to 3 motion detection areas. Here are the descriptions of every setup item: Item Description Enable Motion Check this box to enable motion detection. Detection Enable Check this box to enable this motion detection window.
- Resize: Use the mouse the drag the four corners (upper-left/right, lower-left/right) to resize it. If you only want to adjust width or height, drag the four sidebars (top, bottom, left, and right). Title Input characters in title field to change motion detection area’s (Window 1 to title text so you can identify it. Window 3) Please note that you have to click ‘Apply’ button and the text will change. Percentage Select the percentage of pixel change that will trigger motion detection alert.
3-8 PTZ Control If you mount the IP camera on pan-tilt camera cradles that support pan-tilt control via RS-485 connection, you can use this function to control pan-tilt camera cradle so you can control the orientation of IP camera from remote place. Here are the descriptions of every setup item: Item Description Enable RS-485 Check this box to enable RS-485 functionality. Use Pelco-D Select this option and RS-485 interface will output pan-tile control signal in Pelco-D format.
RS-485 connection is very long (longer than 200M), it’s not recommended to use high speed connection (greater than 2400bps). - Data Bits: Select data bits of RS-485 connection. - Parity: Select parity bit: odd, even, or space. - Stop Bit: Select stop bit: 1 or 2. - Home/Up/Down/Left/Right: Input the command string used to move pan-tilt camera cradle to home or up/down/left/right position. You can click ‘Test’ button to send command string for testing.
3-9 Event When there’s an event, you can use this setup page to define what IP camera should do, like send an Email or trigger digital output to activate external alarm. There are three setup pages: 1. Setting: Define a new event and manage events. 2. Media: Define what kind of media file should be saved on designate media. 3. Event Server: Define the details of remote server. Please refer to following sections for detailed instructions.
3-9-1 Settings This page lists all existing events. You can click ‘Modify’ button to edit an existing event, or ‘Remove’ to delete an existing event. To create a new even, just click “New” button to add an Event setting.
To add a new event, click ‘New’ button and the descriptions of every setup item is listed below: Item Description Enable Setting Check this box to enable this event. If you just want to disable this event temporarily, you can uncheck this box to keep this event and disabling while not deleting it. Title Input any description text for this event so you can identify it quickly. You can use alphabets, numbers, and symbols include: !$-.@^_~ (no spaces allowed).
3-9-2 Media You can define what kind of media file should be saved on designated media. Here are the descriptions of every setup item: Item Description One Snapshot Save a picture file when event is triggered. H.264 Video Save a H.264 video clip. You can also select the recording length before and / or after the time when event is triggered in ‘Pre Event’ and ‘Post’ Event’.
3-9-3 Event Server You can define the details of remote media server: FTP (File), SMTP (Email), and Samba (File). A Samba server can be any computer running windows operating system with network neighbor function enabled. Many stand-alone network file server also support samba server function. Enable FTP server then it will show the related items of FTP server setting.
Here are the descriptions of every setup item: Item Description Enable FTP Check this box to enable FTP server upload. Server - FTP Server: Input FTP server’s IP address or hostname. - Port: Input FTP server’s port number. In most cases it should be default value ‘21’. - User Name: Input FTP server’s username. - Password: Input FTP server’s password. - File Path Name: Input the path where you want to save file on FTP server, like ‘upload/record’.
SMTP Server Check this box to enable Email send. - SMTP Server: Input SMTP server’s IP address or hostname. - Port: Input SMTP server’s port number. In most cases it should be default value ‘25’. - Sender Email Address: Input the sender’s email address that will appear in the Email send by IP camera.
Enable SMTP Server then UI shows the items as below. Item Description Samba Server Check this box to enable Samba server file upload. - Samba Server Address: Input Samba server’s IP address or hostname. - Path: Input the path where you want to save file on Samba server, like ‘upload/record’. If you want to save file on this user’s home directory, you can leave this field blank. - User Name: Input Samba server’s username. - Password: Input Samba server’s password.
3-10 Recording to Micro SD Card When a Micro SD card is inserted into IP camera, you can save video files on it. Note: 1. Be sure that the Micro SD Card format should be FAT32. The NTFS format cannot be supported by this camera. 2. Unlink motion detection; this function will record video at specified time period on selected weekday(s). Here are the descriptions of every setup item: Item Description Enable External Check this box to record video on SD card.
3-11 SDHC The IP camera has an optional Micro-SD card slot. The UI shows the capacity is 0 MB when the module without Micro-SD card slot and memory card. If you need the function please check the option when you place the order of the IP camera module. Once the SD card is inserted, the UI will show the capacity of the Micro-SD card like the image hereunder. There are two UI pages to show the record on the Micro-SD card. They are mapping to the setting of “Recording to SD card” and “Event” accordingly.
Set the time range then click “Search” then shows the records like below.
3-12 Log You can check the usage log of IP camera here. In this page, you can click: 1. First page / Final page: Jump to first / final page of log. 2. Previous / Next: Jump to previous or next page of log. 3. Remove: Clear log. You’ll be prompted for confirmation.
3-13 Device Info You can check the information and network settings of this IP camera. These information are very useful when you need to repair or fix the problem of this IP camera.
3-14 Maintenance You can do some maintenance job about this IP camera here. Here are the descriptions of every setup item: Item Description Reboot Click this button to reboot the IP camera. This function is useful when you find IP camera is not working properly. Reset Clear all settings of IP camera and reset to factory default setting. Backup Backup IP camera’s setting and save it on your computer. Backup to Backup IP camera’s setting and save it on Micro SD card.
SD card device Upgrade SD card. Upgrade IP camera’s firmware. Click ‘Browse’ button to select a firmware image file on your computer first, then click ‘Upgrade’ button. 3-15 Language You can change the display language of web interface. Click ‘Language’ button and select one language. More languages may available in latest firmware file.
Chapter V Troubleshooting Please don’t panic when you found this IP Camera is not working properly. Before you send this IP Camera back to us, you can do some simple checks to save your time: Problem Possible solution(s) description Can’t 1) Please check the IP address of IP Camera again. connect to 2) Please make sure the network cable is correctly IP Camera connected to your local area network. 3) Please make sure power cable is correctly connected to IP Camera.
Digital I/O User Manual DI/DO connector – Use in applications for e.g. motion detection, event triggering, SD recording and alarm notifications via FTP/EMAIL/SAMBA. •Digital output — For connecting external devices such as relays, alarm bell or LEDs. Connected devices can be activated by the ConfigurationEvent interface or digital output buttons on the Home page.
Please refer to the following illustration for DI connection method CAMERA DI H SW RL Power Trigger GND L GND Suggested Component Value Power(VDC) 3.
Federal Communication Commission Interference Statement This equipment has been tested and found to comply with the limits for a Class B digital device, pursuant to Part 15 of FCC Rules. These limits are designed to provide reasonable protection against harmful interference in a residential installation. This equipment generates, uses, and can radiate radio frequency energy and, if not installed and used in accordance with the instructions, may cause harmful interference to radio communications.
The ETSI version of this device is intended for home and office use in Austria, Belgium, Bulgaria, Cyprus, Czech, Denmark, Estonia, Finland, France, Germany, Greece, Hungary, Ireland, Italy, Latvia, Lithuania, Luxembourg, Malta, Netherlands, Poland, Portugal, Romania, Slovakia, Slovenia, Spain, Sweden, Turkey, and United Kingdom. The ETSI version of this device is also authorized for use in EFTA member states: Iceland, Liechtenstein, Norway, and Switzerland.
EU Declaration of Conformity English: This equipment is in compliance with the essential requirements and other relevant provisions of Directive 2004/108/EC. French: Cet équipement est conforme aux exigences essentielles et autres dispositions de la directive 2004/108/EC. Czechian: Toto zařízení je v souladu se základními požadavky a ostatními příslušnými ustanoveními směrnic 2004/108/EC. Polish: Urządzenie jest zgodne z ogólnymi wymaganiami oraz szczególnymi warunkami określonymi Dyrektywą UE 2004/108/EC.
WEEE Directive & Product Disposal At the end of its serviceable life, this product should not be treated as household or general waste. It should be handed over to the applicable collection point for the recycling of electrical and electronic equipment, or returned to the supplier for disposal.
Declaration of Conformity We, Edimax Technology Co., Ltd., declare under our sole responsibility, that the equipment described below complies with the requirements of the European EMC directive (2004/108/EC). Equipment: Model No.: Vandal Dome IP Camera VD-233ED Report No.: T120815D05-E The following European standards for essential requirements have been followed: EN 55022:2006+A1: 2007 +A2:2010 (Class A) CISPR 22: 2008 (Ed 6.
Notice According to GNU General Public License Version 2 This product includes software that is subject to the GNU General Public License version 2. The program is free software and distributed without any warranty of the author. We offer, valid for at least three years, to give you, for a charge no more than the costs of physically performing source distribution, a complete machine-readable copy of the corresponding source code.
TERMS AND CONDITIONS FOR COPYING, DISTRIBUTION AND MODIFICATION 0. This License applies to any program or other work which contains a notice placed by the copyright holder saying it may be distributed under the terms of this General Public License.
b) Accompany it with a written offer, valid for at least three years, to give any third party, for a charge no more than your cost of physically performing source distribution, a complete machine-readable copy of the corresponding source code, to be distributed under the terms of Sections 1 and 2 above on a medium customarily used for software interchange; or, c) Accompany it with the information you received as to the offer to distribute corresponding source code.
8. If the distribution and/or use of the Program is restricted in certain countries either by patents or by copyrighted interfaces, the original copyright holder who places the Program under this License may add an explicit geographical distribution limitation excluding those countries, so that distribution is permitted only in or among countries not thus excluded. In such case, this License incorporates the limitation as if written in the body of this License. 9.
76