UM-1EX_multi1.book 1 ページ 2005年11月1日 火曜日 午後3時19分 Owner’s Manual Bedienungsanleitung Mode d’emploi Manuale d’uso Manual del usuario Thank you, and congratulations on your choice of the UM-1EX USB MIDI Interface. 201a Before using this unit, carefully read the sections entitled: “USING THE UNIT SAFELY” and “IMPORTANT NOTES” (p. 2; p. 4). These sections provide important information concerning the proper operation of the unit.
UM-1EX_multi1.book 2 ページ 2005年11月1日 火曜日 午後3時19分 USING THE UNIT SAFELY The symbol alerts the user to important instructions or warnings.The specific meaning of the symbol is determined by the design contained within the triangle. In the case of the symbol at left, it is used for general cautions, warnings, or alerts to danger. Used for instructions intended to alert the user to the risk of death or severe injury should the unit be used improperly.
UM-1EX_multi1.book 3 ページ 2005年11月1日 火曜日 午後3時19分 007 023 • Make sure you always have the unit placed so it is level and sure to remain stable. Never place it on stands that could wobble, or on inclined surfaces. ............................................................................................... • DO NOT play a CD-ROM disc on a conventional audio CD player. The resulting sound may be of a level that could cause permanent hearing loss. Damage to speakers or other system components may result.
UM-1EX_multi1.book 4 ページ 2005年11月1日 火曜日 午後3時19分 IMPORTANT NOTES 291a In addition to the items listed under “USING THE UNIT SAFELY” on pages 2 and 3, please read and observe the following: Placement Maintenance 352a 401a • This device may interfere with radio and television reception. Do not use this device in the vicinity of such receivers. • 352b • Noise may be produced if wireless communications devices, such as cell phones, are operated in the vicinity of this unit.
UM-1EX_multi1.book 5 ページ 2005年11月1日 火曜日 午後3時19分 Handling CD-ROMs 801 • Avoid touching or scratching the shiny underside (encoded surface) of the disc. Damaged or dirty CD-ROM discs may not be read properly. Keep your discs clean using a commercially available CD cleaner. 204 * Microsoft and Windows are registered trademarks of Microsoft Corporation. 206e * 206j * The screen shots in this document are used in compliance with the guidelines of the Microsoft Corporation.
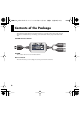
UM-1EX_multi1.book 6 ページ 2005年11月1日 火曜日 午後3時19分 Contents of the Package The UM-1EX includes the following items. When you open the package, first make sure that all items are included. If any are missing, contact the dealer where you purchased the UM1EX. USB MIDI Interface UM-1EX CD-ROM This contains drivers for use with the UM-1EX. Owner’s Manual This is the manual you are reading. Please keep it on hand for reference.
UM-1EX_multi1.book 7 ページ 2005年11月1日 火曜日 午後3時19分 Contents Names of Things and What They Do................................................................... 9 Getting Connected and Installing Drivers (Windows) ..................................... 11 About the Driver Modes ................................................................................................................ 11 Installing the Driver..................................................................................................
UM-1EX_multi1.book 8 ページ 2005年11月1日 火曜日 午後3時19分 Deutsch Herstellung der Verbindung und Installation der Treiber (Windows) ............ 48 Installation des Treibers................................................................................................................. 48 Windows XP/2000-Anwender ............................................................................................ 48 Herstellung der Verbindung und Installation der Treiber (Macintosh) ..........
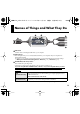
UM-1EX_multi1.book 9 ページ 2005年11月1日 火曜日 午後3時19分 Names of Things and What They Do 3 4 6 1 5 2 7 8 1 USB Cable Use this when connecting the UM-1EX to your computer. 2 USB Indicator This will light when you’ve connected the UM-1EX to your computer and your computer has detected the UM-1EX. In order for your computer to detect the UM-1EX, you must install the driver and make settings. (→“Getting Connected and Installing Drivers” Windows (p. 11) / Macintosh (p.
UM-1EX_multi1.book 10 ページ 2005年11月1日 火曜日 午後3時19分 4 THRU Switch Selects the destination to which the MIDI messages that flow in through the UM-1EX’s MIDI IN cable are to output. ■THRU switch ON/OFF setting You can use the THRU switch to switch the destination device for MIDI messages from the MIDI keyboard or digital piano connected to the MIDI IN cable. There is no need to change any cable connections.
UM-1EX_multi1.book 11 ページ 2005年11月1日 火曜日 午後3時19分 Getting Connected and Installing Drivers (Windows) About the Driver Modes What is a driver? A “driver” is software that transfers data between the UM-1EX and application software running on your computer, when your computer and the UM-1EX are connected. The driver sends data from your application to the UM-1EX, and from the UM-1EX to your application.
UM-1EX_multi1.book 12 ページ 2005年11月1日 火曜日 午後3時19分 Installing the Driver The installation procedure will differ depending on your system. Please proceed to one of the following sections, depending on the system you use. • Windows XP/2000 users..........................................................................................p. 12 • Windows Me/98 users .............................................................................................p.
UM-1EX_multi1.book 13 ページ 2005年11月1日 火曜日 午後3時19分 5. Click [OK] to close the System Properties dialog box. 6. Exit all currently running software (applications). Also close any currently open windows. If you are using virus checking or similar software, you must exit all of these programs as well. 7. Prepare the CD-ROM. Insert the CD-ROM into your computer’s CD-ROM drive.
UM-1EX_multi1.book 14 ページ 2005年11月1日 火曜日 午後3時19分 13. Operation of the UM-1EX Connect the UM-1EX to your computer. A message of “Found New Hardware” will appear. Please wait. * This unit is equipped with a protection circuit. A brief interval (a few seconds) after connecting the UM1EX is required before the unit will operate normally. Windows XP: 1. The Found New Hardware Wizard dialog box will appear.
UM-1EX_multi1.book 15 ページ 2005年11月1日 火曜日 午後3時19分 ■ Giving priority to Background Services To ensure that MIDI data is handled smoothly, proceed as follows to make this setting. Windows XP: 1. Open the System Properties dialog box. 1. From the Windows start menu, choose Control Panel. 2. In “Pick a category,” click “Performance and Maintenance.” 3. In “or Pick a Control Panel icon,” click the System icon. Depending on your setup, the System icon may appear directly in the Control Panel (Classic view).
UM-1EX_multi1.book 16 ページ 2005年11月1日 火曜日 午後3時19分 Windows 2000: 1. Click the Windows Start button, and from the menu that appears, select Settings | Control Panel. 2. In Control Panel, double-click the System icon. 3. Click the Advanced tab. 4. At the right of the Performance field, click [Performance Options]. The Performance Options dialog box will appear. fig.back2000 5. In the Application response field, choose “Background services” and click [OK]. 6.
UM-1EX_multi1.book 17 ページ 2005年11月1日 火曜日 午後3時19分 Windows Me/98 users 1. With the UM-1EX left unconnected, start up Windows. Do not connect the UM-1EX to the computer until you reach Step 9. 2. Exit all currently running software. Also close any open windows. If you are using virus checking or similar software, be sure to exit it as well. 3. Prepare the CD-ROM. Insert the CD-ROM into the CD-ROM drive of your computer. 4. Click the Windows Start menu. From the menu that appears, select Run.... The “Run...
UM-1EX_multi1.book 18 ページ 2005年11月1日 火曜日 午後3時19分 Setting the Driver The following describes the settings needed to use the UM-1EX with Media Player or other sequencer software using Windows standard device settings. If you are using sequencer software that does not utilize Windows standard device settings, make the device settings within the sequencer software. Windows XP users 1. Open the Sounds and Audio Devices Properties dialog box. 1. From the Windows start menu, choose Control Panel. 2.
UM-1EX_multi1.book 19 ページ 2005年11月1日 火曜日 午後3時19分 Windows 2000/Me users 1. Open the Sounds and Multimedia Properties dialog box. 1. Click the Windows start button, and from the menu that appears, select Settings | Control Panel. 2. In Control Panel, double-click the Sounds and Multimedia icon. If Sounds and Multimedia icon is not displayed, click “Show all control panel options” in the frame at the left. 2. Click the Audio tab. fig.2K-E 3.
UM-1EX_multi1.book 20 ページ 2005年11月1日 火曜日 午後3時19分 Windows 98 users 1. Open the Multimedia Properties dialog box. 1. Click the Windows Start menu, and from the menu that appears, select Settings | Control Panel. 2. In Control Panel, double-click the Multimedia icon. 2. Click the MIDI tab. fig.2K-E 3. Select [Single instrument], and select the MIDI device from the list that appears. If you want to use Media Player to play a sound module connected to the UM-1EX’s MIDI OUT cable, select “EDIROL UM-1 MIDI.
UM-1EX_multi1.book 21 ページ 2005年11月1日 火曜日 午後3時19分 Getting Connected and Installing Drivers (Macintosh) About the Driver Modes What is a driver? A “driver” is software that transfers data between the UM-1EX and application software running on your computer, when your computer and the UM-1EX are connected. The driver sends data from your application to the UM-1EX, and from the UM-1EX to your application.
UM-1EX_multi1.book 22 ページ 2005年11月1日 火曜日 午後3時19分 Mac OS X users ■ Installing the driver * If the “Authenticate” dialog box appears during the installation, input the password and click “OK.” * What you actually see on your Macintosh screen may be different, depending on your computing environment and the operating system you’re using. 1. With the UM-1EX left unconnected, start up Macintosh. * Disconnect all USB cables other than those for your keyboard and mouse, and restart your Macintosh. 2.
UM-1EX_multi1.book 23 ページ 2005年11月1日 火曜日 午後3時19分 ■ Setting the driver The following describes the settings enabling use of the UM-1EX with sequencer software using Macintosh standard device settings. If you are using sequencer software that does not utilize Macintosh standard device settings, make the device settings within the sequencer software. * What you actually see on your Macintosh screen may be different, depending on your computing environment and the operating system you’re using. 1.
UM-1EX_multi1.book 24 ページ 2005年11月1日 火曜日 午後3時19分 7. Set the device name. 1. With the new external device selected, click Show Info. 2. Enter the name in the Device Name field. 8. Connect the ▼ and ▲ symbols (which signify the outputs and inputs) of the UM-1 icon to those of the new external device icon by using the mouse to drag between them.s Use the mouse to drag a connection 9. If running Mac OS X v10.3 or earlier: Close the Audio MIDI Setup dialog box. The settings are completed.
UM-1EX_multi1.book 25 ページ 2005年11月1日 火曜日 午後3時19分 10. Click Test Setup. The shape of the mouse cursor changes . 11. Click the area shown in the illustration. If the UM-1EX’s MIDI OUT indicator starts blinking, the settings are correct. 10, 12 Test Setup Use the mouse to drag a connection 12. Click Test Setup and complete the confirmation. 11 Click the icon 13. Close the Audio MIDI Setup dialog box. .
UM-1EX_multi1.book 26 ページ 2005年11月1日 火曜日 午後3時19分 Mac OS 9 users ■ Installing the UM-1 driver Use either OMS or FreeMIDI as the MIDI driver. The included UM-1 driver is an add-on module for using the UM-1EX with OMS or FreeMIDI. OMS can be found in the OMS 2.3.8 E folder within the OMS (Mac OS 9) folder of the CD-ROM. If you would like to know more about OMS, refer to OMS_2.3_Mac.pdf which can be found in the same folder.
UM-1EX_multi1.book 27 ページ 2005年11月1日 火曜日 午後3時19分 5. Verify the Install Location, and click [Install]. The installation location will be shown differently depending on your system. Make sure that you have selected the startup disk for the system you are currently using. fig.05-20 6. If a message like the following is displayed, click [Continue]. The other currently running software will exit, and installation will continue. 7. A dialog box will indicate Installation was successful.
UM-1EX_multi1.book 28 ページ 2005年11月1日 火曜日 午後3時19分 ■ OMS settings If you are using FreeMIDI, proceed to “FreeMIDI settings” (p. 31). 1. Operation of the UM-1EX Set the UM-1EX’s ADVANCED (mode select) Switch to the ON position. 2. Operation of the UM-1EX Connect the UM-1EX to your Macintosh. * Connect the cable to the USB connector of the Macintosh itself, not to the USB connector of the keyboard. * This unit is equipped with a protection circuit.
UM-1EX_multi1.book 29 ページ 2005年11月1日 火曜日 午後3時19分 fig.3-6_35 6. The Create a New Studio Setup dialog box will appear. Click [Cancel]. If you accidentally clicked [OK], click [Cancel] in the next screen. fig.3-8_35 7. Choose “Open” from the File menu. From the OMS Setting folder that you copied in step 3, select the UM-1 file, and click [Open]. A screen like the one shown here will appear. fig.3-9_35 8. From the Edit menu, select OMS MIDI Setup.
UM-1EX_multi1.book 30 ページ 2005年11月1日 fig.3-10_40 9. From the File menu, choose Make Current. If you are unable to select Make Current, it has already been applied, and you may continue to the next step. 10. Verify that MIDI transmission and reception can be performed correctly. From the Studio menu, choose Test Studio. fig.OMS3 11. When you move the mouse cursor near the MIDI connector icon, the cursor will change to a shape. Click the MIDI connector icon shown in the illustration.
UM-1EX_multi1.book 31 ページ 2005年11月1日 火曜日 午後3時19分 ■ FreeMIDI settings 1. 2. Set the UM-1EX’s ADVANCED (mode select) Switch to the ON position. Operation of the UM-1EX Operation of the UM-1EX Connect the UM-1EX to your Macintosh. * Connect the cable to the USB connector of the Macintosh itself, not to the USB connector of the keyboard. * This unit is equipped with a protection circuit. A brief interval (a few seconds) after connecting the UM1EX is required before the unit will operate normally. 3.
UM-1EX_multi1.book 32 ページ 2005年11月1日 火曜日 午後3時19分 fig.FreeMIDI 9. The mouse cursor will change to the shape of a keyboard. Click the icon shown in the illustration. If the UM-1EX’s MIDI OUT indicator starts blinking, the settings are correct. 10. Once again choose the MIDI menu command Check Connections to end the test. 11. From the File menu, choose Quit to exit FreeMIDI Setup.
UM-1EX_multi1.book 33 ページ 2005年11月1日 火曜日 午後3時19分 Basic Use This chapter describes different basic methods of connecting the UM-1EX according to how the UM-1EX is to be used.
UM-1EX_multi1.book 34 ページ 2005年11月1日 火曜日 午後3時19分 Transmitting MIDI Messages from the sequencer software to a MIDI sound module or digital piano If transmitting MIDI messages from the sequencer software to a MIDI sound module or digital piano, or if using a MIDI sound module’s or digital piano’s sound generator to play the sounds from the playback of sequencer software on the computer, make the following connections and settings. fig.
UM-1EX_multi1.book 35 ページ 2005年11月1日 火曜日 午後3時19分 Transmitting MIDI messages from a MIDI Keyboard or other device to a MIDI sound module If you want to play a MIDI keyboard and send MIDI messages to a MIDI sound module, make the connections and settings shown below. There is no need to connect the UM-1EX to a computer. fig.connect-thru_e Connect to the MIDI IN connector of the MIDI sound module.
UM-1EX_multi1.book 36 ページ 2005年11月1日 火曜日 午後3時19分 ■ THRU switch ON/OFF setting You can use the THRU switch to switch the destination device for MIDI messages from the MIDI keyboard or digital piano connected to the MIDI IN cable. There is no need to change any cable connections. Switch Setting OFF ON MIDI Message Destination Device MIDI messages are transmitted to the computer (sequencer software). MIDI messages are transmitted to the MIDI device (e.g., MIDI sound module) connected to the MIDI OUT cable.
UM-1EX_multi1.book 37 ページ 2005年11月1日 火曜日 午後3時19分 Appendices About Standard Driver Mode Use this mode when using the standard MIDI driver provided with the operating system. * Standard driver mode supports only Windows XP SP2 or later, and Mac OS X. If you are using Windows 98/Me/2000/XP or XP SP1, or if you are using Mac OS 9, you must turn the ADVANCED (mode select) Switch ON before you connect the UM-1EX to your computer. Installation of the standard driver 1. * 2. 3. 4.
UM-1EX_multi1.book 38 ページ 2005年11月1日 火曜日 午後3時19分 Troubleshooting If you experience problems, read this chapter first. It contains tips for solving most problems. * For details on operating your Windows or Macintosh computer, refer to the owner’s manual of the computer and operating system you are using. Problems Related to the USB Driver Cannot install the driver correctly Install the UM-1 driver once again as described in Getting Connected and Installing Drivers (Windows) (p.
UM-1EX_multi1.book 39 ページ 2005年11月1日 火曜日 午後3時19分 Is your computer’s power-conservation mode turned off? If power-conservation settings are enabled on your computer, please disable any such settings. For the procedure, refer to the owner’s manual of your computer. Is there sufficient free space on your hard disk? Delete unneeded files to increase the amount of free space. After deleting the unneeded files, empty the recycling bin.
UM-1EX_multi1.book 40 ページ 2005年11月1日 火曜日 午後3時19分 Windows XP/2000 displays a “Hardware Installation” or “Digital Signature Not Found” dialog box Did you make “Driver Signing Options”? In order to install/re-install the driver, you must make the settings described in “Driver Signing Options” (p. 12).
UM-1EX_multi1.book 41 ページ 2005年11月1日 火曜日 午後3時19分 “Find new hardware wizard” does not execute automatically “Find new hardware wizard” ends before the process is completed “Found unknown device” appears even though you installed the driver (Windows) Is the USB cable connected correctly? Make sure that the UM-1EX’s USB cable and your computer are correctly connected. It may take about 15seconds (or more) after the USB cable is connected.
UM-1EX_multi1.book 42 ページ 2005年11月1日 火曜日 午後3時19分 UM-1EX is not detected when making OMS or FreeMIDI settings (Mac OS 9 users) Is the UM-1EX detected? • Reconnect the UM-1EX. • If other USB devices are connected, connect only the UM-1EX. • It is possible that the Macintosh did not correctly detect and initialize the UM-1EX. Leave the UM-1EX connected, and restart your Macintosh. If it is still not detected, shut down your Macintosh, and then restart it.
UM-1EX_multi1.book 43 ページ 2005年11月1日 火曜日 午後3時19分 Deleting the Driver If you were unable to install the driver according to the procedure given, the UM-1EX may not be recognized correctly by the computer. In this case, use the following procedure to delete the driver, and then follow the procedure to install the driver once again. Windows users Here’s how to uninstall the dedicated driver. 1. Start up Windows with the UM-1EX disconnected. Disconnect all USB cables other than a USB keyboard or USB mouse.
UM-1EX_multi1.book 44 ページ 2005年11月1日 火曜日 午後3時19分 Macintosh (Mac OS X) users 1. Start up Macintosh with the UM-1EX disconnected. Disconnect all USB cables other than a USB keyboard or USB mouse. 2. Prepare the CD-ROM. Insert the CD-ROM into the CD-ROM drive of your Macintosh. 3. In the Driver (Mac OS X) folder of the CD-ROM, double-click “UM1_Uninstaller.” 4. The display will indicate “This uninstalls EDIROL UM-1 driver from this Macintosh.”; click [Uninstall].
UM-1EX_multi1.book 45 ページ 2005年11月1日 火曜日 午後3時19分 Problems When Using the UM-1EX Sound is interrupted during MIDI playback In Windows, did you make the setting described in “Giving priority to background services”? In order to ensure that MIDI processing occurs smoothly, make the setting described inGiving priority to Background Services. (➔Windows XP (p. 15) / Windows 2000 (p.
UM-1EX_multi1.book 46 ページ 2005年11月1日 火曜日 午後3時19分 Operating system becomes unstable Operation becomes unstable when the computer is started up with the UM-1EX already connected Please start up your computer with the UM-1EX disconnected, and then connect the UM-1EX. On a computer that uses a USB keyboard, starting up the computer with the UM-1EX already connected may cause operation to become unstable. In this case, start up the computer with the UM-1EX disconnected, and then connect the UM-1EX.
UM-1EX_multi1.
UM-1EX_multi1.book 48 ページ 2005年11月1日 火曜日 午後3時19分 Herstellung der Verbindung und Installation der Treiber (Windows) Installation des Treibers Windows XP/2000-Anwender 1. Starten Sie Windows bei nicht angeschlossenem UM-1EX. Schließen Sie den UM-1EX nicht an den Computer, solange Sie nicht Schritt 13 erreicht haben (S. 50). * Entfernen Sie sämtliche USB-Kabel außer denen der USB-Tastatur und der USB-Maus (falls vorhanden).
UM-1EX_multi1.book 49 ページ 2005年11月1日 火曜日 午後3時19分 6. Beenden Sie alle aktuell ausgeführten Programme (Anwendungen). Schließen Sie außerdem alle noch geöffneten Programmfenster. Wenn Sie ein Antivirus-Programm oder eine ähnliche Software benutzen, müssen Sie diese Programme ebenfalls beenden. Deutsch 7. Halten Sie die CD-ROM bereit. Legen Sie die CD-ROM in das CD-ROM-Laufwerk Ihres Computers.
UM-1EX_multi1.book 50 ページ 2005年11月1日 火曜日 午後3時19分 13. Operation of the UM-1EX Schließen Sie den UM-1EX an Ihren Computer an. Die Meldung “Neue Hardware gefunden” wird angezeigt. Bitte warten Sie. * Dieses Gerät ist mit einem Schutzschaltkreis ausgestattet. Nach dem Anschluss des UM-1EX benötigt das Gerät eine kurze Zeitspanne von einigen Sekunden, bis es den normalen Betrieb aufnimmt. Windows XP: 1. Das Dialogfeld “Assistent Neue Hardware gefunden” erscheint.
UM-1EX_multi1.book 51 ページ 2005年11月1日 火曜日 午後3時19分 Herstellung der Verbindung und Installation der Treiber (Macintosh) * Geben Sie in das eventuell erscheinende Dialogfeld “Authenticate” (Authentifizierung) das Kennwort ein und klicken Sie auf “OK”. * Die tatsächliche Anzeige auf Ihrem Macintosh-Bildschirm kann anders aussehen. Das hängt von Ihrer ComputerUmgebung und Ihrem Betriebssystem ab. 1. Starten Sie Macintosh bei nicht angeschlossenem UM-1EX.
UM-1EX_multi1.book 52 ページ 2005年11月1日 火曜日 午後3時19分 ■ Konfiguration des Treibers Im folgenden werden die Einstellungen beschrieben, die die Verwendung des UM-1EX mit Sequenzsoftware unter Verwendung der Standardgeräteeinstellungen von Macintosh ermöglicht. Wenn Sie eine Sequenzsoftware verwenden, die keine Macintosh Standardgeräteeinstellungen verwendet, nehmen Sie die Geräteeinstellungen mit der Sequenzsoftware vor. * Die tatsächliche Anzeige auf Ihrem Macintosh-Bildschirm kann anders aussehen.
UM-1EX_multi1.book 53 ページ 2005年11月1日 火曜日 午後3時19分 7. Stellen Sie den Laufwerknamen ein. 1. Nach Auswahl des neuen externen Geräts klicken Sie auf Show Info. (Info anzeigen). Deutsch 2. Geben Sie den Namen in das Feld Device Name (Gerätename) ein. Italiano Français 8. Verbinden Sie die Symbole ▼ und ▲ (sie bedeuten Ausgaben und Eingaben) des UM-1 Symbols mit denen des Symbols für das neue externe Gerät und verwenden Sie die Maus, um die Symbole zu ziehen.
UM-1EX_multi1.book 54 ページ 2005年11月1日 火曜日 午後3時19分 10. Klicken Sie auf Test Setup. Die Form des Cursors ändert sich . 11. Klicken Sie auf den in der Abbildung gezeigten Bereich. Wenn die MIDI OUT Anzeige des UM1EX zu blinken beginnt, sind die Einstellungen korrekt. 12. Klicken Sie auf Test Setup und schließen Sie die Bestätigung ab. 10, 12 Test Setup Verwenden Sie zum Ziehen die Maus 11 Klicken Sie auf das Symbol 13. Schließen Sie das Dialogfeld Audio MIDI Setup. .
UM-1EX_multi1.book 55 ページ 2005年11月1日 火曜日 午後3時19分 Installation du pilote Windows XP/2000 1. Avant de connecter l’UM-1EX, démarrez Windows. Ne connectez pas l’UM-1EX avant d’avoir atteint l’étape 13 (p. 57). * Débranchez tous les câbles USB, sauf ceux du clavier USB ou de la souris USB, le cas échéant. * Ouvrez une session Windows en tant qu’utilisateur doté de droits d’administration (Administrateur, par exemple). Français 2. Ouvrez la boîte de dialogue Propriétés Système.
UM-1EX_multi1.book 56 ページ 2005年11月1日 火曜日 午後3時19分 6. Fermez tous les logiciels (applications) actifs. Fermez également toutes les fenêtres ouvertes, s’il y en a. Si vous utilisez un programme antivirus ou des logiciels similaires, fermez-les également. 7. Munissez-vous du CD-ROM. Insérez le CD-ROM dans le lecteur de l’ordinateur.
UM-1EX_multi1.book 57 ページ 2005年11月1日 火曜日 午後3時19分 13. Operation of the UM-1EX Connectez l’UM-1EX à votre ordinateur. Le message “Nouveau matériel détecté” s’affiche. Veuillez patienter. * Cet appareil est équipé d’un circuit de protection. Après avoir connecté l’UM-1EX, il est nécessaire d’attendre quelques secondes avant que l’appareil ne fonctionne normalement. Deutsch Windows XP : 1. La boîte de dialogue Assistant ajout de nouveau matériel s’affiche.
UM-1EX_multi1.book 58 ページ 2005年11月1日 火曜日 午後3時19分 Connexion et installation des pilotes (Macintosh) Installation et configuration du pilote Mac OS X ■ Installation du pilote * Si la boîte de dialogue “Authentifier” apparaît pendant l’installation, saisissez le mot de passe et cliquez sur “OK”. * Il se peut que votre écran affiche des informations légèrement différentes, selon votre environnement et le système d’exploitation que vous utilisez. 1. Avant de connecter l’UM-1EX, démarrez votre Macintosh.
UM-1EX_multi1.book 59 ページ 2005年11月1日 火曜日 午後3時19分 ■ Configuration du pilote Vous trouverez ci-dessous les paramètres qui permettent d’utiliser l’UM-1EX avec un logiciel séquenceur en utilisant le paramétrage Macintosh standard pour les périphériques. Si vous utilisez un logiciel séquenceur qui n’utilise pas les paramètres de périphériques standard Macintosh, paramétrez le périphérique à partir du séquenceur. 1. Operation of the UM-1EX Placez le ADVANCED (mode select) Switch de l’UM-1EX sur ON. 2.
UM-1EX_multi1.book 60 ページ 2005年11月1日 火曜日 午後3時19分 7. Choisissez le nom du périphérique. 1. Sélectionnez le nouveau périphérique externe, puis cliquez sur Afficher les informations. 2. Saisissez le nom dans le champ Nom du périphérique. 8. Connectez les symboles ▼ et ▲ (qui signalent les entrées et les sorties) de l’icône de l’UM-1 à ceux de l’icône du nouveau périphérique externe en utilisant la souris pour tracer les connexions.s Utilisez la souris pour tracer les connexions 9.
UM-1EX_multi1.book 61 ページ 2005年11月1日 火曜日 午後3時19分 10. Cliquez sur Test Setup. Le curseur change de forme . 11. Cliquez sur la zone indiquée sur l’illustration. Si le voyant MIDI OUT de l’UM-1EX clignote, c’est que les paramètres sont corrects. Deutsch 10, 12 Test Setup Utilisez la souris pour tracer les connexions 12. Cliquez sur Test Setup et terminez la confirmation. Français 11 Cliquez sur l’icône 13. Fermez la boîte de dialogue Audio MIDI Setup. .
UM-1EX_multi1.book 62 ページ 2005年11月1日 火曜日 午後3時19分 Collegamento e installazione dei driver (Windows) Installazione del driver Utenti Windows XP/2000 1. Avviare Windows con l’UM-1EX scollegato. Non collegare l’UM-1EX al computer fino al passo 13 (p. 64). * Scollegare tutti i cavi USB, ad eccezione della tastiera e del mouse USB, se utilizzati. * Accedere a Windows utilizzando un nome utente con privilegi amministrativi, ad esempio Administrator. 2. Aprire la finestra di dialogo Proprietà del sistema.
UM-1EX_multi1.book 63 ページ 2005年11月1日 火曜日 午後3時19分 7. Preparare il CD-ROM. Inserire il CD-ROM nell’apposita unità del computer. * Se viene visualizzato il messaggio “È possibile eseguire la stessa operazione ogni volta che si inserisce un disco o che si connette una periferica con il seguente tipo di file” fare clic su [Annulla]. Deutsch 8. Scegliere Esegui… dal menu di avvio di Windows. 9. Nel campo Apri della finestra di dialogo “Esegui” immettere la seguente stringa e quindi fare clic su [OK].
UM-1EX_multi1.book 64 ページ 2005年11月1日 火曜日 午後3時19分 13. Operation of the UM-1EX Collegare l’UM-1EX al computer. Viene visualizzato il messaggio “Installazione guidata nuovo hardware”. Attendere qualche minuto. * Questo apparecchio è provvisto di un circuito di protezione. È necessario attendere qualche secondo dopo aver collegato l’UM-1EX prima che l’apparecchio funzioni normalmente. Windows XP: 1 Appare la finestra di dialogo Installazione guidata nuovo hardware.
UM-1EX_multi1.book 65 ページ 2005年11月1日 火曜日 午後3時19分 Collegamento e installazione dei driver (Macintosh) Deutsch Installazione e configurazione dei driver Utenti Mac OS X ■ Installazione del driver Español Italiano Français * Se durante l’installazione viene visualizzata la finestra di dialogo “Authenticate”, inserire la password e fare clic su “OK”. * La schermata visualizzata potrebbe variare a seconda dell’ambiente e del sistema operativo installato. 1.
UM-1EX_multi1.book 66 ページ 2005年11月1日 火曜日 午後3時19分 ■ Configurazione del driver Di seguito vengono descritte le impostazioni che abilitano l’uso dell’UM-1EX con software sequencer utilizzando le impostazioni standard di Macintosh. Se si utilizza un software sequencer che non utilizza le impostazioni standard di Macintosh, eseguire le impostazioni contenute nel software sequencer. * La schermata visualizzata potrebbe variare a seconda dell’ambiente e del sistema operativo installato. 1.
UM-1EX_multi1.book 67 ページ 2005年11月1日 火曜日 午後3時19分 7. Impostare il nome del dispositivo. 1 Dopo aver selezionato nuovo dispositivo esterno, fare clic su Mostra Info. Deutsch 2 Immettere il nome nel campo Device Name. Italiano Français 8. Collegare i simboli ▼ e ▲ (che rappresentano le uscite e le entrate) dell’icona UM-1 a quelli dell’icona nuovo dispositivo esterno utilizzando il mouse per trascinarli.s Español Utilizzare il mouse per trascinare un collegamento 9.
UM-1EX_multi1.book 68 ページ 2005年11月1日 火曜日 午後3時19分 10. Fare clic su Test Setup. La forma del cursore del mouse cambia . 11. Fare clic sull’area raffigurata nell’immagine. Se l’indicatore MIDI OUT dell’UM-1EX comincia a lampeggiare, le impostazioni sono corrette. 12. Fare clic su Test Setup e completare la verifica. 10, 12 Test Setup Utilizzare il mouse per trascinare un collegamento 11 Fare clic sull’icona 13. Chiudere la finestra di dialogo Audio MIDI Setup.
UM-1EX_multi1.book 69 ページ 2005年11月1日 火曜日 午後3時19分 Conexión e instalación de los controladores (Windows) Deutsch Instalación del controlador Usuarios de Windows XP/2000 Français 1. Con el UM-1EX desconectado, inicie Windows. No conecte el UM-1EX al equipo hasta que llegue al Paso 13 (pág. 71). * Desconecte todos los cables USB excepto el del teclado USB y el ratón USB (si se utilizan). * Inicie sesión en Windows utilizando un nombre de usuario con privilegios de administrador (como Administrador). 2.
UM-1EX_multi1.book 70 ページ 2005年11月1日 火曜日 午後3時19分 6. Salga de todos los programas de software que esté ejecutando (aplicaciones). Cierre todas las ventanas que estén abiertas. Si está utilizando un antivirus o software similar, deberá cerrar todos estos programas. 7. Prepare el CD-ROM. Inserte el CD-ROM en la unidad de CD-ROM de su PC. * Si aparece el mensaje “Windows puede realizar la misma acción cada vez que inserte un disco o conecte un dispositivo con este tipo de archivo”, haga clic en [Cancelar].
UM-1EX_multi1.book 71 ページ 2005年11月1日 火曜日 午後3時19分 13. Operation of the UM-1EX Conecte el UM-1EX al ordenador. Aparecerá un mensaje de “Hardware nuevo encontrado”. Espere. * Esta unidad está provista de un circuito de protección. Es necesario dejar pasar un pequeño intervalo (de unos segundos) después de conectar el UM-1EX para que la unidad funcione correctamente. Deutsch Windows XP: 1. Aparecerá el cuadro de diálogo del Asistente para hardware nuevo encontrado.
UM-1EX_multi1.book 72 ページ 2005年11月1日 火曜日 午後3時19分 Conexión e instalación de los controladores (Macintosh) Instalación del controlador y ajustes Usuarios de Mac OS X ■ Instalación del controlador * Si aparece el cuadro de diálogo “ Authenticate” durante la instalación, introduzca la contraseña y haga clic en “ OK”. * En la pantalla del Macintosh podrá aparecer información diferente, en función de su entorno informático y del sistema operativo que esté utilizando. 1.
UM-1EX_multi1.book 73 ページ 2005年11月1日 火曜日 午後3時19分 ■ Configuración del controlador A continuación se describen los ajustes que permiten el uso del UM-1EX con software del secuenciador mediante ajustes de dispositivos estándares de Macintosh. Si está utilizando un software de secuenciador que no utilice los ajustes de dispositivo estándar de Macintosh, realice la configuración del dispositivo dentro del software del secuenciador. 1.
UM-1EX_multi1.book 74 ページ 2005年11月1日 火曜日 午後3時19分 7. Introduzca el nombre en device name. 1. Una vez seleccionado new external device, haga clic en Show Info. 2. Introduzca el nombre en el campo Device Name. 8. Conecte los símbolos ▼ y ▲ (que representan las salidas y entradas) del icono UM-1 a los del icono new external device utilizando el ratón para arrastrarlos entre ellos.s Utilice el ratón para arrastrar una conexión 9. Si está utilizando Mac OS X v10.
UM-1EX_multi1.book 75 ページ 2005年11月1日 火曜日 午後3時19分 10. Haga clic en Test Setup. Cambia la forma del cursor del ratón . Utilice el ratón para arrastrar una conexión 11 Haga clic en el icono Français 12. Haga clic en Test Setup y finalice la confirmación. 10, 12 Test Setup Deutsch 11. Haga clic en el área que se muestra en la ilustración. Si el indicador MIDI OUT del UM-1EX comienza a parpadear, los ajustes son correctos. 13. Cierre el cuadro de diálogo Audio MIDI Setup. .
UM-1EX_multi1.book 76 ページ 2005年11月1日 Information Paul Bothner(PTY)Ltd. Royal Cape Park, Unit 24 Londonderry Road, Ottery 7800 Cape Town, SOUTH AFRICA TEL: (021) 799 4900 EDIROL (Europe) Ltd. Studio 3.4 114 Power Road London W4 5PY U. K. ASIA TEL: +44 (0)20 8747 5949 CHINA FAX:+44 (0)20 8747 5948 http://www.edirol.com/europe Roland Shanghai Electronics Co.,Ltd. Deutschland 5F. No.
UM-1EX_multi1.book 77 ページ 2005年11月1日 TRINIDAD FINLAND PORTUGAL AMR Ltd Ground Floor Maritime Plaza Barataria Trinidad W.I. TEL: (868)638 6385 Roland Scandinavia As, Filial Finland Elannontie 5 FIN-01510 Vantaa, FINLAND TEL: (0)9 68 24 020 Roland Iberia, S.L. Portugal Office Cais das Pedras, 8/9-1 Dto 4050-465, Porto, PORTUGAL TEL: 22 608 00 60 URUGUAY GERMANY ROMANIA Todo Musica S.A. Francisco Acuna de Figueroa 1771 C.P.: 11.
UM-1EX_multi1.
UM-1EX_multi1.book 79 ページ 2005年11月1日 火曜日 午後3時19分 For EU Countries This product complies with the requirements of European Directive 89/336/EEC. For the USA FEDERAL COMMUNICATIONS COMMISSION RADIO FREQUENCY INTERFERENCE STATEMENT This equipment has been tested and found to comply with the limits for a Class B digital device, pursuant to Part 15 of the FCC Rules. These limits are designed to provide reasonable protection against harmful interference in a residential installation.
UM-1EX_multi1.