V-44SW_e.book 1 ページ 2006年10月23日 月曜日 午後3時25分 Owner’s Manual Before using this unit, carefully read the sections entitled: “IMPORTANT SAFETY INSTRUCTIONS” (p. 2), “USING THE UNIT SAFELY” (p. 6–7), and “IMPORTANT NOTES” (p. 8). These sections provide important information concerning the proper operation of the unit. Additionally, in order to feel assured that you have gained a good grasp of every feature provided by your new unit, Owner’s Manual should be read in its entirety.
V-44SW_e.book 2 ページ 2006年10月23日 月曜日 午後3時25分 IMPORTANT SAFETY WARNING: To reduce the risk of fire or electric shock, do not expose this apparatus to rain or moisture. CAUTION RISK OF ELECTRIC SHOCK DO NOT OPEN ATTENTION: RISQUE DE CHOC ELECTRIQUE NE PAS OUVRIR CAUTION: TO REDUCE THE RISK OF ELECTRIC SHOCK, DO NOT REMOVE COVER (OR BACK). NO USER-SERVICEABLE PARTS INSIDE. REFER SERVICING TO QUALIFIED SERVICE PERSONNEL.
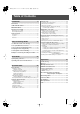
V-44SW_eTOC.fm 3 ページ 2006年10月23日 月曜日 午後5時23分 Table of Contents Introduction 4 Switching Video ................................................................ 36 IMPORTANT NOTES............................................................ 8 Selecting the Video Switching Mode .............................................36 Switching Video in Direct Mode.....................................................36 Switching in Preset Mode..............................................................
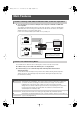
V-44SW_e.book 4 ページ 2006年10月23日 月曜日 午後3時25分 Introduction Main Features Seamless switching of HD, RGB, and SD format video, all with this single device ● You can enjoy free use of the four SD inputs and four inputs for HD video or RGB video from computers. The V-44SW is compatible with HD (1080i/720p; component), SD (S-Video; component), and RGB signal (VGA-SXGA) video formats, allowing you to handle video from HD cameras, SD cameras, and computers simultaneously without concerns about input formats.
V-44SW_e.book 5 ページ 2006年10月23日 月曜日 午後3時25分 Main Features Effects Included ● You can have transitions appear smoothly when switching video. The V-44SW features a selection of screen transition effects, including six types of wipe effects as well as cut and mix effects. You can have such screen transition effects be applied simply by selecting a button. ● You can composite video from two sources.
V-44SW_e.book 6 ページ 2006年10月23日 月曜日 午後3時25分 USING THE UNIT SAFELY The symbol alerts the user to important instructions or warnings.The specific meaning of the symbol is determined by the design contained within the triangle. In the case of the symbol at left, it is used for general cautions, warnings, or alerts to danger. Used for instructions intended to alert the user to the risk of death or severe injury should the unit be used improperly.
V-44SW_e.book 7 ページ 2006年10月23日 月曜日 午後3時25分 USING THE UNIT SAFELY 014 ● Protect the unit from strong impact. (Do not drop it!) .......................................................................................................... 015 ● Do not force the unit’s power-supply cord to share an outlet with an unreasonable number of other devices.
V-44SW_e.book 8 ページ 2006年10月23日 月曜日 午後3時25分 IMPORTANT NOTES In addition to the items listed under “IMPORTANT SAFETY INSTRUCTIONS” and “USING THE UNIT SAFELY” on pages 2 and 6–7, please read and observe the following: Power Supply 301 ● Do not connect this unit to same electrical outlet that is being used by an electrical appliance that is controlled by an inverter (such as a refrigerator, washing machine, microwave oven, or air conditioner), or that contains a motor.
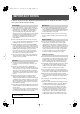
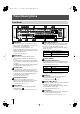
V-44SW_e.book 9 ページ 2006年10月23日 月曜日 午後3時25分 Overview of the V-44SW Organization of the V-44SW The V-44SW comprises two main sections, an “SD section,” used for managing all SD video, and an “HD/RGB section,” which is used to mix all video signals. Composite video signals and S-video signals are mixed in the SD section. The resulting mixes are sent to the HD/ RGB section and mixed with the HD and RGB video. The combined video is then output as the final output in either HD or RGB format.
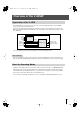
V-44SW_e.book 10 ページ 2006年10月23日 月曜日 午後3時25分 Panel Descriptions Front Panel [MIDI] Button PANEL PRESET Buttons ● This switches reception of MIDI signals on and off. When switched off, the [MIDI] button is unlit, and the V44SW does not receive MIDI signals. Use these buttons to register and call up button settings, settings for other special effects such as the Picture in Picture (P in P), and other settings as presets. The presets change depending on whether the [SHIFT] button is lit or unlit.
V-44SW_e.book 11 ページ 2006年10月23日 月曜日 午後3時25分 Panel Descriptions [KEY] Button Channel Select Buttons This switches the Key Composite effect on and off. The [KEY] button lights when the effect is on. These switch the video images being input. There are two ways to switch input video. ☞ “Applying the Key Composite Effect” (p. 41) ☞ “Switching Video” (p. 36) TRANSITION Select Buttons ● SD VIDEO [1]–[4] Buttons These select the effect to be applied when the video images are switched.
V-44SW_e.book 12 ページ 2006年10月23日 月曜日 午後3時25分 Panel Descriptions Rear Panel AC Inlet SD IN Connect the supplied power cord here. These input composite video signals or S-Video signals from up to four systems. The V-44SW is set at the factory so that if video is input via both the S-VIDEO IN connector and the COMPOSITE IN connector for the same channel, the S-VIDEO IN connector’s input takes precedence. Security Slot ( ) You can attach a commercially available security lock here. http://www.
V-44SW_e.book 13 ページ 2006年10月23日 月曜日 午後3時25分 Setup and Settings Guide 1. Confirm the Contents of the Package The V-44SW includes the following items. Please take a moment to confirm that all of these items have been included with the V-44SW. If you find that any item is missing, contact the nearest authorized EDIROL/Roland distributor in your country. ❏ V-44SW ❏ Owner’s Manual ❏ Operation Reference ❏ Power Cord 2.
V-44SW_e.book 14 ページ 2006年10月23日 月曜日 午後3時25分 Setup and Settings Guide Device Connections ● Whenever connecting the V-44SW to other devices, always turn off the power to all devices to prevent malfunction and/ or damage to video monitors and other equipment. ● Be sure to use cables and adapter plugs with the proper connectors matching those of the other devices you are using. ● Refer to “Examples for Connecting and Setting the V-44SW” (p. 18).
V-44SW_e.book 15 ページ 2006年10月23日 月曜日 午後3時25分 Setup and Settings Guide About the S-VIDEO IN Connectors and COMPOSITE IN Connectors The V-44SW is set at the factory so that if video is input via both the S-VIDEO IN connector and the COMPOSITE IN connector for the same channel, the S-VIDEO IN connector’s input takes precedence. ● If you want to give priority to the input from the COMPOSITE IN connector, select the input channel with “2. SD Input” in the menu, then set “1: SD Input Select” to “Composite.
V-44SW_e.book 16 ページ 2006年10月23日 月曜日 午後3時25分 Setup and Settings Guide 3. Turn on the Power and Output the Video 1 Turn on the power to the connected devices (with video devices, play back the video). 3 2 Press the [POWER] switch at the right of the V-44SW’s front panel to switch it to the ON position and turn on the power. (☞ p. 26). 3 Press one of the OUTPUT FORMAT buttons [1080i], [720p], or [RGB] to select the output video format.
V-44SW_e.book 17 ページ 2006年10月23日 月曜日 午後3時25分 Setup and Settings Guide 4. Adjusting the Video Image Quality ☞ p. 30 4-1. Adjusting the Image Quality of the Final Output Video 1 2 Press the [MENU] button to display the Main menu. Select “1. Output” to display the sub-menu. Select the necessary parameters from the table below, then adjust the brightness, hue, and other such settings for the final output video. ■ “1.
V-44SW_e.
V-44SW_e.book 19 ページ 2006年10月23日 月曜日 午後3時25分 Setup and Settings Guide Outputting to a Projector In business presentations and other such situations, use the V-44SW’s RGB output when outputting video to a data projector.
V-44SW_e.book 20 ページ 2006年10月23日 月曜日 午後3時25分 Setup and Settings Guide Outputting to an LED Display In shows and other situations where SD video is being output to LED displays or similar displays, you can output video from the V-44SW’s HD/RGB OUT PGM connectors.
V-44SW_e.book 21 ページ 2006年10月23日 月曜日 午後3時25分 Setup and Settings Guide Recording Hi-Vision Video to an HD Video Deck When recording the V-44SW’s video output with an HD CAM deck, DVC PRO HD deck, HD non-linear editing device, or other such equipment, it may be necessary to convert the V-44SW’s component output to HD-SDI signals. For this, you will need to obtain a separate HD HD-SDI converter to convert the component signals to HD-SDI.
V-44SW_e.book 22 ページ 2006年10月23日 月曜日 午後3時25分 Quick Guide Try Outputting Some Video When you have finished connecting and making the settings, try switching and outputting some video images. The method for switching video described in this section uses what is referred to as “Direct mode.” In addition to “Direct mode,” the V-44SW also features a “Preset mode” you can use for switching video. ☞ For more detailed operating instructions, refer to “Switching Video” (p. 36).
V-44SW_e.book 23 ページ 2006年10月23日 月曜日 午後3時25分 Quick Guide Try Adding Some Screen Transition Effects The V-44SW features a selection of screen transition effects, including six types of wipe effects as well as cut and mix effects. Now try changing the screen transition effects to switch the video in various different ways. ☞ For more detailed operating instructions, refer to “Selecting the Effects To Be Applied in Switching” (p. 38).
V-44SW_e.
V-44SW_e.
V-44SW_e.book 26 ページ 2006年10月23日 月曜日 午後3時25分 Basic Operation Turning the Power On ● This unit is equipped with a protection circuit. A brief interval (a few seconds) after power up is required before the unit will operate normally. Setting the Various Functions (Menu) 1 Confirm that all other devices are properly connected. Video brightness and contrast adjustments and a variety of other settings for the V-44SW are made by displaying menus and making the settings with these menus.
V-44SW_e.book 27 ページ 2006年10月23日 月曜日 午後3時25分 Basic Operation ■ Working with the Menus Changing the Value of a Setting Displaying Menus and Selecting Parameters 1 1 Use the [CURSOR/VALUE] knob to change a value. If the cursor is located at the value set for a parameter in the menu, rotating the knob will change the value. Press the [MENU] button to display the Main menu. Closing Menus 1 2 Press [MENU] a number of times; menus close with each press of the button until the Main menu closes.
V-44SW_e.book 28 ページ 2006年10月23日 月曜日 午後3時25分 Basic Operation Fading Out the Final Output You can fade out the final output. This convenient function allows you to output black (or white) video when useful, such as during pauses for standby and at the ends of presentations. 1 Set the fade time with the [TIME] knob. You can set the fade time to any value from 0.0 to 4.0 seconds. If you want to cut instantly to black (or white), set the time to “0.0” (seconds).
V-44SW_e.book 29 ページ 2006年10月23日 月曜日 午後3時25分 Basic Operation Restoring the Original Factory Default Settings (Factory Reset) You can return the content of the settings to their original status at the time the V-44SW shipped from the factory. Try running Factory Reset when the V-44SW functions differently than described in the Owner’s Manual, even though you’ve carried out the procedures according to the instructions.
V-44SW_e.book 30 ページ 2006年10月23日 月曜日 午後3時25分 Setting the Input and Output The V-44SW handles input and output video in differing video formats, thus requiring adjustment of the image quality and field of view for each format. Appropriate settings need to be made for the input and output, to accommodate both the device that will be supplying the input to the V-44SW and the device to which the V-44SW will be outputting video.
V-44SW_e.book 31 ページ 2006年10月23日 月曜日 午後3時25分 Setting the Input and Output ■ Setting the Output Compatible Output Formats Frame Rate 60 (NTSC) 1080/60i 720/60p 480/60p 480/60i Frame Rate 50 (PAL) 1080/50i 720/50p 576/50p 576/50i ● The component format settings include “60” and “50” frame rate settings. The general frame rate setting for Japan and the United States (NTSC) is “60” frames per second; the general setting in Europe (PAL) is “50.
V-44SW_e.book 32 ページ 2006年10月23日 月曜日 午後3時25分 Setting the Input and Output HD Signals: Compatible Input Formats Setting the HD/RGB Input With HD/RGB video, since the field of view and color may vary according to the format and device, be sure to make these settings for each input 1 Press the [MENU] button to display the Main menu. 2 Select “3. HD/RGB Input” and then select the channel you want to set with “1: HD/RGB SD”–“5: HD/RGB Ch4” in the sub-menu.
V-44SW_e.book 33 ページ 2006年10月23日 月曜日 午後3時25分 Setting the Input and Output About the Scaling Type You can scale (enlarge or reduce) input video with a different aspect ratio (the ratio of the screen’s vertical and horizontal dimensions) to match that of the output format (p. 30) to have the video appear in the proper aspect ratio.
V-44SW_e.book 34 ページ 2006年10月23日 月曜日 午後3時25分 Setting the Input and Output Setting the SD Input With SD video, there can be individual differences depending on the type of device, so settings for the input should be made individually. SD Signals: Compatible Input Formats NTSC 59.94Hz PAL 50Hz Composite video format S-Video format Composite video format S-Video format SD signals are input to the “SD section” then pass through the “HD/RGB section” before being output (p. 9).
V-44SW_e.book 35 ページ 2006年10月23日 月曜日 午後3時25分 Setting the Input and Output Displaying a Test Pattern Selecting NTSC or PAL Format The V-44SW’s input and output formats are selectable; you can specify the NTSC format used in Japan and the United States or the PAL format used in Europe. Switch to the format suited to your needs. ● Switching the input and output formats also switches the frame rate of the output format of component (p. 31).
V-44SW_e.book 36 ページ 2006年10月23日 月曜日 午後3時25分 Switching Video Selecting the Video Switching Mode The V-44SW features two different video switching modes, “Direct mode” and “Preset mode.” Each mode functions in switching video as follows. Switching Video in Direct Mode ● Immediately after the power is turned on, SD VIDEO Channel 1 is assigned as the final output. 1 Press one of the SD VIDEO buttons [1]–[4] or one of the HD/RGB buttons [1]–[4] to select the channel.
V-44SW_e.book 37 ページ 2006年10月23日 月曜日 午後3時25分 Switching Video Switching in Preset Mode ● Immediately after the power is turned on, SD VIDEO Channel 1 is assigned as the final output. 1 Press one of the SD VIDEO buttons [1]–[4] or one of the HD/RGB buttons [1]–[4] to select the channel. The selected button flashes, and the input video appears in the preview monitor connected to the HD/RGB OUT PREVIEW connector. ● The final output video is not switched at this stage.
V-44SW_e.book 38 ページ 2006年10月23日 月曜日 午後3時25分 Switching Video Selecting the Effects To Be Applied in Switching The V-44SW features a selection of screen transition effects, including six types of wipe effects as well as cut and mix effects. 1 Press a TRANSITION selection button to select the screen transition effect. The selected button lights up. For more details on effects, refer to the table “TRANSITION Selection Buttons and Effects” below.
V-44SW_e.book 39 ページ 2006年10月23日 月曜日 午後3時25分 Adding Effects to the Video You can add effects that combine two different video images. Adding the Picture in Picture (P in P) Effect ● You cannot select the WIPE [1 P in P effect is on. ] buttons (p. 38) when the 1 Output the video to be used as the background screen. The channel select button lights in yellow. 2 Press the [P in P] button. The [P in P] button lights up, and the P in P effect is switched on.
V-44SW_e.book 40 ページ 2006年10月23日 月曜日 午後3時25分 Adding Effects to the Video About the Final Output When the P in P Effect is Off If the P in P effect is turned off while the sub-screen is still being displayed, the video on the channel assigned to the subscreen at that time becomes the final output video. If you do not want the final output video to switch, first press the [TAKE] button to hide the sub-screen, then switch off the P in P effect.
V-44SW_e.book 41 ページ 2006年10月23日 月曜日 午後3時25分 Adding Effects to the Video Applying the Key Composite Effect With this effect, the portions matching the key color in the video on the channel to which the key composite effect is applied are made transparent, and the video on the other channel is composited as shown in the figure below. Background screen Key Composite Video 4 Once you decide on the video to use as the key composite video, press the [TAKE] button.
V-44SW_e.book 42 ページ 2006年10月23日 月曜日 午後3時25分 Registering Often-Used Settings (Panel Presets) You can register button settings, settings for the Picture in Picture (P in P) and other special effects, and other settings as presets. You can register up to fifteen presets. Registering Presets You can call up registered presets instantly just by pressing the PANEL PRESET buttons. Hold down for at least two seconds.
V-44SW_e.book 43 ページ 2006年10月23日 月曜日 午後3時25分 Registering Often-Used Settings (Panel Presets) Fading Out the Output When Calling Up Presets You can call up presets after you have started to fade out the output. 1 Press the [MENU] button to display the Main menu. 2 Select “7. Panel Preset Edit” and select “4: Set Preset Fade Time” from the sub-menu. 3 Set the fade time. You can set the fade time to any value from 0.0 to 4.0 seconds.
V-44SW_e.book 44 ページ 2006年10月23日 月曜日 午後3時25分 Using the V-44SW with Other Devices Using the V-44SW with a V-440HD for Multi-Screen Output You can link V-44SWs with an Edirol V-440HD in a system of up to six devices to display a single video source across multiple screens. This function is referred to as “Multi-Screen Output.” ● When using Multi-Screen Output, you must have a V-440HD as the master device. The V-44SWs function as slave devices to the V-440HD.
V-44SW_e.book 45 ページ 2006年10月23日 月曜日 午後3時25分 Using the V-44SW with Other Devices Using MIDI The V-44SW can be controlled from an external device using MIDI. You can, for example, control the V-44SW from a Roland MIDI-compatible product (e.g., a Fantom-X Series keyboard) to conduct video performances synchronized with sounds.
V-44SW_e.book 46 ページ 2006年10月23日 月曜日 午後3時25分 Using the V-44SW with Other Devices ■ Controlling the V-44SW from an External Device Via MIDI When V-LINK mode (p. 48) is off, you can transmit the unit’s button and knob operations using MIDI messages. Conversely, you can also use MIDI messages transmitted by external devices to control the V-44SW’s button and knob settings. ● For more details about MIDI messages, refer to the MIDI Implementation.
V-44SW_e.book 47 ページ 2006年10月23日 月曜日 午後3時25分 Using the V-44SW with Other Devices ■ Controlling the V-44SW from a PR-80/50 You can control the V-44SW remotely from an Edirol PR-80 or PR-50 (hereafter referred to as PR Series devices) via MIDI. The following operations can be controlled from the PR Series device.
V-44SW_e.book 48 ページ 2006年10月23日 月曜日 午後3時25分 Using the V-44SW with Other Devices Control Using V-LINK What is V-LINK? V-LINK ( ) is a function that allows music and images to be performed together. By using MIDI to connect two or more V-LINK compatible devices, you can easily enjoy performing a wide range of visual effects that are linked to the expressive elements of a music performance.
V-44SW_e.book 49 ページ 2006年10月23日 月曜日 午後3時25分 Using the V-44SW with Other Devices Backing Up the V-44SW’s Settings to a Computer You can back up and restore the V-44SW’s settings by transmitting data between the V-44SW and a computer. ● This function requires software supporting backup and restore procedures. ● With the V-44SW, use the “Serial Data Tool” software used in backing up the V-440HD’s settings (for Windows XP only). This software can be downloaded from the Roland Systems Group website.
V-44SW_e.
V-44SW_e.
V-44SW_e.book 52 ページ 2006年10月23日 月曜日 午後3時25分 Troubleshooting If you suspect a malfunction, please check the following points. If this does not resolve the problem, contact a nearby EDIROL/Roland Service Center or an authorized EDIROL/Roland distributor. Video Output Video not being output ● Devices are connected incorrectly Properly reconnect the devices. ➔ “Device Connections” (p. 14) ➔ “About Connection Cables Used with the Component Inputs and Outputs” (p.
V-44SW_e.book 53 ページ 2006年10月23日 月曜日 午後3時25分 Troubleshooting Screen shows visible vertical discrepancies Since the V-44SW handles video with differing aspect ratios, if you do not scale (enlarge/reduce) the input video to match the output format, the screen aspect ratio may not display properly. For each input channel, set the “Scaling Type” parameter under “3. HD/RGB Input” in the menu to adjust the aspect ratio.
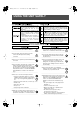
V-44SW_e.book 54 ページ 2006年10月23日 月曜日 午後3時25分 Menu List Main menu This is the Main menu list displayed when the [MENU] button is pressed. Parameters Explanation Sub Menu 1. Output Settings for the final output are made here. p. 54 2. SD Input SD input settings are made here. p. 55 3. HD/RGB Input HD/RGB input settings are made here. p. 55 4. P in P/Zoom Advanced settings P in P effect are made here. p. 56 5. Key Advanced settings key composite effects are made here. p. 56 6.
V-44SW_e.book 55 ページ 2006年10月23日 月曜日 午後3時25分 Menu List 2. SD Input SD input settings are made here. Parameters Explanation Sub Menu 1: SD Ch1 Sets video input to Channel 1 of the SD IN connectors Refer to “SD Ch Sub Menu” below.
V-44SW_e.book 56 ページ 2006年10月23日 月曜日 午後3時25分 Menu List *1 Cannot be set in HD/RGB SD. Parameter numbers are in sequence, with these parameters omitted. *2 Enabled when Format Auto Detect is set to Manual. *3 Enabled when Pre Scaling Mode is set to Manual. The “Manual Pre Scaling” setting has no effect in the P in P effect (p. 39) sub-screen. *4 Enabled when Scaling Type is set to Manual. About the HD/RGB Input Format The V-44SW inputs component and RGB video in the formats shown in the following table.
V-44SW_e.book 57 ページ 2006年10月23日 月曜日 午後3時25分 Menu List 6. Wipe Select Wipe effect settings are made here. Parameters Explanation Sub Menu 1: Wipe Sw1 Sets WIPE [1] button Refer to “Wipe Sw Sub Menu” below.
V-44SW_e.book 58 ページ 2006年10月23日 月曜日 午後3時25分 Menu List 8. System The V-44SW’s system settings are made here.
V-44SW_e.book 59 ページ 2006年10月23日 月曜日 午後3時25分 MIDI Implementation Chart MULTI-FORMAT VIDEO SWITCHER Date : Oct. 10, 2006 MIDI Implementation Chart Model V-44SW Transmitted Function... Recognized Basic Channel Default Changed 1 1–16 1 1–16 Mode Default Messages Altered Mode 3 X Mode 3 X ************** ************** X X X X Note Number : True Voice Velocity Note On Note Off X X X X After Touch Key's Channel's X X Version : 1.
V-44SW_e.book 60 ページ 2006年10月23日 月曜日 午後3時25分 REMOTE Command Reference ● For more information on transmission settings, refer to “Controlling the V-44SW from an External Device Using the REMOTE Connector” (p. 48). Overview of Commands A command consists of an ASCII code sequence containing “stx,” three uppercase letters of the alphabet, and a semicolon (“;”). The three letters of the alphabet indicate the command type.
V-44SW_e.book 61 ページ 2006年10月23日 月曜日 午後3時25分 REMOTE Command Reference OUT OUTPUT FORMAT Button Select stxOUT:a; a: 0–2 (0: 1080i, 1: 720p, 2: RGB) This selects the OUTPUT FORMAT button, changing the format of the video output. ACK is returned by the V-44SW upon proper reception of the command. Commands Transmitted from the V-44SW to External Devices In the following, stx (02H), ACK (06H), and Xon (11H) / Xoff (13H) are control codes.
V-44SW_e.book 62 ページ 2006年10月23日 月曜日 午後3時25分 Connector Specifications HD/RGB IN OUT Connectors ■ Inputting and Outputting Analog Component Signals • Connector Type: D-sub 15-pin shrink terminal (female) Pin number 1 2 3 4 5 6 7 8 9 10 11 12 13 14 15 FG Signal name Pr Y Pb GND GND Pr-GND Y-GND Pb-GND N.C. GND (Reserved) Frame GND 1 9 15 6 10 • Connector Type: D-sub 15-pin shrink terminal (female) 2 3 4 5 6 7 8 9 10 11 12 13 14 15 FG 62 Signal name Red Green Blue GND GND R-GND G-GND B-GND N.C.
V-44SW_e.book 63 ページ 2006年10月23日 月曜日 午後3時25分 About Connection Cables Used with the Component Inputs and Outputs You can use a D-sub to 5-BNC cable to connect the component inputs and outputs. Check the D-sub to 5-BNC wiring diagram, then correctly connect the (three) BNC connectors. * Be sure to use cables and adapter plugs with the proper connectors matching those of the other devices you are using.
V-44SW_e.book 64 ページ 2006年10月23日 月曜日 午後3時25分 Menu Settings Memo 1. Output 4. P in P/Zoom 1: Output Format (1080i) Sw 1: Size 2: Output Format (720p) Sw 2: X Position 3: Output Format (RGB) Sw 3: Y Position 4: Output Format Sw Lock 4: Zoom 5: Zooming 5: Pan X Position 6: Bright 6: Pan Y Position 7: Contrast 7: Border Size 8: Saturation 8: Border Color 9: Red 9: Border Edge 10: Green 10: Crop 11: Blue 5.
V-44SW_e.book 65 ページ 2006年10月23日 月曜日 午後3時25分 Menu Settings Memo 8. System 1: System Frame Rate 2: SD Deinterlacer 3: SD Input Sync Threshold 4: REMOTE Baudrate 5: Seamless Delay Time 6: HD/RGB On Screen Display 7: Panel Operation Mode 8: Input Sw LED Color 9: V-440HD Slave Mode 9.
Buttons Picture in Picture 128 3 Auto No fade Key Level Key Soft Edge Output Fade Mode OUTPUT FADE Level Original Crop Luminance Key2 Hard Key Type Black Border Edge 15 Border Color 14 0 13 0% 12 Border Size 11 Pan Y Position 10 0% 9 105% 8 Pan X Position 7 Zoom 6 +25% 5 -25% 4 Y Position SD VIDEO [1] Button Channel Select Buttons 3 X Position [MIX] Button TRANSITION Select Buttons 2 午後3時25分 30% Off [KEY] Button 1 PANEL PRESET Button No.
(RS-232C) REMOTE MIDI IN HD/RGB IN 4 (D-Sub) HD/RGB IN 3 (D-Sub) HD/RGB IN 2 (D-Sub) HD/RGB IN 1 (D-Sub) HD/RGB IN 4 (D-Sub) HD/RGB IN 3 (D-Sub) HD/RGB IN 2 (D-Sub) Video Input Auto Detection A/D A/D A/D A/D CONTROL MIDI IN Scaler Effect Video Fader Scaler PGM OUT OSD MIDI OUT PREVIEW OUT HD/RGB MIXER MIDI / SERIAL Frame Synchronizer Frame Synchronizer Frame Synchronizer Frame Synchronizer D/A D/A D/A MIDI OUT / THRU (D-Sub) HD/RGB PREVIEW OUT (D-Sub) HD/RGB OUT 2 (D-S
V-44SW_e.book 68 ページ 2006年10月23日 月曜日 午後3時25分 Main Specifications V-44SW: MULTI-FORMAT VIDEO SWITCHER Video Processing Video Format: SD HD RGB Video Sampling Rate: Effects SD HD RGB Video Transition Composition FX NTSC or PAL [CVBS, S (Y/C)] 1080/59.94i/50i SMPTE274M (Y/Pb/Pr TriLevel Sync) 720/59.94p/50p SMPTE296M (Y/Pb/Pr TriLevel Sync) Input: 640 x 480/60/75, 800 x 600/60/75, 1024 x 768/60/75, 1280 x 768/60/75, 1280 x 1024/60 * RGB VH: positive/negative logic * VESA DMT Version 1.
V-44SW_e.book 69 ページ 2006年10月23日 月曜日 午後3時25分 Index Numerics M 16:9 Output ............................................................. 18 4:3 Output ............................................................... 20 Menu ...................................................................... 26 Changing the value ........................................... 27 Closing .............................................................. 27 Display monitor ...........................................
V-44SW_e.book 70 ページ 2006年10月23日 月曜日 午後3時25分 Index S Scaling .................................................................... 33 Scaling type ............................................................. 33 SD input .................................................................. 34 SD size (4:3) output ................................................ 20 Serial Data Tool ...................................................... 49 Slave Mode ...........................................................
V-44SW_e.book 71 ページ 2006年10月23日 月曜日 午後3時25分 For EU Countries This product complies with the requirements of European Directives EMC 89/336/EEC and LVD 73/23/EEC. For the USA FEDERAL COMMUNICATIONS COMMISSION RADIO FREQUENCY INTERFERENCE STATEMENT This equipment has been tested and found to comply with the limits for a Class B digital device, pursuant to Part 15 of the FCC Rules. These limits are designed to provide reasonable protection against harmful interference in a residential installation.
V-44SW_e.book 72 ページ 2006年10月23日 月曜日 午後3時25分 Information When you need repair service, call your nearest EDIROL/Roland Service Center or authorized EDIROL/Roland distributor in your country as shown below. ASIA CHINA Roland Shanghai Electronics Co.,Ltd. 5F. No.1500 Pingliang Road Shanghai 200090, CHINA TEL: (021) 5580-0800 Roland Shanghai Electronics Co.,Ltd. (BEIJING OFFICE) 10F. No.18 3 Section Anhuaxili Chaoyang District Beijing 100011 CHINA TEL: (010) 6426-5050 KOREA KOREA AVICS CO., LTD.