DASH CAM, HD Manual 87231
In order to make better use of all the function of the car DVR, please read the manual carefully before using. Caution 1. Please insert the memory card to the Car DVR and format it. Please insert the card according to the correct direction to avoid damaging the TF card or Car DVR. 2. It is suggested to regularly backup the recorded files from the card every week. 3. Please charge the Car DVR for the first time use. 4. Please note that this Car DVR is not waterproof. 5.
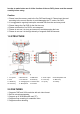
.0 OPERATION GUIDE 3.1 Power on/off The Car DVR can be turned on by either long-pressing the POWER key or simply connected it with the car charger to automatically power it on. After power on, the Car DVR will enter the video mode automatically and start recording if the MicroSD card is already inserted. The Status LED would start to flash in green color indicating recording.
3.6 Photo Under Standby mode, press the “MODE” button once to enter the Snapshot mode. Then press the “OK” button to take pictures. You can hear the clicking sound indicating photo taken. 3.7 Playback and Delete files. Under Standby, short press the “MODE” button twice, it will enter into “PLAYBACK” Mode. Press UP or DOWN to select the files you want to preview. Then press “OK” button to play or stop.
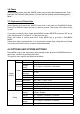
.0 CONNECTED TO THE COMPUTER 5.1 Video and photo download When connecting the Car DVR to your computer via USB cable, the red Status LED lights up. Then you will see the selection “Mass storage” and “PC camera” show up on the screen. If you select “Mass storage”, then you can browse and manage the files on the computer to download or format it. If “PC camera” is selected, it can be used as video tool such as web camera for communication application. 6.0 PRODUCT SPECIFICATIONS Screen size 2.