
User`s guide


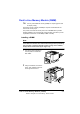


Dual In-Line Memory Module (DIMM)
173
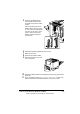
5
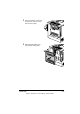
Insert the new DIMM straight
into the DIMM connector until
the latches snap into the locked
position.
Observe the keyed side of the
DIMM to align it with the connec-
tor. If you cannot snap the DIMM
into place, do not force it. Repo-
sition it, making sure that the
DIMM is seated completely in
the connector.
6
Reinstall the panel and tighten the seven screws.
7
Attach the rear cover.
8
Reconnect all interface cables.
9
Reconnect the power cord, and
turn on the printer.
10
Declare the additional RAM in the Windows printer driver (Properties/Con-
figure tab).
11
Print a configuration page (
PRINT/CONFIGURATION PG
) and verify
that the total amount of the RAM installed in your printer is listed.
EDNord - Istedgade 37A - 9000 Aalborg - telefon 9633350