
Owner's manual


Assembly Instructions for Pro
Assembly Instructions for Pro
Assembly Instructions for Pro
-
-
-
Maxx Cabinets Page 3
Maxx Cabinets Page 3
Maxx Cabinets Page 3
Step 2 - Side Assembly
First step is to identify the right side panel and the left
side panel. Identify by taking one of the panels and
place the tab edge facing down. Notice the hinges are
now facing up. Now look at the top and bottom edges.
The top has a round and square hole, and the bottom
has two round holes (see figure 2 for references). Place
the corresponding side panel under the back assembly
making sure the tabs of the side panel ride into the rec-
tangular holes of the back assembly. Slide the parts to-
gether making sure that the tabs and rectangular holes
fully engage (if properly completed, the side and back
assembly will be even at both ends, and the bottom
screw hole will be aligned). After assuring the correct
side is fastened to the back assembly and the tab en-
gagements are complete, use a # 10-24 screw and nut to
fasten the side panel to the back assembly (screw loca-
tions are located at the bottom of the unit, see figure 2
for locations). Repeat the same process for the opposite
side panel.
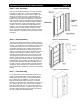
Figure 2 - Side Assembly
Step 3 - Top Assembly
Attach the top to the back and side assembly. Position
the top so that the tabs on the top align with the rectan-
gular holes on the top end of the left and right side pan-
els. It helps to slightly lift the back and side assembly
and engage the tabs one at a time. Check to make sure
the tabs have engaged properly and that the screw holes
have aligned (use your small tipped screwdriver to assist
in aligning the holes if necessary). Using five (5) # 10-24
screws and nuts, finalize the attachment of the top to the
side and back assembly (see figure 3 for screw loca-
tions).
Figure 3 - Top Assembly
Step 4 - Bottom Assembly
The back, side, and top assembly is ready for the bot-
tom. Holding the bottom from the largest formed side
(front), place the bottom onto the inside of the back, side,
and top assembly. The rear part of the bottom will slide
down onto four (4) tabs located on the back assembly.
Once all tabs have been properly engaged, move the
front of the bottom into position so that the four (4) screw
holes align with the left and right side panels (use your
small tipped screw driver to assist in aligning the holes if
necessary). Using four (4) of the # 10-24 screws and
nuts, attach the bottom to the sides (see figure 4 for
screw locations). Also use one (1) screw and nut and
fasten the bottom to the back assembly (again see figure
4 for screw location).
Figure 4 - Bottom Assembly