
Manual EX180-240 T3-T2T


COMMISSIONING YOUR HEATER
IMPORTANT
Before switching “on” the power at the main circuit breaker panel make sure that the hot
water circuit is free of air pockets or premature failure of the heating element will occur.
To do this open all hot water faucets one at a time for a minute or two until the water flow
is continuous and free from “gulping” and from visible air pockets.
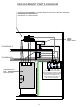
1) With inlet and outlet BALL VALVES fully open, turn on a hot water outlet.
2) Run for 1 minute.
3) Switch on electric supply at circuit breaker panel.
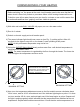
4) The power indicator light should now come on (see Fig. 1), pulsing at first. Allow 40
seconds for the lights to stay full on, the heater is now operating at full power.
NOTE: At this point water temperature may not be hot.
5) Using the OUTLET BALL VALVE slowly reduce water flow until desired temperature is
achieved at hot water outlet.
NOTE: The water temperature is regulated by the flow through the heater. The lower the
flow the higher the temperature and vice versa.
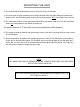
MINIMUM SETTING
MAXIMUM SETTING
THE TEMPERATURE CONTROLLING
POTENTIOMETER IS A PRECISION
COMPONENT. ADJUST GENTLY AND
DO NOT TURN BEYOND THE MIN.
AND MAX. STOP POINTS
6) Now turn the temperature adjustment screw on the first module counter clockwise about
1/8 of a turn, wait for 10-15 seconds and see if the indicator light begins to pulse. If it does
not, turn another 1/8 of a turn, wait and again see if the lamp begins to pulse. Repeat until
the light is pulsing regularly which indicates that the temperature has stabilized at the set
temperature. Repeat with modules two and three. Check that the outlet temperature is at
6