
Install Instructions
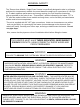
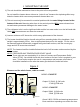

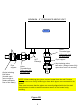
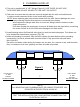

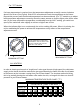
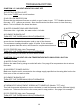
Table Of Contents

For “T2T” Models
If a lower temperature is required, turn the temperature adjustment screw(s) counter-clockwise
about 1/8 of a turn (See Figure). Wait 15-20 seconds and check the temperature at the fixture.
Repeat this process until the desired temperature has been achieved. (For T2T models try to adjust
both temperature adjustment screws by about the same amount so that the lights pulse at the same
rate.) If you have reduced the temperature considerably from the 140 F setting, you could now
open up the outlet ball valve slightly to achieve a higher rate of flow.
When the indicator light is on continuously, the unit is emitting full power. When it is pulsing, the
unit is modulating the power to achieve the temperature set by means of the temperature
adjustment screw.
ALL HEATERS
In order to obtain good control at “single lever” mixer type faucets (single spout) the cold water
supply to the faucet should be restricted to give approximately the same flow rate of cold water
to the faucet as the hot water coming from your Eemax heater. The simplest method of doing
this is by partially closing the cold water valve under the sink, as long as this does not shut off
pressure to your Eemax heater.
MAXIMUM TEMPERATURE RISE CHART (
0
F )
FLOW RATE ( GAL. PER MIN. )
OUTPUT 1 1.5 2 2.5 3 3.5 4
22.5 kW 51 102 77 61 51 44 38
28.0 kW 65 127 96 76 64 55 48
9
MINIMUM SETTING
MAXIMUM SETTING
THE TEMPERATURE CONTROLLING
POTENTIOMETER IS A PRECISION
COMPONENT. ADJUST GENTLY AND
DO NOT TURN BEYOND THE MIN.
AND MAX. STOP POINTS