
User Guide


9
Installation Instructions
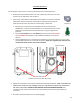
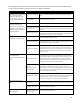
STEP 1: Making sure all electrical power is shut off, remove the black, red, and ground wires from the
existing tank heater coming from the circuit breaker. These wires will now go into the AutoBooster™
through the hole in the unit’s back plate (see Electrical Wiring Diagram on page 10 and Connection
Reference 1 on page 11.)
STEP 2: Using a suitable wire gauge that meets all applicable electrical codes for the size of the breakers
used, run Line 1 (black wire), Line 2 (red wire), and ground (green wire) from the home’s main breaker
panel to the AutoBooster™ water heater, through the back plate hole. See Connection Reference 1 on page
11.
Note: A separate ground conductor for each incoming circuit is required.
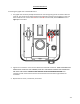
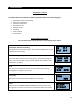
STEP 3: Connect the supplied pigtail cord to the AutoBooster™. See Connection Reference 2 on page 12.
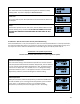
STEP 4: Now connect the wires included with the AutoBooster™ (pigtail cord stemming from the unit) to
the existing tank heater. The black, red, and green (ground) wires should all have secure connections.
MAKE SURE THESE CONNECTIONS ARE IN AN ENCLOSED AREA. EXPOSED CONNECTIONS CAN LEAD TO
SERIOUS INJURY OR DEATH.
STEP 5: DOUBLE CHECK the electrical connections to make sure they are correct and that all wire
connections are tight and secure. Also confirm that the correct breaker size and wire gauge has been used
and confirm that the unit has been connected to a ground in accordance with applicable codes.
STEP 6: Confirm that all the air has been purged from the water lines prior to turning on power to the unit.
Refer to STEP 4 in the plumbing installation section.
CAUTION: Ensure that you have made the correct connections. You must follow the wiring connection as
shown to ensure the proper operation of the unit. If you mix up one set of wires with another, the unit will
not operate correctly even though it turns on and otherwise appears to function properly.