
Installation Guide and Manual


6
BEFORE INSTALLATION
READ THESE INSTRUCTIONS THOROUGHLY AND COMPLETELY PRIOR TO INSTALLATION & USE. FAILURE TO
FOLLOW INSTRUCTIONS COULD CAUSE PROPERTY DAMAGE, SERIOUS PERSONAL INJURY, OR DEATH.
By installing this product, you acknowledge the terms of the manufacturer’s warranty. Once the heater is installed, do not return
product to the place of purchase. If you have any questions regarding the warranty or product return policies, please contact
Manufacturer’s national service department at 1-(800) 543-6163.
Before installation, inspect all components. The package includes:
ProSeries XTP unit
Mounting bracket with locking screw
Warranty card
Registration card
Recommended equipment for installation:
Electric drill for pre-drilling holes
Phillips Head screwdriver
Flat Head screwdriver
Tape measure/ruler
¾” Dielectric Unions
¾” shut off valves
¾” check valve
Air Eliminator/ Magnet Dirt Remover
Pressure Reducing Regulator
Boiler drains (may be beneficial)
Adjustable wrench
Pipe cutter (may be beneficial)
Pencil (used to mark measurements)
Level
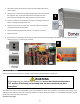
MOUNTING THE HEATER TO THE WALL
Follow the mounting instructions below as appropriate to your installation. Eemax recommends the heater be installed close to the
point-of-use.
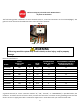
CAUTION
This heater must be installed in a location where it is not subject to freezing
temperatures, unless supplied with factory installed freeze protection.
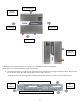
Install the product upright with the water connections facing downward for best performance. Mounting the heater in an alternate
(horizontal) orientation is acceptable. When mounting the unit in a horizontal orientation do not use the included bracket and
ensure the fittings are facing to the right as shown below. Note that the display readout and buttons will not rotate to accommodate
for this alternate orientation. The orientation of the display and buttons are not rotatable. Refer to the specified orientations below
for proper installation.