
Installation Guide and Manual


8
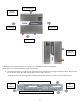
2. Remove the locking screw from the center of the slide lock bracket (to be
used in step 8)
3. Hang the unit on the bracket by aligning the left edge of the enclosure with
the alignment mark on the wall bracket and the top edge of the wall
bracket with the top edge of the alignment label on the front cover.
4. Slide the unit down onto the bracket until it stops, indicating that the wall
bracket is holding the weight of the unit.
5. Slide the unit to the left to until it stops. The stop is aligned such that the
unit will hide the wall mount bracket.
6. Test the bracket by lifting the unit upwards – it should not come free
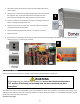
7. Remove the cover
8. (Optional) Insert the locking screw through the center of the back plate and lightly hand tighten. This will prevent unwanted
sliding of the unit, i.e. tampering or accidental.
ELECTRICAL HOOKUP
Eemax recommends that the heater is installed and serviced by a licensed plumber and electrician.
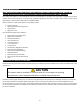
WARNING
Before beginning any work on this installation, be sure that the electrical breaker is
"off" and that all mounting and plumbing work has been completed per these
instructions.
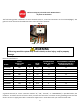
This heater must have its own independent circuit using insulated, UL listed, wire conductors (3 conductors plus ground) of the
appropriate size suitable for up to 90° C and protected by the correctly rated circuit breaker. For recommended conductor, ground
and breaker ratings refer to the chart below:
See chart on next page.
3
8