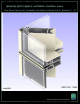
One Piece Corner Unit Assembly Instructions Volume 3 of 6 - Sections 7 - 10 Unit Corner Mullion July 2011 PART NO.
Table of Contents Volume 1 of 6 1. General Notes and Guidelines 2. Parts Identification 3. Frame Assembly Volume 2 of 6 4. Unit Glazing Preparation : SSG and Captured 5. SSG Unit Glazing 6. Captured Unit Glazing Volume 3 of 6 SECTION PAGE 7. Outside 90° Corner Frame Assembly A. Mullion Subassembly…………………………………………..………………… 4 - 7 B. Unit Frame Assembly…………………………………………………………….. 8 - 12 8. Inside 90° Corner Frame Assembly A. Mullion Subassembly…………………………………………..………………… 13 - 16 B.
Series 8700 / 8800 Unitized Curtain Wall Installation Instructions - Volume 3 EFCO 2009 Series 8700 / 8800 Unitized Curtain Wall Installation Instructions - Volume 3 Table of Contents Volume 5 of 6 15. General Notes and Guidelines 16. Size Limitations 17. Standard Hardware Identification 18. Frame Assembly - Vent at Fixed Horizontal 19. Frame Assembly - Vent at Stack Sill 20. Unit Glazing Preparation - Vent at Fixed Horizontal 21. Unit Glazing Preparation - Vent at Stack Sill 22.
Series 8700 / 8800 Unitized Curtain Wall Installation Instructions - Volume 3 Table Wall of Contents Series 8700 / 8800 Unitized Curtain Installation Instructions - Volume Volume 6 of 6 33. Shadow Box Assembly 34. Shadow Box Installation 35. Shadow Box Insulation Installation 36. Back Panel Installation 37. Back Panel Insulation Installation 38. Final Cleaning Minimizing Condensation Note: Please reference EFCO's "Understanding Condensation" brochure which can be obtained through your EFCO representative.
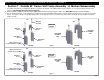
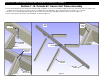
Series 8700 / 8800 Unitized Curtain Wall Installation Instructions - Volume 3 Section 7 - Outside 90° Corner Unit Frame Assembly : A. Mullion Subassembly 1. Assemble anchor kits by screwing in the M170 set screw into the bottom of the FM07 mullion anchors until the set screw is flush with the bottom of the anchor. (Left and Right Hand Assemblies Required) 2. Slide the FM05 or FM06 hook anchor into the FM07 mullion anchor as shown in Figure 1 and 2. See END VIEW on page 6 for part orientation. 3.
Series 8700 / 8800 Unitized Curtain Wall Installation Instructions - Volume 3 Section 7 - Outside 90° Corner Unit Frame Assembly : A. Mullion Subassembly 4. Apply the mullion anchor assemblies to the unit corner mullions (KV09 and KV10). Insert (3) bolts (3/8”-16 x 4 1/2” HX-MS 18-8) through the anchors and mullion. 5.
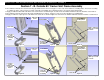
Series 8700 / 8800 Unitized Curtain Wall Installation Instructions - Volume 3 Section 7 - Outside 90° Corner Unit Frame Assembly : A. Mullion Subassembly 7. Apply shear blocks (KV11) for the intermediate horizontals to the unit corner mullion with (4) SM00 (1/4"-10 X 3/4 SL-HW-SMS ZC A) at each intermediate horizontal location.
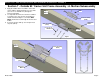
Series 8700 / 8800 Unitized Curtain Wall Installation Instructions - Volume 3 Section 7 - Outside 90° Corner Unit Frame Assembly : A. Mullion Subassembly 8. Once the shear blocks have been attached with SM00 fasteners, adjust the shear blocks so that the face of the horizontal aligns with the face of the corner mullion. Using a mitered, short piece of horizontal as shown in Figure 7 will aid with alignment.
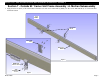
Series 8700 / 8800 Unitized Curtain Wall Installation Instructions - Volume 3 Section 7 - B. Outside 90° Corner Unit Frame Assembly 12. Insert the horizontal onto the shear block and attach with (7) STD0 (1/4”-10 x 1” PL-FH-SMS 18-8 AB) fasteners per shear block. Note: The number and locations of fasteners may vary. Remove all excess sealant from areas that will be exposed to the interior. See Figures 13, 14, and 15. 13.
Series 8700 / 8800 Unitized Curtain Wall Installation Instructions - Volume 3 Section 7 - B. Outside 90° Corner Unit Frame Assembly 16. Assemble the mitered 17H1 stack heads using (4) SFQ5 fasteners and a 2” long piece of the 17J5 corner mullion as a welding fixture. Ensure the assembly is completely square. Take measures to make certain the surrounding exposed finished surfaces are protected from weld spatter. 17.
Series 8700 / 8800 Unitized Curtain Wall Installation Instructions - Volume 3 Section 7 - B. Outside 90° Corner Unit Frame Assembly 20. Using an approved solvent or cleaner, clean the sealant contact surfaces of each end of the corner mullions and of the horizontals. 21. Seal the top of the corner mullion as shown in Figure 24 on page 12. 22. Attach the 17H1 stack head assembly and lifting lug to the top of the corner mullion using (10) SFQ5 frame screws as shown below.
Series 8700 / 8800 Unitized Curtain Wall Installation Instructions - Volume 3 Section 7 - B. Outside 90° Corner Unit Frame Assembly 25. 26. 27. 28. 29. Once the stack head and sill assemblies have been attached, remove all excess sealant from areas that will be exposed to the interior. Remove excess sealant from gasket reglets and areas where the isolator clips and adapters will later be inserted.
Series 8700 / 8800 Unitized Curtain Wall Installation Instructions - Volume 3 Section 7 - B. Outside 90° Corner Unit Frame Assembly 30. Attach the remaining framing members shown below. Refer to Volume 1 and Volume 2 of the S-8000 Unitized Curtain Wall Assembly Instructions for assembly detail as noted. Unit Corner Mullion Intermediate Horizontals Stack Head Assembly Stack Sill Assembly Refer to Volume 1, Page 26 for mullion gasket installation.
Series 8700 / 8800 Unitized Curtain Wall Installation Instructions - Volume 3 Section 8 - Inside 90° Corner Unit Frame Assembly : A. Mullion Subassembly 1. Assemble anchor kits by screwing in the M170 set screw into the bottom of the FM08 mullion anchors until the set screw is flush with the bottom of the anchor. (Left and Right Hand Assemblies Required) 2. Slide the FM05 or FM06 hook anchor into the FM08 mullion anchor as shown in Figure 1 and 2. See END VIEW on page 15 for part orientation. 3.
Series 8700 / 8800 Unitized Curtain Wall Installation Instructions - Volume 3 Section 8 - Inside 90° Corner Unit Frame Assembly : A. Mullion Subassembly 4. Apply the mullion anchor assemblies to the unit corner mullions. Insert (3) bolts (3/8”-16 x 4 1/2” HX-MS 18-8) through the anchors and mullion. 5. Use right and left hand corner anchor assemblies to orient the top of the anchors and mullion as shown in Figure 32 and the END VIEW, and insert the anchor over the bolts. 6.
Series 8700 / 8800 Unitized Curtain Wall Installation Instructions - Volume 3 Section 8 - Inside 90° Corner Unit Frame Assembly : A. Mullion Subassembly 7. Apply shear blocks (KV12) for the intermediate horizontals to the unit corner mullion with (4) SM00 (1/4"-10 X 3/4 SL-HW-SMS ZC A) at each intermediate horizontal location. 8. Attach a 1” x 1” alum. Angle caulk stop x 1” long to each end of the corner mullion with (1) STK4 fastener (#8-18 x 3/4” PL-FH-SMS 410 TEK 2).
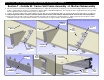
Series 8700 / 8800 Unitized Curtain Wall Installation Instructions - Volume 3 Section 8 - Inside 90° Corner Unit Frame Assembly : A. Mullion Subassembly 9. Use a short piece of 17E9 adapter to align the horizontal and vertical (see Figure 39). Once the shear blocks have been attached with SM00 fasteners, adjust the shear blocks so that the face of the horizontal aligns with the face of the 17E9 adapter. Using a mitered scrap piece of horizontal as shown in Figure 38 will aid with alignment.
Series 8700 / 8800 Unitized Curtain Wall Installation Instructions - Volume 3 Section 8 - B. Inside 90° Corner Unit Frame Assembly 13. Insert the horizontal onto the shear block and attach with (7) STD0 (1/4”-10 x 1” PL-FH-SMS 18-8 AB) fasteners per shear block. Note: The number and locations of fasteners may vary. See Figures 44, 45, and 46 14. Seal the end of the horizontals where they project above the corner mullion as shown in Figure 47. 15.
Series 8700 / 8800 Unitized Curtain Wall Installation Instructions - Volume 3 Section 8 - B. Inside 90° Corner Unit Frame Assembly 18. Assemble the mitered 17H1 stack heads using (4) SFQ5 fasteners and a 2” long piece of the 17J4 corner mullion as a welding fixture. Ensure the assembly is completely square. Take measures to make certain the surrounding exposed finished surfaces are protected from weld spatter. 19.
Series 8700 / 8800 Unitized Curtain Wall Installation Instructions - Volume 3 Section 8 - B. Inside 90° Corner Unit Frame Assembly 22. Using an approved solvent or cleaner, clean the sealant contact surfaces of each end of the corner mullions and of the horizontals. 23. Seal the top of the corner mullion as shown in Figure 55 on page 21. 24. Attach the 17H1 stack head assembly and lifting lug to the top of the corner mullion using (10) SFQ5 frame screws as shown below.
Series 8700 / 8800 Unitized Curtain Wall Installation Instructions - Volume 3 Section 8 - B. Inside 90° Corner Unit Frame Assembly 27. 28. 29. 30. 31. Once the stack head and sill assemblies have been attached, remove all excess sealant from areas that will be exposed to the interior. Remove excess sealant from gasket reglets and areas where the isolator clips and adapters will later be inserted.
Series 8700 / 8800 Unitized Curtain Wall Installation Instructions - Volume 3 Section 8 - B. Inside 90° Corner Unit Frame Assembly 32. Using an approved solvent or cleaner, clean the sealant contact surfaces of the corner mullion and 17E9 adapter. 33. Apply continuous 1/8” diameter beads of sealant in the adapter reglets for the full height of each D.L.O. at the corner mullion. Seal across the corner mullion at each end of where the adapters will be placed as shown in Figure 59.
Series 8700 / 8800 Unitized Curtain Wall Installation Instructions - Volume 3 Section 8 - B. Inside 90° Corner Unit Frame Assembly 36. Seal each end of the 17E9 adapters and tool water tight. 37. Cap seal the heads of SFC7. 38. Remove all excess sealant from areas of the frame exposed to view. 17H0 Stack Sill Assembly Intermediate Horizontal Insert adapters into the reglets in the corner mullion and match drill. Butt seal each end of the adapters prior to setting into opening.
Series 8700 / 8800 Unitized Curtain Wall Installation Instructions - Volume 3 Section 8 - B. Inside 90° Corner Unit Frame Assembly 39. Attach the remaining framing members shown below. Refer to Volume 1 and Volume 2 of the S-8000 Unitized Curtain Wall Assembly Instructions for assembly detail as noted. Refer to Volume 1, Page 26 for mullion gasket installation. Stack Sill Assembly Stack Head Assembly Unit Corner Mullion Intermediate Horizontals Refer to Volume 1, Page 27 - 28 for Frame Pad application.
Series 8700 / 8800 Unitized Curtain Wall Installation Instructions - Volume 3 Section 9 - Outside 90° Corner Unit Glazing Preparation : SSG and Captured 1. Thoroughly clean all debris from the shadow box and back panel areas if the project has shadow boxes or back panels. 2. Using an approved solvent or cleaner, clean the surfaces of the mullions to receive the WC18 spacer gasket and sealant of all oils and other contaminants.
Series 8700 / 8800 Unitized Curtain Wall Installation Instructions - Volume 3 Section 9 - Outside 90° Corner Unit Glazing Preparation : SSG and Captured 5. Apply the WC18 spacer gasket to the mullions as shown below and on the previous page. The gaskets will run through as shown below. Butt the gaskets together at the corners (see Figures 68, 69 and 70). “Crowd” in extra gasket, (approximately 4% to 5% extra) where it runs between the gaskets to ensure a snug butt joint at the corners.
Series 8700 / 8800 Unitized Curtain Wall Installation Instructions - Volume 3 Section 10 - Inside 90° Corner Unit Glazing Preparation : SSG and Captured 1. Thoroughly clean all debris from the shadow box and back panel areas if the project has shadow boxes or back panels. 2. Using an approved solvent or cleaner, clean the surfaces of the mullions to receive the WC18 spacer gasket and sealant of all oils and other contaminants.
Series 8700 / 8800 Unitized Curtain Wall Installation Instructions - Volume 3 Section 10 - Inside 90° Corner Unit Glazing Preparation : SSG and Captured 5. Apply the WC18 spacer gasket to the mullions as shown below and on the previous page. The gasket will run through as shown below. Butt the gaskets together at the corners (see Figures 68, 69 and 70). “Crowd” in extra gasket, (approximately 4% to 5% extra) where it runs between the gaskets to ensure a snug butt joint at the corners.