One Piece Corner Unit Assembly Instructions Volume 4 of 6 - Sections 11 - 14 July 2011 PART NO.
Table of Contents Volume 1 of 6 1. General Notes and Guidelines 2. Parts Identification 3. Frame Assembly Volume 2 of 6 4. Unit Glazing Preparation : SSG and Captured 5. SSG Unit Glazing 6. Captured Unit Glazing Volume 3 of 6 7. Outside 90° Corner Frame Assembly 8. Inside 90° Corner Frame Assembly 9. Outside 90° Corner Unit Glazing Preparation : SSG and Captured 10. Inside 90° Corner Unit Glazing Preparation : SSG and Captured Volume 4 of 7 SECTION 11. Outside 90° Corner SSG Unit Glazing PAGE A.
Table of Contents Volume 4 of 7 SECTION 13. Outside 90° Corner Captured Unit Glazing PAGE A. Temporary Glazing Locators…………………………………………………….. 23 B. Setting and Caulking Glazing …………………………………………………… 24 - 25 C. Adapter and Cover Installation……….…………………………………………. 26 - 33 14. Inside 90° Corner Captured Unit Glazing A. Temporary Glazing Locators…………………………………………………….. 34 B. Setting and Caulking Glazing …………………………………………………… 35 - 36 C. Adapter and Cover Installation……….…………………………………………. 37 - 44 Volume 5 of 6 15.
Series 8700 / 8800 Unitized Curtain Wall Assembly Instructions - Volume 4 Table Wall of Contents Series 8700 / 8800 Unitized Curtain Assembly Instructions - Volume 4 Volume 5 of 6 26. Assembly and Glazing - SSG Vent at Fixed Horizontal 27. Assembly and Glazing - SSG Vent at Stack Sill 28. Assembly and Glazing - Captured Vent at Fixed Horizontal 29. Assembly and Glazing - Captured Vent at Stack Horizontal 30. Hardware Mounting On Unit Assembly 31. Hardware Mounting On Sash 32.
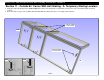
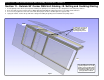
Series 8700 / 8800 Unitized Curtain Wall Assembly Instructions - Volume 4 Section 11 - Outside 90° Corner SSG Unit Glazing : A. Temporary Glazing Locators 1. Apply two temporary glazing locators (KV01, KV02) with isolators and setting blocks at approximate quarter points at the sill and intermediate horizontal locations. 2. Refer to Volume 2, page 8 of the S-8000 Unitized Curtain Wall Assembly Instructions for assembly details and notes.
Series 8700 / 8800 Unitized Curtain Wall Assembly Instructions - Volume 4 Section 11 - Outside 90° Corner SSG Unit Glazing : B. Setting and Caulking Glazing 1. 2. 3. 4. Set the glazing on the silicone spacer gaskets making sure glazing is pressed firmly onto the setting blocks of the temporary retainers. Refer to Volume 2, pages 9 and 10 of the S-8000 Unitized Curtain Wall Assembly Instructions for assembly details and notes.
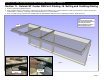
Series 8700 / 8800 Unitized Curtain Wall Assembly Instructions - Volume 4 Section 11 - Outside 90° Corner SSG Unit Glazing : B. Setting and Caulking Glazing 5. Remove the temporary glazing retainers. 6. Apply structural silicone sealant into the void between the glass and mullion per the sealant manufacturer’s application instructions. Frames should not be moved until the sealant has cured and per the sealant manufacturer’s recommendations. 7.
Series 8700 / 8800 Unitized Curtain Wall Assembly Instructions - Volume 4 Section 11 - Outside 90° Corner SSG Unit Glazing : C. Adapter Installation 1. Apply L142 thermal isolator clip to the verticals and horizontals. Refer to Volume 2, page 11 of the S-8000 Unitized Curtain Wall Assembly Instructions for more information. 2. Apply 17B7 SSG glazing adapter to the stack sill. Butt together the 17B7 at the corners. Slide the WC17 horizontal stack joint rain screen gasket into position.
Series 8700 / 8800 Unitized Curtain Wall Assembly Instructions - Volume 4 Section 11 - Outside 90° Corner SSG Unit Glazing : C. Adapter Installation 4. Apply the preset thermal isolator (WC16) to the head, running the gasket continuously between the vertical mullions and the miter of the stack head at the corner. Refer to Volume 2, page 11 of the S-8000 Unitized Curtain Wall Assembly Instructions for more information. 5.
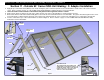
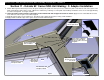
Series 8700 / 8800 Unitized Curtain Wall Assembly Instructions - Volume 4 Section 11 - Outside 90° Corner SSG Unit Glazing : C. Adapter Installation 9. Slide in WC19 gasket and LC23 spacer into the gutter starting at the jamb end. LC23 spacer runs continuously and is flush with the ends of the gutter on the jamb end and butts together at the corner. WC19 runs continuously, overhangs 3” on the jamb end, and wraps around the corner on one side approximately 3” to butt seals together. See Figure 9 below. 10.
Series 8700 / 8800 Unitized Curtain Wall Assembly Instructions - Volume 4 Section 11 - Outside 90° Corner SSG Unit Glazing : C. Adapter Installation 13. Slide WC20 bulb gasket into one of the 17F6 glazing adapters and both 17A6 SSG vertical fin bars. Exercise care to avoid stretching the gasket during installation. Let the bulb gasket run approximately 1/4” longer on each end than 17A6 and 17F6. The bulb gasket must be installed prior to applying 17F6 and 17A6. 14.
Series 8700 / 8800 Unitized Curtain Wall Assembly Instructions - Volume 4 Section 11 - Outside 90° Corner SSG Unit Glazing : C. Adapter Installation 18. Using an approved solvent or cleaner, clean the surfaces of the mullions at the intersection of the intermediate horizontal and the jamb vertical. 19. Apply a heavy bead of sealant at the intersection of the intermediate horizontals and verticals (Refer to Volume 2, page 15, Figure 32 of the S-8000 Unitized Curtain Wall Assembly Instructions). 20.
Series 8700 / 8800 Unitized Curtain Wall Assembly Instructions - Volume 4 Section 11 - Outside 90° Corner SSG Unit Glazing : D. Weather Seal Application 1. Using an approved solvent or cleaner, clean the sealant contact surfaces of the glazing and adapters of all oils and other contaminants. 2. If sealant primer is required, apply it per the primer/sealant manufacturer’s instructions. 3. Insert 3/8” diameter backer rod between the glazing and adapters around all four corners of each lite of glazing.
Series 8700 / 8800 Unitized Curtain Wall Assembly Instructions - Volume 4 Section 12 - Inside 90° Corner SSG Unit Glazing : A. Temporary Glazing Locators 1. Apply two temporary glazing locators (KV03 AND KV04) with isolators and setting blocks at approximate quarter points at the sill and intermediate horizontal locations. 2. Refer to Volume 2, page 8 of the S-8000 Unitized Curtain Wall Assembly Instructions for assembly details and notes.
Series 8700 / 8800 Unitized Curtain Wall Assembly Instructions - Volume 4 Section 12 - Inside 90° Corner SSG Unit Glazing : B. Setting and Caulking Glazing 1. Set the glazing on the silicone spacer gaskets making sure glazing is pressed firmly onto the setting blocks of the temporary retainers. 2. Refer to Volume 2, pages 9 and 10 of the S-8000 Unitized Curtain Wall Assembly Instructions for assembly details and notes. 3.
Series 8700 / 8800 Unitized Curtain Wall Assembly Instructions - Volume 4 Section 12 - Inside 90° Corner SSG Unit Glazing : B. Setting and Caulking Glazing 5. Remove the temporary glazing retainers 6. Apply sealant and tool the frames as required per the sealant manufacturer’s application instructions. Frames should not be moved until the sealant has cured and per the sealant manufacturer’s recommendations. 7.
Series 8700 / 8800 Unitized Curtain Wall Assembly Instructions - Volume 4 Section 12 - Inside 90° Corner SSG Unit Glazing : C. Adapter Installation 7. Apply L142 thermal isolator clip to the verticals and horizontals. Refer to Volume 2, page 11 of the S-8000 Unitized Curtain Wall Assembly Instructions for more information. 8. Apply 17B7 SSG glazing adapter to the stack sill. Butt together the (2) 17B7 at the corners. Slide the WC17 horizontal stack joint rain screen gasket into position.
Series 8700 / 8800 Unitized Curtain Wall Assembly Instructions - Volume 4 Section 12 - Inside 90° Corner SSG Unit Glazing : C. Adapter Installation 10. Apply the preset thermal isolator (WC16) to the head, running the gasket continuously between the vertical mullions and the miter of the stack head at the corner. Refer to Volume 2, page 11 of the S-8000 Unitized Curtain Wall Assembly Instructions for more information. 11.
Series 8700 / 8800 Unitized Curtain Wall Assembly Instructions - Volume 4 Section 12 - Inside 90° Corner SSG Unit Glazing : C. Adapter Installation 14. Slide in WC19 gasket and LC23 spacer into the gutter starting at the jamb end. LC23 spacer runs continuously and is flush with the ends of the gutter on the jamb end and butts together at the corner. WC19 runs continuously, overhangs 3” on the jamb end, and wraps around the corner on one side approximately 3” to butt seals together. See Figure 29 below. 15.
Series 8700 / 8800 Unitized Curtain Wall Assembly Instructions - Volume 4 Section 12 - Inside 90° Corner SSG Unit Glazing : C. Adapter Installation 18. Slide WC20 bulb gasket into one of the 17F7 glazing adapters and both 17A6 SSG vertical fin bars. Exercise care to avoid stretching the gasket during installation. Let the bulb gasket run approximately 1/4” longer on each end than 17A6 and 17F7. The bulb gasket must be installed prior to applying 17F7 and 17A6. 19.
Series 8700 / 8800 Unitized Curtain Wall Assembly Instructions - Volume 4 Section 12 - Inside 90° Corner SSG Unit Glazing : C. Adapter Installation 23. Using an approved solvent or cleaner, clean the surfaces of the mullions at the intersection of the intermediate horizontal and the jamb vertical. 24. Apply a heavy bead of sealant at the intersection of the intermediate horizontal and vertical (Refer to Volume 2, page 15, Figure 32 of the S-8000 Unitized Curtain Wall Assembly Instructions). 25.
Series 8700 / 8800 Unitized Curtain Wall Assembly Instructions - Volume 4 Section 12 - Inside 90° Corner SSG Unit Glazing : D. Weather Seal Application 1. Using an approved solvent or cleaner, clean the sealant contact surfaces of the glazing and adapters of all oils and other contaminants. 2. If sealant primer is required, apply it per the primer/sealant manufacturer’s instructions. 3. Insert 3/8” diameter backer rod between the glazing and adapters around all four corners of each lite of glazing.
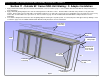
Series 8700 / 8800 Unitized Curtain Wall Assembly Instructions - Volume 4 Section 13 - Outside 90° Corner Captured Unit Glazing : A. Temporary Glazing Locators 1. Apply two temporary glazing locators (KV03 AND KV04) with isolators and setting blocks at quarter points at the sill and intermediate horizontal locations. 2. Refer to Volume 2, page 20 of the S-8000 Unitized Curtain Wall Assembly Instructions for assembly details and notes.
Series 8700 / 8800 Unitized Curtain Wall Assembly Instructions - Volume 4 Section 13 - Outside 90° Corner Captured Unit Glazing : B. Setting and Caulking Glazing 1. Set the glazing on the silicone spacer gaskets making sure glazing is pressed firmly onto the setting blocks of the temporary retainers. 2. Refer to Volume 2, pages 21 and 22 of the S-8000 Unitized Curtain Wall Assembly Instructions for assembly details and notes. 3.
Series 8700 / 8800 Unitized Curtain Wall Assembly Instructions - Volume 4 Section 13 - Outside 90° Corner Captured Unit Glazing : B. Setting and Caulking Glazing 5. Remove the temporary glazing retainers. 6. Apply and tool the frames as required per the sealant manufacturer’s application instructions. Frames should not be moved until the sealant has cured and per the sealant manufacturer’s recommendations. 7.
Series 8700 / 8800 Unitized Curtain Wall Assembly Instructions - Volume 4 Section 13 - Outside 90° Corner Captured Unit Glazing : C. Adapter and Cover Installation 1. Apply L142 thermal isolator clip to the verticals and horizontals. Refer to Volume 2, page 23 of the S-8000 Unitized Curtain Wall Assembly Instructions for more information. 2. Apply 17B5 captured glazing adapter to the stack sill. Butt together the 17B5 at the corners. Slide the WC17 horizontal stack joint rain screen gasket into position.
Series 8700 / 8800 Unitized Curtain Wall Assembly Instructions - Volume 4 Section 13 - Outside 90° Corner Captured Unit Glazing : C. Adapter and Cover Installation 4. Apply the preset thermal isolator (WC16) to the head, running the gasket continuously between the vertical mullions and the miter of the stack head at the corner. Refer to Volume 2, page 23 of the S-8000 Unitized Curtain Wall Assembly Instructions for more information. 5.
Series 8700 / 8800 Unitized Curtain Wall Assembly Instructions - Volume 4 Section 13 - Outside 90° Corner Captured Unit Glazing : C. Adapter and Cover Installation 9. Slide in WC19 gasket and LC23 spacer into the gutter starting at the jamb end. LC23 spacer runs continuously and is flush with the ends of the gutter on the jamb end and butts together at the corner. WC19 runs continuously, overhangs 3” on the jamb end, and wraps around the corner on one side approximately 3” to butt seals together.
Series 8700 / 8800 Unitized Curtain Wall Assembly Instructions - Volume 4 Section 13 - Outside 90° Corner Captured Unit Glazing : C. Adapter and Cover Installation 13. Insert 17K1 glazing retainer into 17B5 stack sill glazing adapter and roll into position. Insert 17K0 glazing retainer into 17B1 gutter and roll into position. The glazing retainers will be flush with the ends of the adapters and butt together in the corners. No sealant is necessary for this step. 14.
Series 8700 / 8800 Unitized Curtain Wall Assembly Instructions - Volume 4 Section 13 - Outside 90° Corner Captured Unit Glazing : C. Adapter and Cover Installation 15. Slide WC20 bulb gasket into one of the 17E3 glazing adapters and both 17A2 captured vertical fin bars. Exercise care to avoid stretching the gasket during installation. Let the bulb gasket run approximately 1/4” longer on each end than 17A2 and 17E3. The bulb gasket must be installed prior to applying 17E3 and 17A2. 16.
Series 8700 / 8800 Unitized Curtain Wall Assembly Instructions - Volume 4 Section 13 - Outside 90° Corner Captured Unit Glazing : C. Adapter and Cover Installation 20. Using an approved solvent or cleaner, clean the surfaces of the mullions at the intersection of the intermediate horizontal and the jamb vertical. 21. Apply a heavy bead of sealant at the intersection of the intermediate horizontals and verticals.
Series 8700 / 8800 Unitized Curtain Wall Assembly Instructions - Volume 4 Section 13 - Outside 90° Corner Captured Unit Glazing : C. Adapter and Cover Installation 23. Insert 17B8 cover onto 17B9 captured glazing adapter and rotate into place as shown in Figures 60 and 61. 24. Cut the WC22 gaskets approximately 4% to 5% longer than the D.L.O. dimension. 25. Drive in WC22 wedge gaskets starting with the gasket on the setting block side of the glazing pocket.
Series 8700 / 8800 Unitized Curtain Wall Assembly Instructions - Volume 4 Section 13 - Outside 90° Corner Captured Unit Glazing : C. Adapter and Cover Installation 26. Insert 17A3 cover into 17A2 captured glazing adapter at each unit jamb and rotate into place as shown in Figures 63 and 64. 27. Cut the WC22 gaskets approximately 4% to 5% longer than the D.L.O. dimension. 28. Drive in WC22 wedge gaskets as shown in Figure 64. The gaskets should be applied starting in the center of the D.L.O.
Series 8700 / 8800 Unitized Curtain Wall Assembly Instructions - Volume 4 Section 14 - Inside 90° Corner Captured Unit Glazing : A. Temporary Glazing Locators 1. Apply two temporary glazing locators (17B5, 17B9 x 4” long) with isolators (L142) and setting blocks (HS31) at quarter points at the sill and intermediate horizontal locations. 2. Refer to Volume 2, page 20 of the S-8000 Unitized Curtain Wall Assembly Instructions for assembly details and notes.
Series 8700 / 8800 Unitized Curtain Wall Assembly Instructions - Volume 4 Section 14 - Inside 90° Corner Captured Unit Glazing : B. Setting and Caulking Glazing 1. Set the glazing on the silicone spacer gaskets making sure glazing is pressed firmly onto the setting blocks of the temporary retainers. 2. Refer to Volume 2, pages 21 and 22 of the S-8000 Unitized Curtain Wall Assembly Instructions for assembly details and notes. 3.
Series 8700 / 8800 Unitized Curtain Wall Assembly Instructions - Volume 4 Section 14 - Inside 90° Corner Captured Unit Glazing : B. Setting and Caulking Glazing 5. Remove the temporary glazing retainers. 6. Apply structural silicone sealant into the void between the glass and mullion per the sealant manufacturer’s application instructions. Frames should not be moved until the sealant has cured and per the sealant manufacturer’s recommendations. 7.
Series 8700 / 8800 Unitized Curtain Wall Assembly Instructions - Volume 4 Section 14 - Inside 90° Corner Captured Unit Glazing : C. Adapter and Cover Installation 1. Apply L142 thermal isolator clip to the verticals and horizontals. Refer to Volume 2, page 23 of the S-8000 Unitized Curtain Wall Assembly Instructions for more information. 2. Apply 17B5 captured glazing adapter to the stack sill. Butt together the (2) 17B5 at the corners.
Series 8700 / 8800 Unitized Curtain Wall Assembly Instructions - Volume 4 Section 14 - Inside 90° Corner Captured Unit Glazing : C. Adapter and Cover Installation 4. Apply the preset thermal isolator (WC16) to the head, running the gasket continuously between the vertical mullions and the miter of the stack head at the corner. Refer to Volume 2, page 23 of the S-8000 Unitized Curtain Wall Assembly Instructions for more information. 5.
Series 8700 / 8800 Unitized Curtain Wall Assembly Instructions - Volume 4 Section 14 - Inside 90° Corner Captured Unit Glazing : C. Adapter and Cover Installation 9. Slide in WC19 gasket and LC23 spacer into the gutter starting at the jamb end. LC23 spacer runs continuously and is flush with the ends of the gutter on the jamb end and butts together at the corner. WC19 runs continuously, overhangs 3” on the jamb end, and wraps around the corner on one side approximately 3” to butt seals together.
Series 8700 / 8800 Unitized Curtain Wall Assembly Instructions - Volume 4 Section 14 - Inside 90° Corner Captured Unit Glazing : C. Adapter and Cover Installation 13. Insert 17K1 glazing retainer into 17B5 stack sill glazing adapter and roll into position. Insert 17K0 glazing retainer into 17B1 gutter and roll into position. The glazing retainers will be flush with the ends of the adapters and butt together in the corners. No sealant is necessary for this step. 14.
Series 8700 / 8800 Unitized Curtain Wall Assembly Instructions - Volume 4 Section 14 - Inside 90° Corner Captured Unit Glazing : C. Adapter and Cover Installation 15. Slide WC20 bulb gasket into one of the 17E7 glazing adapters and both 17A2 captured vertical fin bars. Exercise care to avoid stretching the gasket during installation. Let the bulb gasket run approximately 1/4” longer on each end than 17A2 and 17E7. The bulb gasket must be installed prior to applying 17E7 and 17A2. 16.
Series 8700 / 8800 Unitized Curtain Wall Assembly Instructions - Volume 4 Section 14 - Inside 90° Corner Captured Unit Glazing : C. Adapter and Cover Installation 20. Using an approved solvent or cleaner, clean the surfaces of the mullions at the intersection of the intermediate horizontal and the jamb vertical. 21. Apply a heavy bead of sealant at the intersection of the intermediate horizontals and verticals.
Series 8700 / 8800 Unitized Curtain Wall Assembly Instructions - Volume 4 Section 14 - Inside 90° Corner Captured Unit Glazing : C. Adapter and Cover Installation 26. Insert 17B8 cover onto 17B9 captured glazing adapter and rotate into place as shown in Figures 85 and 86. 27. Cut the WC22 gaskets approximately 2” longer than the D.L.O. dimension. 28. Drive in WC22 wedge gaskets starting with the gasket on the setting block side of the glazing pocket.
Series 8700 / 8800 Unitized Curtain Wall Assembly Instructions - Volume 4 Section 14 - Inside 90° Corner Captured Unit Glazing : C. Adapter and Cover Installation 29. Insert 17A3 cover into 17A2 captured glazing adapter at each unit jamb and rotate into place as shown in Figures 88 and 89. 30. Cut the WC22 gaskets approximately 2” longer than the D.L.O. dimension. 31. Drive in WC22 wedge gaskets as shown in Figure 89. The gaskets should be applied starting in the center of the D.L.O.