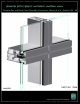
Series 8700 / 8800 Unitized Curtain Wall Assembly Instructions - Volume 6 Shadow Box and Back Panel Assembly Instructions Volume 6 of 6 - Sections 33 - 38 July 2011 PART NO.
Series 8700 / 8800 Unitized Curtain Wall Assembly Instructions - Volume 6 EFCO 2009 Series 8700 / 8800 Unitized Curtain Wall Assembly Instructions - Volume 6 Table of Contents Volume 1 of 6 1. General Notes and Guidelines 2. Parts Identification 3. Frame Assembly Volume 2 of 6 4. Unit Glazing Preparation : SSG and Captured 5. SSG Unit Glazing 6. Captured Unit Glazing Volume 3 of 6 7. Outside 90° Corner Frame Assembly 8. Inside 90° Corner Frame Assembly 9.
Table of Contents Volume 5 of 6 SECTION PAGE 15. General Notes and Guidelines 16. Size Limitations 17. Standard Hardware Identification 18. Frame Assembly - Vent at Fixed Horizontal 19. Frame Assembly - Vent at Stack Sill 20. Unit Glazing Preparation - Vent at Fixed Horizontal 21. Unit Glazing Preparation - Vent at Stack Sill 22. SSG Vent Unit Glazing at Fixed Horizontal 23. SSG Vent Unit Glazing at Stack Sill 24. Captured Vent Unit Glazing at Fixed Sill 25. Captured Vent Unit Glazing at Stack Sill 26.
Series 8700 / 8800 Unitized Curtain Wall Assembly Instructions - Volume 6 Table Wall of Contents Series 8700 / 8800 Unitized Curtain Assembly Instructions - Volume 6 Volume 6 of 6 SECTION PAGE 33. Shadow Box Assembly…………………………………………………………………… 5 - 7 34. Shadow Box Installation…………………………………………………………………. 8 - 9 35. Shadow Box Insulation Installation……………………………………………………. 10 - 11 36. Back Panel Installation…………………………………………………………………… 12 - 13 37.
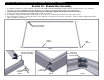
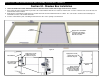
Series 8700 / 8800 Unitized Curtain Wall Assembly Instructions - Volume 6 Section 33 - Shadow Box Assembly 1. Assemble the unit frame as shown in Volume 1 of Series 8700 / 8800 Unitized Curtain Wall Assembly Instructions, through “Section 3 - B. Unit Frame Assembly”. For reduced handling for units with shadow boxes, assemble the unit frame with the interior side facing upward. 2. Clean the ends of the shadow box framing members where sealant will be applied with an approved solvent or cleaner. 3.
Series 8700 / 8800 Unitized Curtain Wall Assembly Instructions - Volume 6 Section 33 - Shadow Box Assembly 6. 7. 8. 9. 10. 11. Clean the surfaces of the shadow box frame where the tape and sealant will be applied with an approved solvent or cleaner. Apply 1/4” x 1/4” glazing tape (WM86) to the shadow box frame. Remove the liner only from the side of the tape to be applied. See Figure 6.
Series 8700 / 8800 Unitized Curtain Wall Assembly Instructions - Volume 6 Section 33 - Shadow Box Assembly 12. Apply silicone sealant into the voids formed by the panel, tape, and shadow box frame being sure to fill the void completely. 13. Tool the sealant smooth and flush with the panel and the shadow box frame. The sealant joint should be continuous around all four sides of the shadow box panel assembly. Allow proper cure time for the sealant joint before proceeding to the next step.
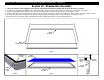
Series 8700 / 8800 Unitized Curtain Wall Assembly Instructions - Volume 6 Section 34 - Shadow Box Installation 1. For reduced handling, assemble the unit frame with the interior side facing upward. Use wood blocking set below the panel, clamped to the mullions on four sides of the opening to provide the proper spacing for the shadow box. The number of wood blocks will very with the size of the panel to be applied. 2. Frames must be true and square.
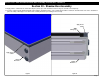
Series 8700 / 8800 Unitized Curtain Wall Assembly Instructions - Volume 6 Section 34 - Shadow Box Installation 6. Clean the shadow box frame and mullion surfaces that will contact sealant with an approved solvent or cleaner. 7. Cap seal the tip of the fastener where it penetrates the vertical mullions with silicone sealant as shown below. Tool the sealant over the end of the fastener and smooth it onto the mullion. 8.
Series 8700 / 8800 Unitized Curtain Wall Assembly Instructions - Volume 6 Section 35 - Shadow Box Insulation Installation 1. 2. 3. 4. Clean the panel and impaling pin surfaces that will contact sealant (or adhesive) with an approved solvent or cleaner. Apply adhesive or sealant to the surface of the panel in a pattern per the manufacture’s recommendations. See Figure 17. Apply impaling pins into the adhesive or sealant forcing the material through the holes in the base of the impaling pin. See Figure 19.
Series 8700 / 8800 Unitized Curtain Wall Assembly Instructions - Volume 6 Section 35 - Shadow Box Insulation Installation 5. Cut the specified rigid insulation to size. The insulation should fit tightly into the framed opening. The edges of the insulation may be cut slightly angled to assist with insertion into the opening. 6. Insert the insulation onto the impaling pins into the opening so that the insulation is flush with the back of the mullion. 7.
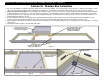
Series 8700 / 8800 Unitized Curtain Wall Assembly Instructions - Volume 6 Section 36 - Back Panel Installation 1. Rotate the assembled unit frame over so that the exterior side facing upward. Use wood blocking set below the panel, clamped to the mullions around the opening to provide the proper spacing for the back panel. The number of wood blocks will very with the size of the back panel to be applied. 2. Frame must be true and square. Prior to installing the back panel, ensure the unit frame is square.
Series 8700 / 8800 Unitized Curtain Wall Assembly Instructions - Volume 6 Section 36 - Back Panel Installation 6. Using an approved solvent or cleaner, clean the surfaces to receive sealant of all oils and other contaminants. 7. The back panel has a raised lip that runs around the four sides of the panel. Apply sealant between this lip and the side of the mullion as shown below, filling the void thoroughly. See Figure 28. 8. Tool the sealant into the joint smoothly, around all four sides continuously.
Series 8700 / 8800 Unitized Curtain Wall Assembly Instructions - Volume 6 Section 37 - Back Panel Insulation Installation 1. 2. 3. 4. Clean the panel and impaling pin surfaces that will contact sealant (or adhesive) with an approved solvent or cleaner. Apply adhesive or sealant to the surface of the panel in a pattern per the manufacture’s recommendations. See Figure 29. Apply impaling pins into the adhesive or sealant forcing the material through the holes in the base of the impaling pin. See Figure 31.
Series 8700 / 8800 Unitized Curtain Wall Assembly Instructions - Volume 6 Section 37 - Back Panel Insulation Installation 5. Cut the specified rigid insulation to size. The insulation should fit tightly into the framed opening. The edges of the insulation may be cut slightly angled to assist with insertion into the opening. 6. Insert the insulation onto the impaling pins into the opening so that the insulation is flush with the back of the mullion. 7.
Series 8700 / 8800 Unitized Curtain Wall Assembly Instructions - Volume 6 Section 38 - Final Cleaning 1. Before proceeding with the glazing process, a thorough cleaning of the exposed areas of the shadow box must be done. 2. Blow all debris out of the joints around the edges and exposed areas of the shadow box. Any metal shavings or dirt must be removed from the opening.