
Installation Instructions User guide

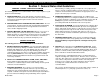
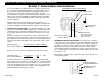
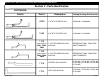
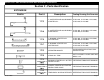
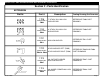
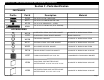
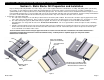
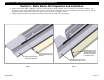
Table Of Contents
- Table Of Contents
- Section 1: General Notes And Guidelines
- Section 2 - Parts Identification
- Section 3 - Static Starter Sill Preparation and Installation
- Section 4 - Dynamic Starter Sill Preparation and Installation
- Section 5 - Dynamic Starter Sill Anchor Installation
- Section 6 - Intermediate Floor Slab Anchor Installation
- Section 7 - Unit Inspection and Preparation for Installation
- Section 8 - Setting Units at Static Starter Sills
- Section 9 - Setting Units at Dynamic Starter Sills
- Section 10 - Setting Typical Intermediate Units
- Section 11 - Setting Assembled (One Piece) Corner Units
- Section 12 - Applying Critical Seals
- Section 13 - Applying Typical Perimeter Seals
- Section 14 - Deglaze / Re-glaze Procedures - Captured System
- Section 15 - Deglaze / Re-glaze Procedures - SSG System

EFCO 2009 Page 9
Series 8700 / 8800 Unitized Curtain Wall Installation Instructions
Section 3 - Static Starter Sill Preparation and Installation
LC23
Silicone Sealant
WC19
End Dam - Attach
with (1) M153
Figure 1
Projects will be produced by EFCO in one of three ways: 1) As a stock length product where all fabrication, assembly, and glazing will be performed by
the customer, or: 2) Prefabricated “knock down” where EFCO fabricates the materials, and the customer performs the assembly, and glazing, or:
3) EFCO will provide a completely fabricated, assembled and glazed product. The materials shown here in the installation instructions may be received
in the field with varying degrees of shop assembly, with some items shop installed, and other items to be field installed. Certain assembly and installation
procedures shown and described in this document may be performed in the shop or the field at the discretion of the assembler.
1. Preparation of the Static Starter Sill:
a. The static starter sill may have an end dam pre-attached and sealed at the jamb condition. Ensure that the end dam is properly applied and sealed
to the starter sill as described below. This is a critical seal and the joint must be carefully tooled to create a watertight seal. See Figures 1, 2, and 3.
b. The starter sill may have gaskets (WC19 and LC23) pre-applied. The LC23 is cut to the length of the starter sill while the WC19 will be
approximately 6” to 8” longer than the starter sill. Do not cut off excess WC19. The excess gasket will be slid into the adjacent starter sill during
installation.
c. Plug the end of the tubular section of the starter sill at the jambs and corner conditions by recessing backer rod at least 1/4” into the end of the tube.
Fill the voids in the tube and between the thermal struts with sealant and tool smooth. Intermediate splice locations incorporate an internal splice
sleeve and will be covered later in this section.
Clean all sealant contact surfaces using an approved solvent or cleaner of all oils and other contaminants. The sealant manufacturer’s
preparation and application instructions should be followed exactly. If sealant primer is required, apply it per the primer/sealant
manufacturer’s instructions.
Figure 2
Figure 3
M153
Tool sealant smooth
into joints.
Plug with backer rod and fill the voids in
the tube and between the thermal struts
with sealant and tool sealant smooth.
Ensure LC23 and WC16
butt into the end dam fully.