Series 5600 Concealed vent Curtain wall Installation Instructions Part NO.
Series 5600 Curtain Wall Concealed Vent Installation Instructions SECTION TABLE OF CONTENTS PAGE I. General Notes & Guidelines …………………………………………………… 3-4 II. Conceal Vent Notes …………...…….………………………………………….. 5 III. Installation / Frame Assembly ……………………………………………….. 6-7 IV. Installation / Vent Adaptor .…………………………………………………… 8 V. Installation / Pressure Plate .…………………………………………………. 9 VI. Sash Inspection ………………………….………………………………………. 10 VII. Installation of Sash Frame …..………………………………………………. 11 VIII.
Series 5600 Curtain Wall Concealed Vent Installation Instructions Section I: General Notes & Guidelines I. II. HANDLING / STORING / PROTECTING ALUMINUM - The following precautions are recommended to assure early acceptance of your products and workmanship. A. HANDLE CAREFULLY - Store with adequate separation between components so the material will not rub together. Store material off the ground. Protect materials against weather elements and other construction trades. B.
Series 5600 Curtain Wall Concealed Vent Installation Instructions Section I: General Notes & Guidelines F. Follow EFCO framing installation and glazing instructions. G. Verify Contents of all material shipments received upon arrival. Verify quantity and correct finishes. NOTIFY EFCO IMMEDIATELY OF ANY DISCREPANCIES OR DAMAGE, THAT MAY HAVE OCCURRED. H. Throughout these instructions the term “SEALANT” will appear.
Series 5600 Curtain Wall Concealed Vent Installation Instructions Section II: Concealed Vent Notes Concealed Vent Notes A.) The S-5600 Wall Concealed vent is a factory fabricated, assembled, and glazed product. All vent gaskets, hardware, screws, and fabricated jamb adaptor will be included with the vent. B.) The following items, unless otherwise specified, WILL NOT be fabricated. 1. Intermediate Horizontal Mullion 2. Horizontal Pressure Plate 3. Horizontal Cover at Vent Head C.
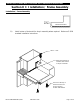
Series 5600 Curtain Wall Concealed Vent Installation Instructions Section III: Installation / Frame Assembly Installation / Frame Assembly A.) Assemble shear blocks to mullion as required. Follow standard installation instructions noted in steps #3 thru #5 in the S-5600 Exterior Glazed Curtain Wall Instructions. Note: Sealant at horizontals as shown below. Seal glazing race at joint plug location with sealant prior to installing the joint plug. #14 X ½” Hex washer head sheet metal screw.
Series 5600 Curtain Wall Concealed Vent Installation Instructions Section III: Installation / Frame Assembly Installation / Frame Assembly Notched horizontal B.) Notch bottom of horizontal for drop-in assembly where required. Reference S-5600 standard installation instructions. #8 X ¾” Tek. After the horizontal is installed, tool sealant at top of horizontal. Seal across the top of the shear block and at the joint plug location with sealant. EFCO CORPORATION 6/2012 PART NO.
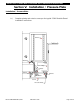
Series 5600 Curtain Wall Concealed Vent Installation Instructions Section IV: Installation / Vent Adaptor Installation / Vent Adaptor A.) Install the jamb adaptor into the openings after completion of the previous sealant details. B.) Attach the adaptor to the vertical with #10 X ¾” PL-PH-SMS Tek3 at 5” from the bottom of the adaptor and 6” O.C. (Staggered around arm brackets) C.) Seal the adaptors to the horizontal as shown below.
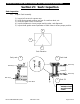
Series 5600 Curtain Wall Concealed Vent Installation Instructions Section V: Installation / Pressure Plate Installation / Pressure Plate A.) Complete glazing and exterior covers per the typical S-5600 Outside Glazed Installation Instructions. Anchor Gasket Vent Adaptor Isolator Gasket Gasket Side Block Cover Pressure Plate EFCO CORPORATION 6/2012 PART NO.
Series 5600 Curtain Wall Concealed Vent Installation Instructions Section VI: Sash Inspection Sash Inspection A.) Inspect Sash Assembly. 1.) 2.) 3.) 4.) 5.) Inspect all corners for square ness. Verify that exposed surfaces are free of scratches dents, etc. Verify the glass is free of scratches. Inspect hardware to insure proper working order, and alignment. Inspect bulb gasket around perimeter of sash frame to insure proper position. B A C Sash Elevation A B Sash Head 1/8" MIN.
Series 5600 Curtain Wall Concealed Vent Installation Instructions Section VII: Installation of Sash Frame Installation of Sash Frame A.) Install sash frame into opening. B.) Set sash from exterior, tilting top of sash frame inward to allow Gasket front of frame to hook into horizontal as shown. C.) Anti-Lift Clip After sash frame is hung in opening, install anti-lift clip at 3” long. Locate one at each end of vent and one at centerline of D.L.O. Gasket D.
Series 5600 Curtain Wall Concealed Vent Installation Instructions Section VIII: Attachment of Limit Device Attachment of Limit Device A.) Use EFCO Program to determine arm size and location. 2.062 ARM ATTACHMENT AT FRAME .110 SASH BRACKET .625 .073 1.125 .180 FRAME BRACKET 0.725 1.125 PIVOT POINT DI M CL EA R CENTER LINE TO CENTER LINE JAMB ADAPTOR OP EN IN G MIN. DIM. 1.250 .073 EFCO CORPORATION 6/2012 PART NO. Y310 1.125 1.125 MA X.
Series 5600 Curtain Wall Concealed Vent Installation Instructions Section IX: Reglaze Instructions Reglaze Instruction 1.) Remove Limit device and anti-lift clips. 2.) Remove sash from opening. 3.) Remove damaged or broken glass from sash. 4.) Remove old silicone sealant. 5.) Remove old setting blocks, jamb blocks, and glazing tape. 6.) Clean all metal and infill that will contact silicone with proper cleaner, and then apply primer, if required, as recommended by sealant manufacturer. 7.