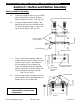
Series 5600 Sloped glazed Curtain wall Installation Instructions Part NO.
Series 5600 Slope Glazed Curtain Wall Installation Instructions SECTION TABLE OF CONTENTS PAGE I. General Notes & Guidelines …………………………………………………. 3-4 II. Gutter and Mullion Assembly .…….………………………………………… 5 III. End Cap Installation …………………………………………………………… 6-7 IV. Rafter and Purlin Assembly .………………………………………………… 8-9 V. Purlin Assembly …………………………………………………………………..10-14 VI. PVC Isolator and Gasket Application ……………………………………. 15-16 VII. Glazing Instructions …………………………………………..………………. 17-21 VIII.
Series 5600 Slope Glazed Curtain Wall Installation Instructions Section I: General Notes & Guidelines I. II. HANDLING / STORING / PROTECTING ALUMINUM - The following precautions are recommended to assure early acceptance of your products and workmanship. A. HANDLE CAREFULLY - Store with adequate separation between components so the material will not rub together. Store material off the ground. Protect materials against weather elements and other construction trades. B.
Series 5600 Slope Glazed Curtain Wall Installation Instructions Section I: General Notes & Guidelines F. Follow EFCO framing installation and glazing instructions. G. Verify contents of all material shipments received upon arrival. Verify quantity and correct finishes. NOTIFY EFCO IMMEDIATELY OF ANY DISCREPANCIES OR DAMAGE, THAT MAY HAVE OCCURRED. H. Throughout these instructions the term “SEALANT” will appear.
Series 5600 Slope Glazed Curtain Wall Installation Instructions Section II: Gutter and Mullion Assembly Gutter and Mullion Assembly A.) B.) Insert the transition anchor in top of 5600 wall vertical mullion using (4) #14 flat head countersunk screws. (Ref. Fig. #1) 3/8” Diameter bolts & flat washers At extreme jamb members attach .062 aluminum end cap to top of mullion with (2) #8 countersunk screws. Line up end cap as shown below. (Ref. Fig. #3) Gutter clip, sized and cut per job.
Series 5600 Slope Glazed Curtain Wall Installation Instructions Section III: End Cap Installation End Cap Installation End cap as designed on a per job basis. End cap T.O. Mullion 1/8" 1" Location of gutter once installed on top of vertical mullion. 5" [FIG. 3] A.) Inside edge of mullion #8 Flat head countersunk screws. Seal joint between gutter and end cap as shown.
Series 5600 Slope Glazed Curtain Wall Installation Instructions Section III: End Cap Installation End Cap Installation Self – locking nut End Cap Sealant 3/8” X 3” Flat head Transition gutter S-5600 Wall Mullion Transition gutter S-5600 Wall Mullion [FIG. 4] Note: Refer to typical S-5600 Wall Installation Instructions for procedures regarding installation of curtain wall above or below slope glazing system. EFCO CORPORATION 6/2012 PART NO.
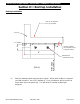
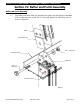
Series 5600 Slope Glazed Curtain Wall Installation Instructions Section IV: Rafter and Purlin Assembly Rafter and Purlin Assembly A.) Slide lower rafter clip in bottom end of rafter and attach with (4) #14 countersunk screws. (Ref. Fig. #5) Note: Anchor conditions vary on a per job basis. Refer to “APPROVED” shop drawings for actual anchoring conditions, and attach accordingly. Rafter #14 X ¾” FHSMS B.
Series 5600 Slope Glazed Curtain Wall Installation Instructions Section IV: Rafter and Purlin Assembly Rafter and Purlin Assembly C.) Slide rafter and lower rafter clip assembly over gutter clip and align pre-fabricated 3/8” through bolt holes, install 3/8” X 3” hex bolt, washers & self-locking nuts as shown in figure #6 Rafter Lower Rafter Clip Self – locking nut Transition Gutter Gutter Clip 3/8” X 3” Hex bolt Transition Anchor [FIG. 6] EFCO CORPORATION 6/2012 PART NO.
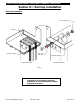
Series 5600 Slope Glazed Curtain Wall Installation Instructions Section V: Purlin Assembly Purlin Assembly Note: Slide purlin over stiffener tube where applicable prior to sealing. A.) Install all horizontal purlins at head, intermediates and transition, being careful to seal as indicated. (Ref. Figs. #8, 9, 10, 11, & 12) [FIG. 8] Sealant Seal underside of each purlin as shown prior to setting in notch. Make sure that slide – in grooves of purlin are completely full of sealant.
Series 5600 Slope Glazed Curtain Wall Installation Instructions Section V: Purlin Assembly Purlin Assembly B.) Snap-on purlin retainer clips at each end of purlin as shown. (Ref. Figs. #9 & 10) Aluminum purlin retainer clips Lay a bed of sealant in notch on rafter prior to setting horizontal purlin. [FIG. 9] EFCO CORPORATION 6/2012 PART NO.
Series 5600 Slope Glazed Curtain Wall Installation Instructions Section V: Purlin Assembly Purlin Assembly Note: Tool underside of purlin seal with putty knife to insure a complete seal. Purlin Retainer Clips Horizontal Purlin Rafter [FIG. 10] EFCO CORPORATION 6/2012 PART NO.
Series 5600 Slope Glazed Curtain Wall Installation Instructions Section V: Purlin Assembly Purlin Assembly Aluminum Purlin Clip Transition Purlin Purlin notch in rafter C.) Install all horizontal purlins at head, intermediates and transition being careful to seal as indicated. (Ref. Figs. #8, 9, 10, 11 & 12) D.) Snap-on purlin retainer clips at each end of purlin as shown. (Ref. Figs. #8 & 9) 1.250 [FIG. 11] Note: Make sure the clips are secured in position in order to hold down purlins.
Series 5600 Slope Glazed Curtain Wall Installation Instructions Section V: Purlin Assembly Purlin Assembly Sealant at joint. Notched at jambs only Weep holes. (Ref. shop drawings for locations) This End Down Purlin Retainer Clip Transition Purlin [FIG. 12] EFCO CORPORATION 6/2012 PART NO.
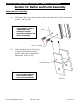
Series 5600 Slope Glazed Curtain Wall Installation Instructions Section VI: PVC Isolator & Gasket PVC Isolator and Gasket Application A.) Insert appropriate gasket and isolator into rafter and purlins as shown. (Ref. Figs. 13A & 13B) B.) Gaskets can become somewhat deformed during storage in cartons. They should be removed from cartons and / or rolls several hours prior to use, lay flat or hang so as to allow for recovery of correct shape.
Series 5600 Slope Glazed Curtain Wall Installation Instructions Section VI: PVC Isolator & Gasket PVC Isolator and Gasket Application D.) Fit gaskets and isolators between purlin retainer clips. (Ref. Fig. #14) E.) Seal joints as indicated. Seal joint between vertical rafters and purlins. Butt and bed gaskets with sealant [FIG. 14] EFCO CORPORATION 6/2012 PART NO.
Series 5600 Slope Glazed Curtain Wall Installation Instructions Section VII: Glazing Instructions Glazing Instructions A.) Place setting blocks in position at ¼ points in intermediate and transition purlins. (Ref. Fig. #15) Customer / Installer Note: EFCO setting blocks are typically 4" in length with different depths. If the glazing infill is "NOT BY EFCO" and glazing sizes are larger than 40 square feet, then the glazing details must be reviewed by the glazing manufacturer for proper setting block size.
Series 5600 Slope Glazed Curtain Wall Installation Instructions Section VII: Glazing Instructions Glazing Instructions B.) Set all glass units in position, being careful to center in D.L.O. (Typical glass bite is ½”) (Glass size = D.L.O. + 1”) Note: Temporary Glazing Retainers are available from EFCO. These retainers are considered an extra, and can be provided at customer’s request. EFCO CORPORATION 6/2012 PART NO.
Series 5600 Slope Glazed Curtain Wall Installation Instructions Section VII: Glazing Instructions Glazing Instructions C.) Install transition pressure plate, flashing, and any other infill as required prior to final assembly. (Ref. Figs. 16A & 16B) Note: Set transition pressure plate in full bed of sealant at gutter and end cap locations. (Ref. Fig. 16A) Closure Angle Sealant Transition Pressure Plate End Cap as designed on a per job basis. [FIG. 16B] Bed of sealant [FIG.
Series 5600 Slope Glazed Curtain Wall Installation Instructions Section VII: Glazing Instructions Glazing Instructions D.) Apply glazing gaskets to pressure plate. Gaskets applied to rafter pressure plate must be cut flush at both ends. Gaskets applied to purlin pressure plates cut ¼” long both ends maximum. Exterior Preset Gasket Infill Infill Infill Infill Purlin Rafter E.) Refer to Fig. #14 to insure that sealant is at rafter to purlin joinery as illustrated. EFCO CORPORATION 6/2012 PART NO.
Series 5600 Slope Glazed Curtain Wall Installation Instructions Section VII: Glazing Instructions Glazing Instructions F.) Install pressure plates. Attach pressure plate to rafters and purlin with screws at 6” O.C. typical. Note: In cold weather, first torque all pressure plate fasteners at 40 inch pounds. When possible work from center outward on purlins and from transition upwards on rafters. Then torque all screws to 80 inch pounds.
Series 5600 Slope Glazed Curtain Wall Installation Instructions Section VIII: Snap-On Exterior Covers Snap-On Exterior Covers A.) Install Vertical Rafter Covers… Caution: Care must be taken to avoid damage to covers during installation. Use a nominal 12” long 2 X 2 or 2 X 4 and mallet to seat covers. Mallet or hammer. Approximately 12” long block of wood. B.) Install Horizontal Purlin Covers… Silicone sealant continuous for drainage. EFCO CORPORATION 6/2012 PART NO.
Series 5600 Slope Glazed Curtain Wall Installation Instructions Section VIII: Snap-On Exterior Covers Snap-On Exterior Covers C.) After installation of purlin covers, seal as shown above for water drainage. Reseal pressure plate to vertical covers prior to attaching horizontal covers. Vertical Cover D.) Center horizontal snap cover in opening; engage one side, then use block and mallet to engage opposite side.