Window installation instructions Part NO.
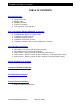
Window Installation Instructions TABLE OF CONTENTS General Overview 1. 2. 3. 4. 5. 6. General notes Construction notes Building codes Window installation Perimeter anchorage Vent inspection or reinstallation Basic Installation Without Subframe or Panning 1. 2. 3. 4. 5. 6.
Window Installation Instructions Subframe Installation 1. General notes 2. Mullion Installation into subframe Screen Frame Installation 1. 2. 3. 4. 5. 6. 7.
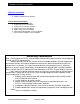
Window Installation Instructions - General Overview Section - These recommendations are for general erection procedures only. For actual job conditions, see the details on the shop drawings. For perimeter anchor type and spacing, refer to the approved shop drawings or consult the project design professional. 1. General notes Windows are finished products and must be protected against damage. The following procedures and precautions are recommended: A. Protection and Storage 1.
Window Installation Instructions - General Overview Section - These recommendations are for general erection procedures only. For actual job conditions, see the details on the shop drawings. For perimeter anchor type and spacing, refer to the approved shop drawings or consult the project design professional. 2. Ship Open For Field Glazing The following procedures are standard practice for EFCO corporation: A.
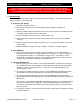
Window Installation Instructions - General Overview Section - These recommendations are for general erection procedures only. For actual job conditions, see the details on the shop drawings. For perimeter anchor type and spacing, refer to the approved shop drawings or consult the project design professional. D. Plumb / Level / True 1. All materials are to be installed plumb, level, true, and in proper alignment and relation to established line grades.
Window Installation Instructions - General Overview Section - These recommendations are for general erection procedures only. For actual job conditions, see the details on the shop drawings. For perimeter anchor type and spacing, refer to the approved shop drawings or consult the project design professional. 5. Window Installation A. The rough opening should be checked for the correct size as determined by tolerances listed in the architectural specifications and the shop drawings. B.
Window Installation Instructions - General Overview Section - These recommendations are for general erection procedures only. For actual job conditions, see the details on the shop drawings. For perimeter anchor type and spacing, refer to the approved shop drawings or consult the project design professional. F. Seal all exposed perimeter joints between structure and window perimeters with a skinning, non-hardening type of sealant. Refer to the approved shop drawings for joint design.
Window Installation Instructions - General Overview Section - These recommendations are for general erection procedures only. For actual job conditions, see the details on the shop drawings. For perimeter anchor type and spacing, refer to the approved shop drawings or consult the project design professional.
Window Installation Instructions - General Overview Section - These recommendations are for general erection procedures only. For actual job conditions, see the details on the shop drawings. For perimeter anchor type and spacing, refer to the approved shop drawings or consult the project design professional. 7. Vent Inspection or Reinstallation A. Upon completion of the window installation, all operating vents must be checked for proper alignment and operation.
Window Installation Instructions - Basic Window Installation Section - Completely read the General Installation Instructions and all other sections which pertain to your project before starting work. These recommendations are for general erection procedures only. For actual job conditions, see the details on the shop drawings. For perimeter anchor types and spacing, refer to the approved shop drawings or consult the project design professional.
Window Installation Instructions - Basic Window Installation Section - Completely read the General Installation Instructions and all other sections which pertain to your project before starting work. These recommendations are for general erection procedures only. For actual job conditions, see the details on the shop drawings. For perimeter anchor types and spacing, refer to the approved shop drawings or consult the project design professional. Installation with Optional “F” Anchor Clips 1.
Window Installation Instructions - Basic Window Installation Section - Completely read the General Installation Instructions and all other sections which pertain to your project before starting work. These recommendations are for general erection procedures only. For actual job conditions, see the details on the shop drawings. For perimeter anchor types and spacing, refer to the approved shop drawings or consult the project design professional. Installation of Architectural Sills 1.
Window Installation Instructions - Basic Window Installation Section - Completely read the General Installation Instructions and all other sections which pertain to your project before starting work. These recommendations are for general erection procedures only. For actual job conditions, see the details on the shop drawings. For perimeter anchor types and spacing, refer to the approved shop drawings or consult the project design professional.
Window Installation Instructions - Basic Window Installation Section - Completely read the General Installation Instructions and all other sections which pertain to your project before starting work. These recommendations are for general erection procedures only. For actual job conditions, see the details on the shop drawings. For perimeter anchor types and spacing, refer to the approved shop drawings or consult the project design professional.
Window Installation Instructions - Basic Window Installation Section - Completely read the General Installation Instructions and all other sections which pertain to your project before starting work. These recommendations are for general erection procedures only. For actual job conditions, see the details on the shop drawings. For perimeter anchor types and spacing, refer to the approved shop drawings or consult the project design professional.
Window Installation Instructions - Basic Window Installation Section - Completely read the General Installation Instructions and all other sections which pertain to your project before starting work. These recommendations are for general erection procedures only. For actual job conditions, see the details on the shop drawings. For perimeter anchor types and spacing, refer to the approved shop drawings or consult the project design professional.
Window Installation Instructions - Hung Window Installation Section - Completely read the General Installation Instructions and all other sections which pertain to your project before starting work. These recommendations are for general erection procedures only. For actual job conditions, see the details on the shop drawings. For perimeter anchor types and spacing, refer to the approved shop drawings or consult the project design professional. General Installation Instructions for Hung Windows 1.
Window Installation Instructions - Hung Window Installation Section - Completely read the General Installation Instructions and all other sections which pertain to your project before starting work. These recommendations are for general erection procedures only. For actual job conditions, see the details on the shop drawings. For perimeter anchor types and spacing, refer to the approved shop drawings or consult the project design professional. 4.
Window Installation Instructions - Hung Window Installation Section - Completely read the General Installation Instructions and all other sections which pertain to your project before starting work. These recommendations are for general erection procedures only. For actual job conditions, see the details on the shop drawings. For perimeter anchor types and spacing, refer to the approved shop drawings or consult the project design professional. Tilt Window Sash Removal and Cleaning Instructions 1. 2.
Window Installation Instructions - Hung Window Installation Section - Completely read the General Installation Instructions and all other sections which pertain to your project before starting work. These recommendations are for general erection procedures only. For actual job conditions, see the details on the shop drawings. For perimeter anchor types and spacing, refer to the approved shop drawings or consult the project design professional.
Window Installation Instructions - Hung Window Installation Section - Completely read the General Installation Instructions and all other sections which pertain to your project before starting work. These recommendations are for general erection procedures only. For actual job conditions, see the details on the shop drawings. For perimeter anchor types and spacing, refer to the approved shop drawings or consult the project design professional.
Window Installation Instructions - Hung Window Installation Section - Completely read the General Installation Instructions and all other sections which pertain to your project before starting work. These recommendations are for general erection procedures only. For actual job conditions, see the details on the shop drawings. For perimeter anchor types and spacing, refer to the approved shop drawings or consult the project design professional.
Window Installation Instructions - Hung Window Installation Section - Completely read the General Installation Instructions and all other sections which pertain to your project before starting work. These recommendations are for general erection procedures only. For actual job conditions, see the details on the shop drawings. For perimeter anchor types and spacing, refer to the approved shop drawings or consult the project design professional.
Window Installation Instructions - Hung Window Installation Section - Completely read the General Installation Instructions and all other sections which pertain to your project before starting work. These recommendations are for general erection procedures only. For actual job conditions, see the details on the shop drawings. For perimeter anchor types and spacing, refer to the approved shop drawings or consult the project design professional.
Window Installation Instructions - Hung Window Installation Section - Completely read the General Installation Instructions and all other sections which pertain to your project before starting work. These recommendations are for general erection procedures only. For actual job conditions, see the details on the shop drawings. For perimeter anchor types and spacing, refer to the approved shop drawings or consult the project design professional. 4. Sash at rest in hold down position. 5.
Window Installation Instructions - Hung Window Installation Section - Completely read the General Installation Instructions and all other sections which pertain to your project before starting work. These recommendations are for general erection procedures only. For actual job conditions, see the details on the shop drawings. For perimeter anchor types and spacing, refer to the approved shop drawings or consult the project design professional.
Window Installation Instructions - Sliding Window Installation Section - Completely read the General Installation Instructions and all other sections which pertain to your project before starting work. These recommendations are for general erection procedures only. For actual job conditions, see the details on the shop drawings. For perimeter anchor types and spacing, refer to the approved shop drawings or consult the project design professional. Horizontal Sliding Window Sash Removal 1.
Window Installation Instructions - Sliding Window Installation Section - Completely read the General Installation Instructions and all other sections which pertain to your project before starting work. These recommendations are for general erection procedures only. For actual job conditions, see the details on the shop drawings. For perimeter anchor types and spacing, refer to the approved shop drawings or consult the project design professional. 3.
Window Installation Instructions - Casement Window Installation Section - Completely read the General Installation Instructions and all other sections which pertain to your project before starting work. These recommendations are for general erection procedures only. For actual job conditions, see the details on the shop drawings. For perimeter anchor types and spacing, refer to the approved shop drawings or consult the project design professional.
Window Installation Instructions - Casement Window Installation Section - Completely read the General Installation Instructions and all other sections which pertain to your project before starting work. These recommendations are for general erection procedures only. For actual job conditions, see the details on the shop drawings. For perimeter anchor types and spacing, refer to the approved shop drawings or consult the project design professional.
Window Installation Instructions - Casement Window Installation Section - Completely read the General Installation Instructions and all other sections which pertain to your project before starting work. These recommendations are for general erection procedures only. For actual job conditions, see the details on the shop drawings. For perimeter anchor types and spacing, refer to the approved shop drawings or consult the project design professional.
Window Installation Instructions - Pivot Window Installation Section - Completely read the General Installation Instructions and all other sections which pertain to your project before starting work. These recommendations are for general erection procedures only. For actual job conditions, see the details on the shop drawings. For perimeter anchor types and spacing, refer to the approved shop drawings or consult the project design professional. General Installation Instructions for Pivot Windows 1.
Window Installation Instructions - Panning Installation Section - Completely read the General Installation Instructions and all other sections which pertain to your project before starting work. These recommendations are for general erection procedures only. For actual job conditions, see the details on the shop drawings. For perimeter anchor types and spacing, refer to the approved shop drawings or consult the project design professional.
Window Installation Instructions - Panning Installation Section - Completely read the General Installation Instructions and all other sections which pertain to your project before starting work. These recommendations are for general erection procedures only. For actual job conditions, see the details on the shop drawings. For perimeter anchor types and spacing, refer to the approved shop drawings or consult the project design professional. 8. Pull the panning frame into the opening from the exterior.
Window Installation Instructions - Panning Installation Section - Completely read the General Installation Instructions and all other sections which pertain to your project before starting work. These recommendations are for general erection procedures only. For actual job conditions, see the details on the shop drawings. For perimeter anchor types and spacing, refer to the approved shop drawings or consult the project design professional.
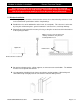
Window Installation Instructions - Panning Installation Section - Completely read the General Installation Instructions and all other sections which pertain to your project before starting work. These recommendations are for general erection procedures only. For actual job conditions, see the details on the shop drawings. For perimeter anchor types and spacing, refer to the approved shop drawings or consult the project design professional. Typical Jamb Condition 3” interior trim clips.
Window Installation Instructions - Panning Installation Section - Completely read the General Installation Instructions and all other sections which pertain to your project before starting work. These recommendations are for general erection procedures only. For actual job conditions, see the details on the shop drawings. For perimeter anchor types and spacing, refer to the approved shop drawings or consult the project design professional. Mullion Installation in Panning 1.
Window Installation Instructions - Panning Installation Section - Completely read the General Installation Instructions and all other sections which pertain to your project before starting work. These recommendations are for general erection procedures only. For actual job conditions, see the details on the shop drawings. For perimeter anchor types and spacing, refer to the approved shop drawings or consult the project design professional. Fastener for anchorage to the opening condition by others.
Window Installation Instructions - Typical Subframe Installation Section Subsill Prepara on Prior to Installa on Measure the opening for the horizontal opening dimension. Square cut the subsill the length of the M.O. (masonry opening) minus 1/2”. Sealant over strut area is by EFCO if subsill is ordered fabricated. If subsill is ordered in stock lengths this sealant is by installer. If the subsill has an extension: The extension must be cut to the same length as the subsill.
Window Installation Instructions - Typical Subframe Installation Section Subsill Installa on Locate and install the subsill as shown on the shop drawings. Note: The sealing of the subsill to the condiƟon is criƟcal to the performance of the assembly and will vary greatly based on the building condiƟon. The locaƟon of these seals will be shown on the shop drawings. For perimeter anchor type and spacing, refer to the approved shop drawings or consult the project design professional.
Window Installation Instructions - Typical Subframe Installation Section Subhead/Subjamb Prepara on and Installa on Typically EFCO will send subjambs long for field fit. The sill end of the subjambs may have some type of notch cut by EFCO when required. When the subjambs come pre‐notched at the sill end, all length adjustment should be done to the head end. All notching will be done in the field by the installer on “Express Jobs”.
Window Installation Instructions - Typical Subframe Installation Section Subsill to Subjamb Cri cal Seal Areas Seal subframe to building cond on around the en re perimeter of the opening, using a silicone compa ble sealant as specified by the architect or contractor. Tool sealant into subsill profile. Tool sealant into void around subsill extender.
Window Installation Instructions - Typical Subframe Installation Section Installa on of Window into Subframe Immediately before the window is set into the subframe, run a bead of silicone sealant along the subsill where the exterior leg of the window will set. This step is not op onal. Run a bead of silicone sealant on the exterior leg of the subhead and subjambs next to the gasket reglet.
Window Installation Instructions - Typical Subframe Installation Section Installa on of Subsill Drive‐in Field cut and install the subhead closure ght to the opening condi on. Drive Alignment dart gasket between the window frame and the interior leg of the subsill. The gasket is typically EFCO part number WNA3 or WNA4. Leave a gap 2” or less between the end of the drive in dart gasket and the subjamb.
Window Installation Instructions - Typical Subframe Installation Section Installa on of Subjamb Closure Measure for the subjamb closure length. See the “Z” dimension shown on page 3 of this sec on. Run a bead of silicone sealant beneath where the closure will snap 6” up the subjamb from the subsill. Make sure this bead is con nuous and joins the subsill to subjamb seal below.
Window Installation Instructions - Typical Subframe Installation Section Critcal Final Cap Seals Cap bead the subsill to window joint at the exterior. Join this bead to the subjamb to jamb condi on seal. Tool smooth and visually inspect for pinholes. This cap seal is require and should under no circumstance be le out. Next cap bead the subjamb to window joint at the exterior. Join this seal to the cap seal that was just run at the subsill.
Window Installation Instructions - Typical Subframe Installation Section Subsill Installa on When Subhead /Jambs Are Not Used Prep subsill as show on page 1. Install subsill as shown on page 2. Silicone sealant to be con nuous from the end dam to subsill, silicone should have a minimum contact of 1/2” with each surface. Tool into all crevices and corners. Push backer rod into the void between the end dam and the condi on. Seal the end dam to the condi on.
Window Installation Instructions - Typical Subframe Installation Section Subsill and Subhead Splicing Instruc ons Splices should be located at appropriate loca ons to account for all expected thermal movement and/or aesthe c. Splice joints are typically placed every 16 feet maximum with a 1/2” separa on. (Reference approved shop drawings for specifics of job) Field apply 4” Perma‐Barrier tape (EFCO part # WM01) to the joints.
Window Installation Instructions - Typical Subframe Installation Section Mullion Installa on Into Subframe Set mullion into the subframe and plumb to the opening. Fasten the mullion to the opening by using two mullion anchor clips supplied by EFCO (KA20). Locate one at the subhead and one at the subsill. Fasten the clip to the mullion with the fasteners provided by EFCO, and to the opening with fasteners provided by the erector.
Window Installation Instructions - Typical Subframe Installation Section Mullion Installa on Into Subframe A ach the 4” pressure clip at the sill end. It should contact the subsill. Seal this pressure clip to the subsill and both window jambs. Seal over the head of all fasteners that pierce the 4” clip. Field cut and/or notch the ver cal cover and snap over the mullion clips. Fillet seal the exterior of the mullion to the window jambs.
Window Installation Instructions - Screen Installation Section - Completely read the General Installation Instructions and all other sections which pertain to your project before starting work. These recommendations are for general erection procedures only. For actual job conditions, see the details on the shop drawings. For perimeter anchor types and spacing, refer to the approved shop drawings or consult the project design professional.
Window Installation Instructions - Screen Installation Section - Completely read the General Installation Instructions and all other sections which pertain to your project before starting work. These recommendations are for general erection procedures only. For actual job conditions, see the details on the shop drawings. For perimeter anchor types and spacing, refer to the approved shop drawings or consult the project design professional. Project-Out Screen Installation 1.
Window Installation Instructions - Screen Installation Section - Completely read the General Installation Instructions and all other sections which pertain to your project before starting work. These recommendations are for general erection procedures only. For actual job conditions, see the details on the shop drawings. For perimeter anchor types and spacing, refer to the approved shop drawings or consult the project design professional. Project-Out Casement Screen Installation 1.
Window Installation Instructions - Screen Installation Section - Completely read the General Installation Instructions and all other sections which pertain to your project before starting work. These recommendations are for general erection procedures only. For actual job conditions, see the details on the shop drawings. For perimeter anchor types and spacing, refer to the approved shop drawings or consult the project design professional.
Window Installation Instructions - Screen Installation Section - Completely read the General Installation Instructions and all other sections which pertain to your project before starting work. These recommendations are for general erection procedures only. For actual job conditions, see the details on the shop drawings. For perimeter anchor types and spacing, refer to the approved shop drawings or consult the project design professional.
Window Installation Instructions - Screen Installation Section - Completely read the General Installation Instructions and all other sections which pertain to your project before starting work. These recommendations are for general erection procedures only. For actual job conditions, see the details on the shop drawings. For perimeter anchor types and spacing, refer to the approved shop drawings or consult the project design professional. Sliding Window Screen Installation 1.
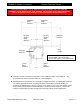
SCRN page 7 of 7 1) INTERIOR VERTICAL SLIDING SCREEN INSTALLATION INSTALL THE HEAD AND SILL INTERIOR TRIM CLIPS. START BY ATTACHING THE FIRST CLIP APPROXIMATELY 6" FROM EACH CORNER, THEN EVERY 16" O.C.. ATTACH THE CLIPS TO THE WINDOW WITH EFCO’S STT6 SCREWS AND TO THE OPENING WITH THE ERECTOR FURNISHED ANCHORS. HOLE DRILLING IN CLIPS IS NOT BY EFCO. THE TRIM CLIPS PROVIDE THE STRUCTURAL SUPPORT FOR THE WINDOW UNIT.