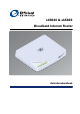
sb5830 & sb5835 Broadband Internet Router 30 sb58 Gebruikershandboek
Copyright 2002, Efficient Networks, Inc. All rights reserved. Printed in the U.S.A. Efficient Networks and SpeedStream are registered trademarks, and the Efficient Networks logo is a trademark of Efficient Networks, Inc. All other names may be trademarks, service marks or registered trademarks held by their respective companies. This document is for information purposes only, Efficient Networks is not responsible for errors or omissions herein.
user’s systems or network. 3. Exclusive Remedy. Your exclusive remedy and EFFICIENT’s exclusive obligation for breach of this limited warranty is, in EFFICIENT’s sole option, either (a) a refund of the purchase price paid for the Hardware/Software or (b) repair or replacement of the Hardware/Software with new or remanufactured products. Any replacement Hardware or Software will be warranted for the remainder of the original warranty period or thirty days, which ever is longer. 4. Warranty Procedures.
EFFICIENT neither assumes nor authorizes any authorized service center or any other person or entity to assume for it any other obligation or liability beyond that which is expressly provided for in this Limited Warranty including the provider or seller of any extended warranty or service agreement. The Limited Warranty period for EFFICIENT supplied attachments and accessories is specifically defined within their own warranty cards and packaging. 2. EXCLUSION OF INCIDENTAL, CONSEQUENTIAL AND OTHER DAMAGES.
Table of Contents INSTALLATIE.................................................................................................................................................. 7 Introductie ................................................................................................................................................. 7 Installatievereisten ....................................................................................................................................
Table of Contents QoS Policy Configuration ................................................................................................................. 54 Maak of wijzig een QoS Policy .................................................................................................. 55 Een QoS Policy verschuiven ..................................................................................................... 56 Verwijder een QoS Policy ...............................................................
INSTALLATIE Introductie Dit gebruikershandboek omvat de installatie en setup van de Efficient Networks sb5830-sb5835 Broadband Internet Router. Het bevat ook specificaties en support-informatie. Dit hoofdstuk begeleidt u door de installatie van uw router. Installatievereisten Inhoud van het pakket Uw routerpakket dient de onderstaande items te bevatten. Als u ziet dat er iets beschadigd is of ontbreekt, neem dan contact op met uw dealer.
Installatie Sluit u uw router aan In de volgende procedure wordt beschreven hoe u de kabels op de juiste wijze met uw router moet verbinden. Stap 1: Plaats uw router in een goed geventileerde ruimte. Sluit het niet op andere toestellen aan en plaats het niet op vloerbedekking of een tapijt. Stap 2: Maak een directe verbinding van uw pc met een van de Ethernet-poorten van uw router met behulp van een van de rode kabels. U kunt nog meer Ethernet-apparaten op de resterende Ethernet-poorten aansluiten.
Installatie • • • • • • Windows ME Windows XP Apple Macintosh Mac OS 9.x Mac OS X Linux Microsoft Windows Windows 98 Stap 1: Rechtsklik op het pictogram Network Neighborhood op uw bureaublad. Scherm 2: Het pictogram Network Neighborhood Stap 2: Nu moet het Network-venster verschijnen. Kies het TCP/IP uit de geïnstalleerde netwerkcomponenten in het tabblad Configuration . Stap 3: Klik op Properties om de eigenschappen van TCP/IP weer te geven.
Installatie Stap 5: Klik in het tabblad IP Address op de optie Obtain an IP address automatically. Scherm 4: Het venster IP Address Stap 6: Klik op OK. Stap 7: Klik op de OK-knoppen om de vensters te sluiten. Opmerking: Misschien moet u uw pc herstarten zodat de wijzigingen van kracht worden. Windows NT 4 Stap 1: Rechtsklik op het pictogram Network Neighborhood op uw bureaublad. Scherm 5: Het pictogram Network Neighborhood Stap 2: 10 Nu moet het Network-venster verschijnen.
Installatie Stap 3: Klik op Properties om de eigenschappen van TCP/IP weer te geven. Scherm 6: Het venster TCP/IP Properties Stap 4: Kies het tabblad IP-adres in het Microsoft-venster TCP/IP-instellingen. Stap 5: Klik in het tabblad IP Address op de optie Obtain an IP address from a DHCP server. Scherm 7: Het venster IP Address Stap 6: Klik op OK. Stap 7: Klik op de OK-knoppen om de vensters te sluiten. Opmerking: Misschien moet u uw pc herstarten zodat de wijzigingen van kracht worden.
Installatie Windows 2000 Stap 1: Rechtsklik op het pictogram My Network Places op uw bureaublad. Scherm 8: Het pictogram My Network Places Stap 2: Het venster The Network and Dial-up Connections verschijnt. Rechtsklik op het pictogram van de Local Area Connection. Scherm 9: Network and Dial-Up Connections-venster Stap 3: Kies de optie Properties in het menu. Stap 4: Nu moet het venster Local Area Connection Properties verschijnen. Kies Internet Protocol (TCP/IP) uit de lijst met componenten.
Installatie Stap 5: Klik op Properties om de eigenschappen van TCP/IP weer te geven. Scherm 10: Het venster LAN Properties Stap 6: Het venster van het Internet Protocol (TCP/IP) Properties verschijnt. Klik op de optie Obtain an IP address automatically en Obtain DNS server address automatically. Scherm 11: Het venster TCP/IP Properties Stap 7: Klik op OK. Stap 8: Klik op de OK-knoppen om de vensters te sluiten. Opmerking: Misschien moet u uw pc herstarten zodat de wijzigingen van kracht worden.
Installatie Windows ME Stap 1: Rechtsklik op het pictogram Network Places op uw bureaublad. Scherm 12: Het pictogram Network Places Stap 2: Kies de optie Properties in het getoonde menu. Stap 3: Nu moet het Network-venster verschijnen. Kies in het tabblad Configuration uit de lijst van geïnstalleerde netwerkcomponenten het TCP/IP Protocol dat correspondeert met uw netwerkkaart. Stap 4: Klik op Properties om de eigenschappen van TCP/IP weer te geven.
Installatie Windows XP Stap 1: Rechtsklik op het pictogram My Network Places op uw bureaublad. Scherm 14: Het pictogram My Network Places Stap 2: Het scherm My Network Places verschijnt. Kies View Network Connections in het menu Network Tasks. Scherm 15: Het venster Network Connections Stap 3: Het scherm Network Connections verschijnt. Klik op het pictogram van de Local Area Connection.
Installatie Stap 4: Nu moet het venster Local Area Connection Properties verschijnen. Kies het Internet Protocol (TCP/IP) uit de lijst van items. Scherm 17: Het venster TCP/IP Properties Stap 5: Het venster van het Internet Protocol (TCP/IP) Properties verschijnt. Kies in het tabblad General de opties Obtain an IP address automatically en Obtain DNS server address automatically. Stap 6: Klik op de OK-knoppen om de vensters te sluiten.
Installatie Apple Macintosh Om TCP/IP en DHCP op uw Macintosh te configureren, moet u eerst de versie van uw Mac OS kiezen: • • Mac OS 9.x Mac OS X Mac OS 9.x Stap 1: Kies in het Apple-menu de optie Control Panels en vervolgens het TCP/IP. Scherm 18: Apple Macintosh Control Panels Menu Stap 2: Het TCP/IP-bedienpaneel verschijnt. Kies Using a DHCP Server uit het meerkeuzemenu Configure.
Installatie Mac OS X Stap 1: Kies Systeemvoorkeuren in het Apple-menu. Scherm 20: Apple Macintosh Preferences Menu Stap 2: Het venster met de Systeemvoorkeuren verschijnt. Klik om het pictogram Network te kiezen. Scherm 21: Apple Macintosh Systeemvoorkeuren-venster 18 Efficient Networks, Inc.
Installatie Stap 3: Het Netwerk-venster verschijnt. Kies het tabblad TCP/IP. Scherm 22: Apple Macintosh Netwerk-venster Stap 4: Kies Using a DHCP Server in het meerkeuzemenu Configure. Stap 5: Voer de informatie in die u van uw serviceprovider hebt ontvangen. Stap 6: Klik op de knop Save om uw instellingen op te slaan en het Network-venster te sluiten. Linux Stap 1: Voer het volgende commando uit via een terminalvenster.
Installatie Stap 2: Het Config-venster verschijnt. Voer de informatie in die u van uw serviceprovider hebt ontvangen, in de velden onder het betreffende tabblad. Scherm 24: Linux Host configuratiescherm Stap 3: Klik op Accept, zodra de instellingen volledig zijn. Stap 4: Om de systeemstatus te updaten, moet de knop 'Activate the changes' branden; klik vervolgens op Act/Changes. Scherm 25: Linux Config System Status-scherm 20 Efficient Networks, Inc.
EASY SETUP De Easy Setup-schermen zijn gemaakt voor een eenvoudige, stap-voor-stap configuratie van de basisfaciliteiten van de router. Easy Setup bestaat uit webvensters met alle bedienopties voor de setup en het gebruik van uw router. U hebt informatie over uw netwerk nodig om Easy Setup uit te kunnen voeren. Deze informatie krijgt u normaliter van uw netwerkprovider.
Easy Setup WAN Interface-scherm Het scherm van de WAN Interface is het eerste scherm van de Easy Setup-procedure. Gebruik dit formulier voor uw Wide Area Network (WAN)-instellingen. Twee instellingen zijn vereist; Data-PVC en WAN-protocol. Scherm 27: WAN Interface-scherm In het scherm WAN Interface kunt u beginnen met de volgende stappen van de Easy Setup. Stap 1: Voer de ATM Permanent Virtual Circuit (PVC)-informatie in. Dit zijn de twee nummers die u van uw netwerkprovider dient te ontvangen.
Easy Setup Point-to-Point Protocol via ATM Als u Point-to-Point Protocol over ATM als WAN-protocol hebt geselecteerd, zal Easy Setup het volgende PPP-configuratiescherm weergeven. Scherm 28: Point-to-Point Protocol via ATM-scherm Om door te gaan met PPP via ATM als uw WAN-protocol moet u de volgende stappen uitvoeren: Stap 1: Voer de naam van de gebruiker in het veld PPP User Name in en het wachtwoord in het veld Password. Deze informatie krijgt u normaliter van uw netwerkprovider.
Easy Setup Point-to-Point Protocol via Ethernet via PPPoA Als u Point-to-Point Protocol over Ethernet over PPPoA als WAN-protocol hebt geselecteerd, zal Easy Setup het volgende PPPoE Configuration-scherm weergeven. Scherm 29: PPPoE configuratiescherm Om door te gaan met PPPoE als uw WAN-protocol moet u de volgende stappen uitvoeren: Stap 1: Voer de naam van de gebruiker in het veld PPP User Name in en het wachtwoord in het veld Password. Deze informatie krijgt u normaliter van uw netwerkprovider.
Easy Setup Point-to-Point Protocol via Ethernet via RFC 1483 Als u Point-to-Point Protocol over Ethernet over RFC 1483 als WAN-protocol hebt geselecteerd, zal Easy Setup het volgende PPP-configuratiescherm weergeven. Scherm 30: PPPoE over RFC 1483 configuratiescherm Om door te gaan met PPPoE als uw WAN-protocol moet u de volgende stappen uitvoeren: Stap 1: Voer de naam van de gebruiker in het veld PPP User Name in en het wachtwoord in het veld Password.
Easy Setup RFC 1483 Networking Als u RFC 1483 als WAN-protocol hebt geselecteerd, zal Easy Setup het volgende RFC 1483 Networkingscherm weergeven. Scherm 31: RFC 1483 Networking-scherm Om door te gaan met RFC 1483 als uw WAN-protocol moet u de volgende stappen uitvoeren: Stap 1: Klik hier om een van de volgende mogelijkheden te kiezen: • Bridging enabled - Als Bridging is ingeschakeld, zal alle verkeer voor remote computers dat niet is gerouted, worden doorgestuurd met behulp van bridging.
Easy Setup • Block NetBIOS Traffic - NetBIOS is een netwerkprotocol waarmee netwerkverbindingen onmerkbaar geopend kunnen worden gehouden. Om buitensporige verbindingskosten te vermijden dient dit soort verkeer worden tegengegaan in een netwerkdienst. Stap 4: Klik op Next om door te gaan met de configuratie van het Dynamic Host Configuration Protocol in Easy Setup.
Easy Setup Stap 2: Als u Bridging enabled hebt gekozen, kunt u optioneel ook Only bridge PPPoE Traffic selecteren. Door deze optie te kiezen wordt alleen het verkeer via PPPoE ge-bridged. Het overige verkeer wordt afgewezen. Stap 3: Als u IP Routing enabled hebt gekozen, kunt u ook nog de volgende opties selecteren: • NAT Enabled - Network Address Translation (NAT) maakt het mogelijk dat diverse workstations binnen uw LAN één public IP-adres delen.
Easy Setup • Configureer DNS met de hand. Voor de handmatige configuratie van DNS hebt u ten minste één DNS-serveradres nodig en één domeinnaam. Deze informatie krijgt u normaliter van uw netwerkprovider. Voer de DNS-informatie in zoals hierna is beschreven: 1. Voer de domeinnaam in het veld Domain Name in. Hiermee wordt de domeinnaam van de DNS ingesteld. 2. Voer het IP-adres van de Primary DNS Server in het betreffende veld in. Dit gebeurt indien DNS-aanvragen worden verstuurd. 3.
Easy Setup Restarting Router-scherm Scherm 35: Restarting Router-scherm U moet een login uitvoeren om de rebootprocedure af te sluiten. Als het scherm van de Router Information niet binnen drie minuten verschijnt, klik op de link in de herstartmelding om uw netwerkverbinding opnieuw tot stand te brengen. De melding is hieronder te zien. Uw router zal een herstart uitvoeren bij http://192.168.254.254. Als uw browser niet binnen drie minuten een automatische reload maakt, klik dan op de link.
GEAVANCEERDE FACILITEITEN U hebt de beschikking over geavanceerde faciliteiten die zowel gewone systeemoperaties als geavanceerde routerfuncties omvatten. Kies uit de onderstaande lijst als u meer wilt weten over het configureren van (een van) deze faciliteiten. • • • • • • • • • • • • • • • Access Control - Met behulp van de faciliteit Access Control kan de toegang en controle van uw router worden beperkt tot een bepaalde groep van hosts.
Access Control Access Control Het scherm Access Control wordt gebruikt om toegangsrestricties tot het systeem in te stellen. Elke remote access-methode kan worden gezet op een van de drie mogelijke toegangsniveaus; zie hierna. Scherm 36: Access Control-scherm De drie niveaus van toegangscontrole van elke toegangsmethode zijn: • • • Geactiveerd zonder toegangsbeperking.
User Management User Management De faciliteit User Management voorziet in het management van User Accounts. Deze User Accounts voorzien in de toegang tot het besturingssysteem en de commando's van de router. User Management-scherm Het scherm User Management toont een lijst van de huidige User Accounts en functies voor deze User Accounts.
User Management Een nieuwe User Account toevoegen Voer de volgende procedure uit om een nieuwe User Account toe te voegen: Stap 1: Klik op New User in het scherm User Management. Het scherm Add/Modify User verschijnt. Scherm 38: Add/Modify User-scherm Stap 2: Voer de naam van de gebruiker in het veld User Name in. Stap 3: Voer het gebruikers-wachtwoord in: a. b. Stap 4: Voer het wachtwoord in het veld Password in. Voer hetzelfde wachtwoord opnieuw in het veld Confirm Password in.
User Management User Templates User Templates zijn voorgeconfigureerd ten behoeve van het maken en beheer van User Accounts. Deze sjablonen bevatten voorgedefinieerde rechten, gebaseerd op typische rollen binnen het routerbeheer. Ook al werd er reeds een sjabloon gekozen voor een gebruiker, kunnen de bijzondere rechten van de gebruiker nog steeds met de hand worden gewijzigd. De knoppen boven aan het venster Add/Modify User verschaffen toegang tot de User Templates.
User Management User Lookup Configuration Het scherm User Lookup Configuration stelt de beheerder in staat om de zoekvolgorde te definiëren (primary en secondary) voor logins van gebruikers. Het scherm User Lookup Configuration is hieronder te zien. Scherm 39: User Lookup Configuration-scherm De keuzeopties zijn: • • • Local - Local zoekt in de database van de lokale gebruikers, die zich in de flash memory bevindt.
User Management Secure Mode Configuration Secure Mode is een faciliteit waarmee de toegang tot het systeem kan worden beperkt tot kanalen die veilig en zeker werken. De Secure Mode kan zowel in verbinding met de WAN interface worden gebruikt als met een, LAN interface of zelfs met beide. Als Secure Mode is geactiveerd, kan een interface in betrouwbaar worden herbenoemd, wat impliceert dat onveilige verbindingen via de betrouwbare interface toegelaten zijn.
Current Date and Time Current Date and Time Met behulp van deze faciliteit kunt u de datum en tijd instellen die uw router registreert. Het veld Current Date and Time toont de huidige datum en tijd van uw pc. Om de datum en tijd van uw router te synchroniseren met de huidige datum en tijd, moet u op de knop Synchronize Router Clock klikken. Scherm 41: Current Date and Time-scherm 38 Efficient Networks, Inc.
DHCP Configuration DHCP Configuration De faciliteit DHCP Configuration stelt u in staat om de huidige Dynamic Host Configuration Protocol (DHCP)instellingen van uw router te maken en te bekijken. DHCP is een TCP/IP-serviceprotocol dat voorziet in de dynamische toekenning van IP-adressen en andere configuratie-informatie aan client hosts binnen een netwerk.
DHCP Configuration toegekend te kunnen worden zodat de network client de router om de toekenning van een nieuw IPadres moet vragen. Om uw DHCP te configureren, moet u de volgende stappen uitvoeren: Stap 1: Wijzig de huidige DHCP Server Status als gewenst. a. Kies de gewenste LAN DHCP Server Status Mode uit het meerkeuzemenu van de New Setting. b. Klik op Apply om uw nieuwe LAN DHCP-modus in te stellen. Stap 2: Definieer het bereik van de IP Address Pool Setting als gewenst. a.
Network Address Translation Network Address Translation Network Address Translation (NAT) is een faciliteit die voorziet in een bepaald veiligheidsniveau door het eigen IP-adres van uw LAN achter het enige public IP-adres van uw router te verstoppen. Alle verbindingen moeten via uw router lopen en worden vertaald via NAT. Uw router vertaalt netwerkadressen van inkomend verkeer van public in private IP-adressen en vertaalt adressen van uitgaand verkeer van private IP-adressen in een public IP-adres.
Network Address Translation NAT Passthrough Setting Het veld NAT Passthrough Setting wordt gebruikt om de NAT Passthrough mode in (enable) of uit te schakelen (disable). Als NAT Passthrough is ingeschakeld (enabled), zijn er multiple Virtual Private Network (VPN)- clients toegestaan. Als NAT Passthrough is gedeactiveerd (disabled), is er slechts één VPN-client toegestaan.
Simple Network Management Protocol (SNMP) Simple Network Management Protocol (SNMP) Simple Network Management Protocol (SNMP) voorziet in de uitwisseling van meldingen tussen een netwerkmanagement client en een netwerkmanagement agent voor remote management of netwerkknooppunten. Deze meldingen bevatten aanvragen voor het ontvangen en instellen van variabelen van netwerkknooppunten ten behoeve van het maken van statistieken, instellen van configuratieparameters en om netwerkevents te volgen.
Simple Network Management Protocol (SNMP) Stap 2: Benoem het SNMP Port Number in door middel van een van de volgende opties: • Default - Klik op deze knop om de SNMP-poort op de standaard van 161 te zetten en SNMP mogelijk te maken. • Disable - Klik op deze knop om de SNMP-poort te deactiveren door deze op 0 (nul) te zetten. • Port Number - Klik op deze knop om een non-standaard poort te definiëren voor het SNMP. Voer het gewenste poortnummer in het betreffende veld in.
Simple Network Management Protocol (SNMP) SNMP Password Met behulp van het SNMP Password-scherm kunnen wijzigingen worden aangebracht in het SNMP-wachtwoord. Het wachtwoord wordt gebruikt voor de authenticatie van een SNMP-manager. Zodra deze is geauthenticeerd, worden configuratieverzoeken van de SNMP-manager gehonoreerd, zodat deze remote wijzigingen in de systeemconfiguratie mag aanbrengen.
Secure Shell (SSH) Secure Shell (SSH) De Secure Shell (SSH) maakt de verzending mogelijk van veilige netwerkdiensten via een onveilig netwerk als het internet. SSH is een veilig en functioneel equivalent van Telnet. Telnet-verbindingen en -opdrachten staan een groot aantal compromissen toe, zoals het toestaan van een niet-geautoriseerde toegang, onderschepping en logging van verkeer van en naar het aangesloten systeem, inclusief wachtwoorden.
Secure Shell (SSH) Configureer de Secure Shell (SSH) Scherm 48: Configure Secure Shell (SSH)-scherm Het Configure Secure Shell (SSH)-scherm voorziet in instellingen voor de SSH van de router. De SSH Configuration omvat de volgende parameters: • • • • • • Status - Kan op Enable of Disable SSH worden gezet. Encryption - Beschrijft de geselecteerde coderingsmethode(n) voor de communicatie via de SSH. De geselecteerde methode is lokaal geconfigureerd op de router (of server).
Secure Shell (SSH) • Gebruik een SSH Port# door op de betreffende knop te klikken en door het gewenste poortnummer in het betreffende veld in te voeren. Stap 6: Voer de Idle Timeout (sec.) interval in het betreffende veld in. De interval kan een tijdsbestek zijn van 30 tot 1200 seconden. 600 seconden is de standaard Idle Timeout interval. Stap 7: Voer de D-H ReKey Interval (in minuten) in het betreffende veld in. Deze interval kan een tijdsbestek zijn van 0 tot 600 seconden.
Secure Shell (SSH) een nieuw pair voor uw maken in het scherm Generate Public-Private Key Pair. Het scherm is hieronder te zien. Scherm 50: Generate Public-Private Key Pair-scherm De procedure voor het maken van nieuwe public-private key pairs werkt als volgt: Stap 1: Lees eerst de waarschuwing in het scherm van de Generate Public-Private Key Pair: PAS OP! Door het uitvoeren van deze functie worden nieuwe keys gemaakt. De uitvoering van deze functie kan in sommige gevallen wel 1 uur duren.
Secure Shell (SSH) Key Generator Status Het scherm SSH Key Generation Status verschijnt zodra een SSH key wordt gemaakt. Scherm 51: SSH Key Generation Status-scherm Om terug te keren naar het scherm Secure Shell (SSH) Configuration List moet u op de SSH Main Page-link klikken. Klik op de link Home om terug te keren naar het scherm van de Router Information. 50 Efficient Networks, Inc.
Firewall Configuration Firewall Configuration Uw router beschermt uw netwerk en datacommunicatie met behulp van ingebouwde firewalleigenschappen. Een firewall is elke combinatie van hardware en software dat een network en het netwerkverkeer beschermd tegen wederrechtelijke onderbrekingen en inbraak. Uw router is voorzien van voorgedefinieerde scripts die aangepast kunnen worden of rechtsstreeks kunnen worden gebruikt om firewalls te construeren.
Firewall Configuration Stap 3: Klik op de knop Home om terug te keren naar het scherm Router Information. PAS OP! Laat alle beveiligingsmaatregelen voor uw netwerk, inclusief de configuratie van uw firewall, uitvoeren door een ervaren en gekwalificeerde netwerkspecialist die vertrouwd is met de unieke architectuur en vereisten van uw netwerk. De fabrikant kan niet aansprakelijk worden gesteld voor ongeoorloofde indringing als gevolg van een ondeugdelijke of onjuiste configuratie van de firewall.
Quality of Service Quality of Service Quality of Service (QoS) is een set van faciliteiten voor een actief management van netwerk bandbreedte om serviceniveaus voor prioritaire toepassingen te ondersteunen. Mission-critical en real-time netwerktoepassingen vereisen netwerkfaciliteiten die voorzien in veilige en stabiele netwerkdienstlevels en -bronnen. Quality of Service-faciliteiten voorzien in dit niveau van zekerheid.
Quality of Service • definieerde Mapping Rules. Als DiffServ is uitgeschakeld (OFF), zullen er geen tags verschijnen zodra er datapakketten passeren. Dit wordt ook wel 'DiffServ pass through' genoemd. QoS Priority/Weight Setting - Deze instellingen worden gebruikt om waarden toe te kennen voor max. vier verschillende prioriteiten. Deze voorkeuren hebben een numerieke waarde die tussen 0 en 256 ligt. Deze numerieke waarden voeren een rangschiking uit binnen de QoS m.b.t.
Quality of Service Maak of wijzig een QoS Policy Scherm 55: Create QoS Policy Configuration-scherm De volgende parameters worden gebruikt om een QoS Policy mee te maken of te wijzigen: • • • • • • • • • Policy Name - Dit veld kent een naam toe aan een policy. Status - Met deze knoppen kan de QoS policy op Enable of Disable worden gezet. Source IP - Deze velden specificeren het bron-IP-adres of het bereik van IP-adressen die wordt/worden gecontroleerd door de QoS Policy .
Quality of Service • • • • • Code Point - outgoing - Dit veld specificeert de het uitgaande codepunt van de QoS Policy. De knop Standaard zet de uitgaande codepunt op de standaardpositie. Bidirection - Met deze knoppen kan de bidirectionele operatie van uw QoS-instellingen in- en uit worden geschakeld. Start Time - Specificeert het tijdsbestek gedurende de dag dat de QoS Policy actief is. Duration - Geeft het tijdsbestek aan waarbinnen de QoS policy actief moet blijven.
Quality of Service Verwijder een QoS Policy Scherm 57: Delete QoS Policy-scherm De Delete-optie van de QoS Policy Configuration voorziet in velden die nodig zijn om een policy of alle policy's van een QoS te verwijderen van de IP Policy list. Voer de volgende procedure uit om een IP Policy of meerdere IP policy's te verwijderen: Stap 1: Klik op een van de radioknoppen om 'all policies in IP policy list' te verwijderen of een heel bepaalde policy.
Stateful Firewall Stateful Firewall Traditionele firewalls zijn stateless. Met andere woorden: ze hebben geen geheugen waarin de verbindingen zijn opgeslagen van de datapakketten die de firewall zijn gepasseerd. Zulke IP filterende firewalls controleren de header-informatie van elk pakket en vergelijken deze met een set van gedefinieerde regels. Als de firewall overeenstemming aantreft, wordt de beschreven actie uitgevoerd.
Stateful Firewall • • • UDP Packet Threshold Setting - Zodra een UDP-pakketteller deze drempelwaarde overschrijdt, zal de firewall dit UDP-pakket afwijzen. De standaarddrempelwaarde is 1000 per seconde. ICMP Ping Packet Threshold Setting - Zodra de ICMP ping pakkettenteller deze drempelwaarde overschrijdt, zal de firewall alle ICMP ping pakketten afwijzen. De standaarddrempelwaarde is 1000 per seconde.
Stateful Firewall Stateful Firewall Rule-configuratie Als een firewall, voert de stateful firewall beveiligingsacties uit voor uw netwerk die zijn gebaseerd op de regels die uw netwerkbeheerder heeft gedefinieerd. Deze regels voorzien de Stateful Firewall met een richtsnoer voor het efficiënte managen van verbindingen en data, terwijl tevens adequaat wordt gereageerd op bedreigingen voor de netwerkveiligheid. Er bestaan twee hoofdtypes van deze regels: Allow of Deny.
Stateful Firewall Stateful Firewall Rules maken De Create Mode van het scherm Stateful Firewall Rule Configuration toont de bedienopties voor het maken van nieuwe firewall-regels. Scherm 61: Create Stateful Firewall Rule-scherm Stateful Firewall Rule Parameters Met de volgende parameters kunnen Stateful Firewall Rules worden gemaakt en gewijzigd: • Rule List - Voor firewall-regels; er bestaan twee soorten: Allow Rules en Deny Rules.
Stateful Firewall • Number - Dit veld geeft het protocol met behulp van het nummer. • ICMP - Internet Control Message Protocol - Als het protocol ICMP is, moet de bron van het pakkeet met het opgegeven ICMP-type corresponderen. Het ICMP-pakket moet corresponderen met de ICMP-code. • Application - Dit veld wordt gebruikt om een toepassing als doel van een regel te definiëren.
Stateful Firewall Stateful Firewall Rules verwijderen De Delete Mode in het scherm van de Stateful Firewall Rule Configuration toont de bedienopties voor het verwijderen van firewall-regels. Het scherm is hieronder te zien. Scherm 62: Delete Stateful Firewall Rule-scherm Voer de volgende procedure uit om een firewall-regel te verwijderen: Stap 1: Klik op de knop Delete in het menu van de Firewall Rule Configuration.
Stateful Firewall Actualiseer Stateful Firewall Rules De Refresh Mode in het scherm van de Stateful Firewall Rule Configuration toont een geactualiseerde lijst van de bestaande en geconfigureerde firewall-regels. Om de lijst van firewall-regels op te frissen, moet u de volgende stappen uitvoeren. Stap 1: 64 Klik op de knop Refresh in het scherm van de Firewall Rule Configuration. Het venster van de Firewall Rule Configuration verschijnt, inclusief de geactualiseerde lijsten. Efficient Networks, Inc.
Dial Backup Dial Backup Dial Backup voorziet in een backup-verbinding met uw serviceprovider via een modem. Deze backup-link kan geactiveerd worden in het geval van een storing of onderbreking van uw eerste WAN-dienst. Gedurende zulke onderbrekingen zal uw router de Dialup-modemverbinding gebruiken terwijl de primary WAN-dienst wordt hersteld. Zodra de eerste netwerklink weer actief is, schakelt de Dial Backup automatisch over naar de eerste netwerkverbinding.
Dial Backup Stap 9: Voer de IP-adressen in het veld IP Addresses in. De IP-adressen zijn die adressen die de router gebruikt om een ping uit te voeren via de WAN-link. Als de ping-test is mislukt, zal de router het verkeer via de backup-poort afwerken totdat de tijd voor herhalingen is afgelopen. Stap 10: Voer de Ping Success Rate in het betreffende veld in. Het resultaat van ping (Ping Success Rate) is van toepassing op alle adressen die zijn opgegeven in het veld IP Addresses.
ATM Traffic Shaping Configuration ATM Traffic Shaping Configuration Het scherm Traffic Shaping Configuration voorziet in bedienopties voor het managen van de ATM-25 link met uw router. Het ATM Traffic Shaping Configuration-scherm is hieronder te zien.
Diagnostic Diagnostic Het Diagnostics-scherm voorziet in diagnosetests en controleert de status van diverse routersystemen. U kunt de tests via een meerkeuzemenu selecteren en uitvoeren. De resultaten van de tests zijn te zien in de Output Window. Scherm 65: Diagnostics-scherm Om een diagnosetest via het Diagnostics-scherm te starten, moet u de volgende stappen uitvoeren: Stap 1: Kies een test uit de meerkeuzelijst van Choose a Diagnostic. Stap 2: Klik op de knop Execute om de diagnose uit te voeren.
Command Line Interface Command Line Interface Het scherm Command Line Interface voorziet in een faciliteit voor het invoeren van commando's voor de router via de web-gebruikersinterface. Een volledig overzicht van alle router-commando's treft u aan in de Command Line Interface Reference Guide, te vinden op uw programma-cd. Het scherm Command Line Interface is hieronder te zien.
File Editor File Editor Het File Editor-scherm voorziet in een faciliteit vor het maken en wijzigen van bestanden die zijn opgeslagen op de router. Deze bestanden bevatten configuratiegegevens en andere data die door de router worden gebruikt. Gevorderde gebruikers kunnen het File Editor-scherm gebruiken om bestanden te openen, te wijzigen en vervolgens op te slaan.
IKE/IPSec IKE/IPSec Configuration Internet Key Exchange/Internet Protocol Security (IKE/IPSec) is een veiligheidsfaciliteit voor de authenticatie en encryptie van IP-verkeer m.b.t. de authenticiteit, integriteit en privacy van uw verbindingen. IPSec-sessies komen tot stand via Security Associations (SA's) waarmee tussen veilgheidsappatuur een bepaald niveau van veiligheidsattributen kan ontstaan dat nodig is voor een Virtual Private Network (VPN).
IKE/IPSec ten, zonder spaties en niet-afdrukbare tekens. De Pre-Shared Secret moet door allebei de zijden van een IKE-verbinding worden geaccepteerd. Stap 3: Voer het IP-adres van de Peer Gateway in het IP Address Peer Gateway in. Dit IP-adres hoort bij de gateway van het remote einde van de IKE-verbinding. Stap 4: Voer het Destination IP Address in het betreffende veld in. Dit is het IP-adres van het remote private netwerk dat uw router zal authenticeren met behulp van deze IKE Policy.
IKE/IPSec • IKE IPSec Policies - Hier staan alle gedefinieerde IPSec Policy's. IPSec policy's zijn criteria voor datapakketten die door IPSec worden herkend, en acties die IPSec naar aanleiding van de herkenning zal starten. Klik op Create om nieuwe IPSec Policy's te definiëren.
IKE/IPSec IKE Proposal Definition Scherm 71: IKE Proposal Definition-scherm Stap 1: IKE Proposal Name: Voer een logische naam in voor de IKE Proposal Definition. De naam is niet van belang voor de remote IKE peer. Stap 2: Message Authentication Scheme: Kies een van de twee message authentication schemes: • MD5: Voorziet in authenticatie van meldingen d.m.v. Message Digest 5. • SHA1: Voorziet in authenticatie van meldingen d.m.v. Secure Hashing Algorithm 1 (standaard).
IKE/IPSec IKE IPSec Proposal Definition Scherm 72: IKE IPSec Proposal Definition-scherm Stap 1: IKE IPSec Proposal Name: Voer een logische naam in voor de IKE IPSec Proposal Definition. De naam is niet van belang voor de remote IKE IPSec peer. Stap 2: AH Authentication Scheme: Welke AH-methode wilt u voorstellen: • Opmerking: Request no AH encapsulation. • MD5: Request AH encapsulation and authenticate using Message Digest 5. • SHA1: Voorziet in authenticatie van meldingen d.m.v.
IKE/IPSec • NULL: Deze optie voorziet in ESP encapsulation, maar niet in data encryptie. Met behulp van de ESP encapsulation kan de bron worden geverifieerd, maar de data worden ongecodeerd verzonden ten behoeve van een betere throughput. • Opmerking: Deze optie maakt geen gebruik van ESP encapsulation en evenmin van encryptie. Stap 5: IP Compression Method: Kies om te bepalen of u LZS IP compression wilt voorstellen of geen IP compression.
IKE/IPSec IKE IPSec Policy Definition Scherm 73: IKE IPSec Policy Definition-scherm Stap 1: IPSec Policy Name: Voer een logische naam in voor de IPSec policy. De naam die u kiest, is niet van belang voor de andere zijde van IPSec. Kies een naam die u goed kunt onthouden. Stap 2: Peer Binding: Geef de remote IKE peer aan op welke de policy toegepast moet worden. Deze Peer moet al zijn gedefinieerd met behulp van het IKE Peer Definition-scherm.
IKE/IPSec Stap 7: Source Subnet Mask: Voer het subnetmasker van het LAN in dat gebruik zal gaan maken van deze policy. Dit is meestal het subnetmasker dat is toegewezen aan het netwerk lokaal op uw router. Stap 8: Destination IP Address: Voer het IP-adres van het andere privénetwerk in waarmee u router de verbinding via deze policy tot stand zal brengen.
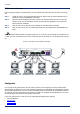
SPECIFICATIE Voorzijde Scherm 74: Aanzicht voorzijde 30 sb58 Table 1: LED's aan de voorzijde LED Kleur Beschrijving Power Groen Uit: Power is AAN Power is UIT Test Geel: Geel, knipperend: Groen (2 sec.
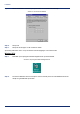
Specificatie Achterzijde Scherm 75: Aanzicht achterzijde POWER 12 V~ 0.8A MAX 1 10/100 ETHERNET/LAN 3 2 4 MGMT WAN Table 2: 5830 Router achterzijde Verbinding Functie Power Maakt gebruik van een 12V AC/DC-netadapter. Ethernetpoorten Vier Ethernet T-100 switched ports (8-pins, RJ-45) Managementpoort Deze 8-pins, RJ-45-poort voorziet in een RS232-aansluiting voor consoleverbindingen. DSL/WAN Port Een 8-pin RJ-45-poort zorgt voor de verbinding met DSL.
Specificatie LAN Interface • • • Ingebouwde achtpoortige Ethernet-schakelaar met RJ-45-stekkers. Groene/amber LED LAN-snelheid van 10 of 100 Mbps, vol of half duplex, met auto-senseschakelaar WAN Interface • • • Een DSL-interface: ADSL, Annex A RJ-45 met 4-5 pinout (center pair) Seriële interface • Een RS-232 asynchrone console of externe modempoort (RJ-45) Keuringseisen • • • • • CE-label TUV Veiligheid: UL 1950, CSA 22.
Specificatie • Differentiated Services (DiffServ) Dial Backup • • • • • Failover naar modem via consolepoort Web Management Interface User selectable fail/restore criteria Optionele modemstekker (DB9 of DB25) Ondersteund L2TP en IPSec tunnel failover Asynchronous Transfer Mode (ATM) • • • • • • • Encapsulation (IP, Bridging and Bridge Encapsulated Routing) (RFC 1483) PPP via ATM (LLC en VC multiplexing) (RFC 2364) PPP via Ethernet Klassieke IP (RFC 1577) AAL5 voor data Multiple Virtual Circuits (VCs) L
SUPPORT Neem voor specifieke productsupport contact op met het bedrijf of de instantie waarvan u de apparatuur hebt gekocht. Als u contact moet opnemen met uw netwerkprovider voor technische ondersteuning, zorg dan dat u de volgende informatie bij de hand hebt: • Modelnummer van de router (aan de onderzijde van het toestel) • Softwareversie van de router (weergegeven in de Command Line and Web User Interface) • Datum van aankoop • Besturingssysteem (bijv.