
User's Manual


4
Wireless Receiver Installation
Determine if you will be using the receiver cradle, or connecting the cables directly to the receiver before
installation:
1. Place the receiver cradle or receiver in a place that will have clear reception with your camera(s).
2. Plug the AC adaptor power output cable into the 5V POWER input of the cradle or receiver. Plug the
power plug into a wall outlet or surge protector.
3. Leave the receiver to charge for several hours prior to first time use so the built-in rechargeable
receiver battery is fully charged. DO NOT remove the power cable from the receiver / from the cradle
during initial charge process. After initial charge, charge the receiver as required.
4. If you wish to view the receiver images on a larger screen, connect the included AV cable to the cradle
or receiver, and connect the other end of the cable to the Video IN (Yellow) and Audio IN (White) ports on
the TV, VCR or other viewing/recording device.
NOTE: the purpose of the AV output is for convenience only. When using with large screen TV/Monitor,
the picture might be grainy as the camera limits video resolution to VGA (640x480 pixels). This is not a
product defect. For best performance use with TV/Monitor PIP (Picture in Picture) function.
Check your TV/Monitor product manual to see if this feature is available on your TV/Monitor. This allows
you to view TV or other video source and see video from the camera in a small window on the same
screen.
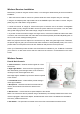
Wireless Camera
Front & Back Controls
1. Camera Antenna – Sends & receives signals to or from
the receiver.
2. Night Light Switch – Press to turn the night light ON or
OFF. Alternatively, press the light button on the receiver to
remotely turn the camera light ON or OFF.
Note: Night Light is available only when the camera is paired
to the receiver.
3. Lens/IR LED Cover – Infrared LEDs provide viewing in
no/low light conditions
4. Microphone – Receives sounds for the area near the
camera, and transmits sound from the camera to the
receiver.
5. DC 9V Power – Connect the DC 9V power adaptor to the camera
NOTE: The camera can also be powered using 4 AA batteries (not included) installed in the base. If the
camera is plugged in with the AC adaptor, the batteries will not be used. The batteries are intended for
short term, portable camera use.
6. Pair Button – The pair button is located on the back of the camera behind the stand mount.