
User's Manual


5
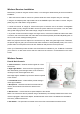
Side Controls
7. Temperature Sensor--- Use to make a temperature induction at the camera side
8. Sensitivity – Adjust the sensitivity knob to set the sound alarm sensitivity. The receiver will beep to
alert you when the sound is above a preset sound level. Adjust the sensitivity knob to increase or
decrease the level.
9. Signal switch—Slip switch from low to high to enhance transmitting signal.
10. Volume--Press to increase or decrease the volume of the audio alarm.
11. Camera ON/OFF Switch – Turns the camera ON or OFF.
Night Vision
This camera has built-in IR LEDs, which provides the camera with the ability to view images in no/low
light conditions. It is important to use the provided power adaptor (and not the batteries) when using the
camera for prolonged periods in low light conditions, as the built-in IR LEDs will drain the battery more
quickly than regular daytime use.
Camera Installation
Before you install the camera, carefully plan where and how it will be positioned, and where you will
route the cable that connects the camera to the power adaptor.
Before starting permanent installation, verify its performance by observing the image on the receiver
when camera is positioned in the same location/position where it will be permanently installed and the
receiver is placed in the location where it will be used most of the time.
1. Carefully unpack the camera.
NOTE: If you are installing cameras that did not come with the system, please see the pairing camera
section of this manual for details on installation.
2. Mount the camera to the wall.
Mark the position of the screw holes on the wall, and drill holes and insert 2 screws, then firmly attach
the camera to the wall by placing the stand over the installed screws and pushing the base downwards.