
User's Manual


2
Wireless Receiver
Front/Back Controls
1. Power/Audio Level LEDs – The green LED indicates the receiver power is ON or OFF. The red LEDs
indicate the audio levels (low to high).
2. LCD Screen – Displays video from the camera.
3. SCAN Button – When the SCAN button is
pressed, the LCD screen is turned off and the
system continuously scans all available cameras
while the monitor is dark. The scan feature can be
used for the following two reasons: (1) to prevent
you from being disturbed (i.e. when sleeping) by the
bright LCD screen, or (2) to conserve battery power.
If audio is detected above the preset audio trigger
level on the camera(s)*, the receiver will beep and
display the image from the triggered camera. The
receiver will return to scan mode about 5 seconds
after the alarm has completed. Press “A”, “M” or
“SCAN” button on the front panel of monitor will exit
scan mode.
4. Navigation Controls/OK Button – Use to controls in Viewing Mode and Menu Mode.
Viewing Mode: The following controls are used while watching live video from the camera:
• Press the UP/DOWN ▲▼ arrows to increase or decrease the volume.
• Press the LEFT ◄ arrow to view cameras* in automatic switching mode.
• Press the RIGHT ► arrow to manually switch between cameras*.
Menu Mode: Use the UP/DOWN/LEFT/RIGHT ▲▼◄► arrows to navigate in Menu Mode. Press the
OK button to confirm the menu selection.
5. MENU Button – Press to go into main the receiver menu, press to back to view mode in main menu,
press to back to previous menu in submenus.
6. Record—Press the button to start recording, press it again to stop recording. In this manual recording
mode, the OSD LCD will mark “Recording”. .
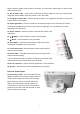
7. Antenna Locking Switch – Slide the switch to unlocking position, the
receiver antenna will pop up. Then you can adjust the antenna to vertical
position for better signal reception.
8. Microphone – Receives sounds from the area near the receiver and
transmits sound from the receiver to the camera (only when TALK Button
is pressed down and held).
9. A/V Out Port (Optional Use) – Connect the included A/V cable to view
video from the receiver on a TV or monitor, or record on a DVD
recorder/VCR.