
User's Manual


3
NOTE: Using this feature will turn off the LCD screen. The LCD screen will turn back on when the A/V
cable is disconnected.
10. DC 5V Power Input – Connect the included DC 5V power adaptor to power the receiver and/or
charge the receiver battery (when the receiver is not in the cradle).
11. Charging Indication LED – Indicates the built-in battery is in charge when the LED is in yellow, and
in green when it is full charged.
12. Night Light Button – Press to remotely turn on/off the night light on the camera (for the camera
currently being displayed on the LCD screen). When the night light is on, an indication icon will be
displayed on the LCD screen.
13. Alarm +/-Button – Press to increase or decrease the volume of the
audio alarm.
14. / Button – Press the button to start or stop the lullaby.
15. Button – Press the button to play next lullaby.
16. TALK Button – Press and hold the button to talk to the camera
currently being displayed on the LCD screen.
17. Power Slide Switch – Slide the switch to ON or OFF position to
switch on/off the receiver.
18. SD Card Slot – Insert Micro SD card to this SD card slot for both
video and audio recording.
* You must have more than one camera configured on the system when
using the functions that requires more than one camera.
19. Receiver Antenna – receives & sends signals from or to the cameras*.
20. Speaker – Produces the sound transmitted from the camera(s) *.
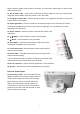
Receiver Cradle Inputs
21. DC 5V Power Input – Connect the DC 5V power
adaptor (included) to the receiver cradle to power the
receiver and/or charge the receiver (when docked).
NOTE: When the receiver is docked, and the A/V
cable is connected (power cable as needs to be
connected), the LCD screen on the receiver will be
blacked out. The LCD screen will turn back on when
the A/V cable is disconnected.