
Owner`s manual


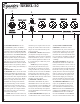
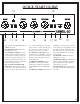


angy compared to the BRIGHT OFF and
TREBLE turned up.
12) CHANNEL 2 LED: ON indicates
CHANNEL 2 is active.
13) CHANNEL 2 TIGHT: This switch
is really useful for tightening up the low
end, especially when using a lot of gain.
It works by cutting the deep bass at the
beginning of the high gain preamp. Set-
ting the TIGHT switch up will result on a
clearer, less muddy distortion.
14 & 15) TONE CONTROLS FOR
CHANNEL 1: Once again, the familiar
passive tone control circuits from the clas-
sic amps we all love. This channel can be
very warm and friendly, like a great old
vintage combo, or crystal clear and glassy
for a pristine clean sound. Just turn the
16) CHANNEL 1 VOLUME: Sets the
overall loudness of CHANNEL 1. Remem-
ber what we said earlier about the interac-
tion between the VOLUME control and
the WATTS knob.
17) CHANNEL 1 BRIGHT: Same as
CHANNEL 2. Adds high end sparkle.
Experiment with different combinations
of the TREBLE knob and the BRIGHT
switch.
18) CHANNEL 1 TIGHT: Same effect as
CHANNEL 2. The tight (up) position cuts
out the deep bass to better balance the tone
with different guitars. TIGHT will also
help clean up the low end if you are crank-
ing the VOLUME knob up and overdriv-
ing the channel.
19) CHANNEL 1 LED: ON indicates
CHANNEL 1 is active.
20) CHANNEL SELECT: A pushbutton
switch to select CHANNEL 1 or CHAN-
when using the footswitch.
21) GUITAR INPUT: Plug your guitar in
here using a high quality, shielded instru-
ment cable.
QUICK START GUIDE
7
1 2 3 4 5 6 7 8 9 10 11 12 13
1
2
3
4
5
6
7 8 9
10 11
12
13 14 15 16 17 18
19
20
21