
Installation guide


Attaching the microphone
Attach the microphone by sliding it into the holder and position the microphone head towards the direction of speech.
6.3.3 Mounting the control unit with integrated display
Define the mounting location
The control console is mounted on a smooth service by means of the self-adhesive pad provided. Make sure that the location is within
easy reach of the intended user.
Cleaning and degreasing the mounting location
The mounting location must be clean and free from grease and dirt/dust. Prior to installation, clean the area with a cleansing product
containing ethyl alcohol. Only use cleansing products that do not damage plastics or varnished wood finishes and are themselves free
of oils or grease. Unsuitable cleansers are, for example, lighter fluid, acetone, turpentine, trichloroethylene and similar products.
Attaching the control unit with integrated display
After defining the appropriate cable direction on the back of the console, fix it by covering it with the self-adhesive pad. Hold the con-
trol console at a distance of several millimetres (about a quarter of an inch) above the desired mounting location. Re-check the posi-
tioning. Re-positioning the console after mounting is no longer possible. Apply the control console to the proposed mounting location
and fix by applying short and light pressure.
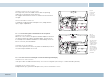
6.4 C onnec tion sc heme
Installation for call reception for a car audio system with a mute input but without a phone input
With this connection option, voice playback is is emitted from the front right car speaker. During calls, the mute input blocks the car
audio signal.
NOTE: Please observe the information in section “6.5.1 Checking the mute inputs” on con-
necting the mute lead of the ISO connecting cable.
Installation for voice playback with a car audio system with phone and mute input options
With this connection option, voice playback comes through the car audio system speakers.
During calls, the car radio output is switched to the phone input by the mute input In order
to access the phone input of your car audio system, the speaker output of your EGO FLASH
must be connected to the phone input of your car audio system. The purple and green leads
of the ISO cable must be connected to the car audio phone input for this option. The purple
and green leads must be disconnected from the ISO connector. The green lead (pin 14 of
Fig. 06:
Connection for the mini
ISO connection cable
EGO FLASH